
Welcome to my blog! Thank you for clicking into my little corner of the online world where I share my landscape passion through my images and tips for other landscape photographers! Sign up for my newsletter and get your free ebook with 25 Tips for Impactful Landscape Photography.
Links to Check Out!
Looking for filters to add to your creativity? Check out MAVEN FILTERS!
Listen to my podcast episode with Jen Ritchie on Wildlife Conversations or watch on YouTube HERE.
Listen to my episode HERE with Austin James Jackson on his podcast, Master the Moment.
Listen to my episode on the Landscape Photography World podcast, hosted by Grant Swinbourne.
Listen to my conversation with Brenda Patrella on the Outdoor Photography Podcast from October 4, 2022
Check out my podcast episode over on InFocus Women - with Sarina Jackson and Steph Vella
Listen to my conversation with Allison Jacobs on “The Creative Frame” podcast.
Read Kristen’s article, “The Allure of Nature”, in the December, 2020 issue of Outdoor Photographer.
Listen to Kristen & Matt Payne’s conversation on the F Stop Collaborate & Listen podcast aired January 6, 2021.


Night Photography Part 4: Star Trails
Creating star trails can be a fun and creative way to add interest and intrigue to your night sky images. They do take quite a bit of time and patience to create in the field as well as in post processing, so keep that in mind as you prepare for the task. Below are a few tips as you shoot star trail images.

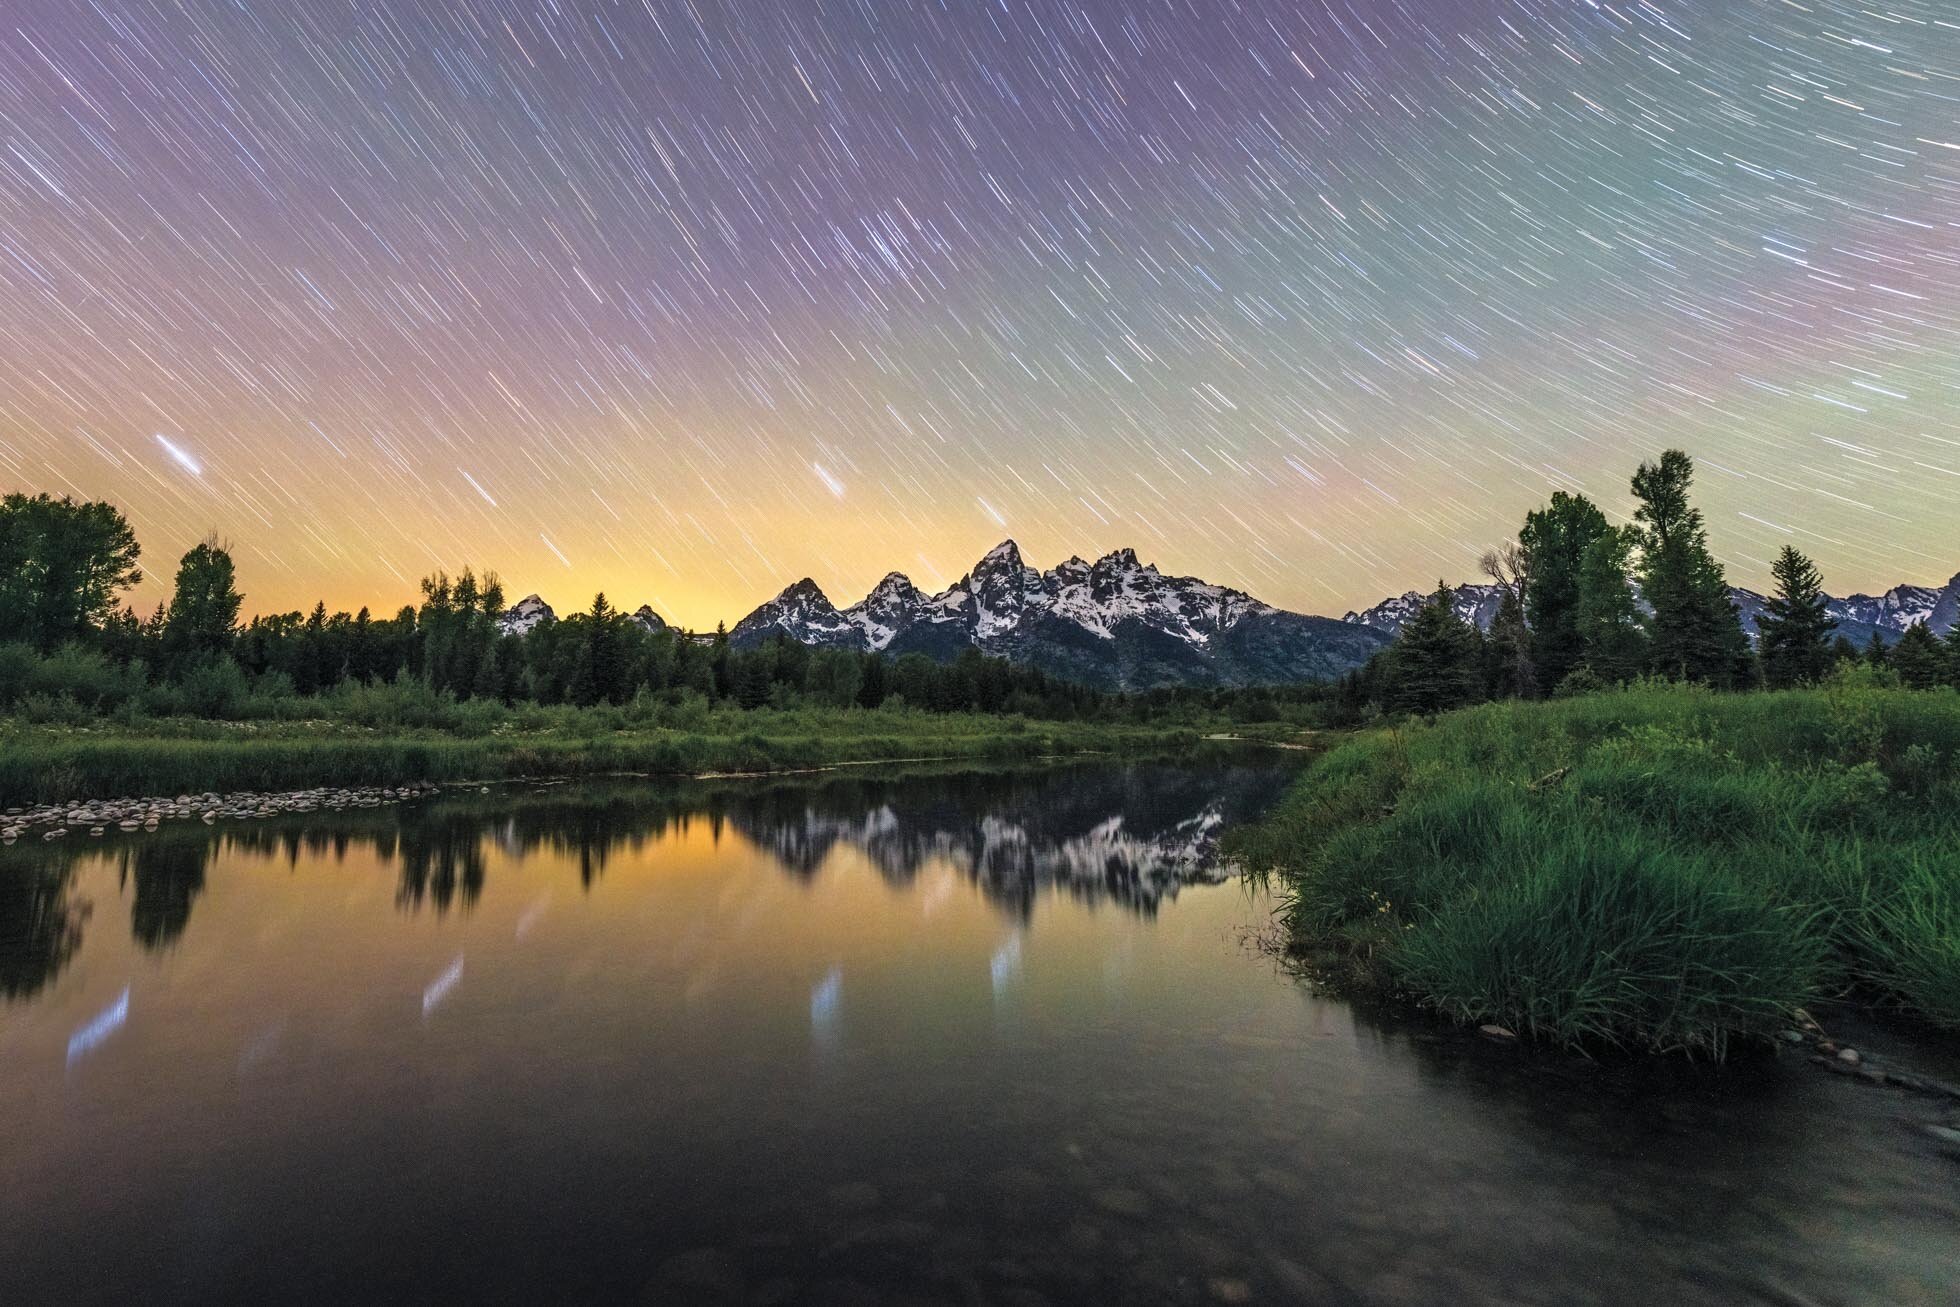
Star Trails at Oxbow Bend in June 2019
1) Prepare the right Gear: A sturdy tripod is essential for shooting star trails as you will need your tripod to stay solidly in one place for extended periods of time. An intervalometer is also a recommended tool for star trails. If shooting 30 second exposures, you can use your in camera intervalometer but if you want to shoot longer than 30 second exposures, you’ll need to be in bulb mode and use an external intervalometer. A wide angle lens will be the best choice for capturing those vast night skies.
2) Find Dark Skies & Clear Nights - Dark and clear skies are needed for bright star trails against a dark night. Look for nights without moon interference and no clouds. I love using the Sun Surveyor app to find information for the moon phase, rise and set. Despite clear skies being ideal, I wouldn’t shy away from shooting if there are a few clouds about. This image below is one of my very favorite star trail images and there were clouds interspersed with the stars.

Star trails amongst the clouds at Vermilion Lakes in Banff National Park
3) Long Trails or Short trails? Choose the effect you are going for. If you want to get many long and continuous trails of stars, you will need to shoot for a long time, at least 30 minutes but ideally an hour or longer. For shorter trails where the star trails are broken and just little lines across the sky, you can shoot a single exposure in the 8-15 minute range. (Such as the Vermilion Lakes shot above)
4) Exposure Time - To decide on your exposure time, consider what effect you are going for. You could shoot one very long exposure, or you could shoot many 30 second exposures and stack them together in Photoshop to create the trails. There are a few benefits to the shorter exposures. First, you can more easily check your exposure with a test shot and adjust before you set the camera to shoot for minutes, or hours. Second, if random light comes in and messes up an exposure, it can be easier to fix than if you have had your exposure running for an hour’s time. And third, you also have static star shots in addition to the trails. This leaves you more options for using these various exposures in post processing from static star images, short trails, longer trails or even a time lapse.

Star trails captured over an hour of time in Wyoming. 30 second exposures stacked into one image.
5) Turn off in Camera Noise Reduction - While the in camera long exposure noise reduction can be helpful for avoiding hot spots, it must be off when shooting star trails because the exposures need to be continuous with the least amount of time between them as possible to avoid breaks in the trails.
6) Switch to Manual Focus - Make sure you have your camera in manual focus so that your camera is not trying to focus during the many star captures.
7) Scout Location during the Day - Use the daytime to find a great location with interesting foreground to add to your star trail image. Heading out with a plan will greatly increase your chances of success!
8) Be Creative! While there are techniques that will help you succeed in getting focused and well exposed star trail images, don’t be afraid to experiment and be creative.
For more tips on Astrophotography see Astrophotography Tips Part 1 and Part 2. Also check out Part 1 in the Night Photography Series: Preparation for more general tips.
Kristen Ryan is an award winning and published landscape and fine art photographer and educator residing in the Midwest suburbs of Chicago. All images are available for purchase in the Fine Art Store or by request. Kristen leads ladies landscape photography retreats in the Tetons, Chicago, and the Canadian Rockies, offers private mentoring and teaches an online landscape photography workshop, The World Around You. The next run of The World Around You begins August 17!
My 5 Favorite Weather Apps for Landscape Photography Planning
Weather has such a strong impact on landscape photography and getting out in ideal conditions can really take your imagery to the next level. There are a number of helpful weather apps that are helpful in predicting when Mother Nature will provide those ideal conditions. While no app or forecast is foolproof or perfect, here are 5 of my favorite apps I use in planning my photography adventures.
1 ) Sun Surveyor
I love Sun Surveyor because it gives so many different tidbits of information in one little app! Put in your location and date and Sun Surveyor tells you sunrise and sunset time, moonrise and moonset, golden hour, and blue hour. You can find out the phase of the moon and the time that the core of the milky way will be visible (if applicable). There is a map that will show the arc of the movement of the sun and moon across your location. The live view will also show you exactly where the sun, moon or milky way will be at any given time as you stand in your location.
2) Photopills
Photopills is my go-to app for planning my Milky Way shoots. Using the Photopills planner, I can plan my Milky Way shooting wherever I may traveling too. I can set the pin at a location and see how the Milky Way will line up at all hours of the night. This eliminates the guesswork involved with astrophotography. The Night AR view allows me to see exactly how the Milky Way will line up at a particular time as I stand in a location. I have planned many Milky Way shooting sessions for my retreats months in advance by using Photopills.
3) Astrospheric
Astrospheric is another awesome weather app that shows cloud cover by the hour and includes a radar that shows the clouds moving over your location. You can watch the radar or click on a particular hour to see the cloud cover prediction and location of the clouds. Great for predicting those clear nights for astrophotography.
This app gives you hour by hour information on the cloud cover in your chosen location. Not only does it tell your overall cloud cover but it also tells you whether they are low, mid or high clouds. You can also see visibility, fog, chance of rain and temperature. The cloud cover numbers are so helpful for predicting clear nights for astrophotography as well as chance of clouds for enhancing sunrise and sunset.

This helpful app will give you the current KP index and show you the likelihood of seeing the Northern Lights in your chosen location. There is an Aurora Map that shows the best locations to see the Aurora and shows you the long term KP potential forecast. A forecast is always a forecast though, right?! The app also will alert you of high aurora activity.
Again, forecasts can be unpredictable and no app is perfect, but the combination of these apps can help to figure out when and where I can find the best opportunities for landscape and astrophotography. Do you have any favorite apps not listed here? I’d love to hear about them and add them to my tool list 😊
Just 3 spots left in my 2023 Ladies Landscape Retreats! 1 spot in the June Magic in the Tetons Retreat and 2 spots in Magic in Hilton Head!
Kristen Ryan is an award winning and published landscape and fine art photographer and educator residing in the Midwest suburbs of Chicago. All images are available for purchase in the Fine Art Store or by request. Kristen leads ladies landscape photography retreats in the Tetons, Chicago, Glacier, Hilton Head and the Canadian Rockies, and offers private mentoring.
One Piece of Gear that is a Game Changer
One thing we discover as we get into landscape photography is that it tends to encourage more and more gear accumulation. Tripods, filters, remotes, etc. It seems there is always something more to purchase and add to our ‘need’ or ‘want’ list! It can be hard to decide which gear is truly worth the expense.
If you are into long exposure photography or astrophotography, there is one piece of gear that is a total game changer. That item is an “L Bracket”. This little piece of metal is in the shape of an L and it screws onto the bottom of your camera where you would screw on the tripod plate. It replaces the plate and stays on your camera tightly unless you take it off. It adds a small amount of weight and bulk but minimally so and is well worth the benefit.
The L Bracket allows you to place your camera securely in either horizontal OR vertical orientation. In my experience, long exposures with a typical tripod plate are frequently lacking sharpness, especially with a heavy camera and lens combination. This is because when the ball head is turned to shoot vertically, the weight of the camera causes it to slip and even the slightest movement will create blurriness in our images. The L bracket allows the camera to sit securely on top of the tripod without moving during long exposures.
The ability to shoot portrait orientation long exposures is especially helpful in situations such as shooting tall waterfalls or astrophotography when you want to capture the height of the sky and Milky Way. It is also helpful in keeping the camera composition steady when utilizing focus stacking in a vertical orientation. As a bonus, I find my camera is more secure on my tripod with the L bracket than the tripod plate regardless of whether I’m shooting horizontally or vertically.
The L bracket also means you don’t have to worry about forgetting your tripod plate because it will always be ready to mount on the tripod. The little allen wrench fits in a space at the bottom of the L bracket so it is always there if an adjustment is needed. Be sure to purchase an L bracket specific to your camera model and make sure it works with the ball head on the tripod. Just check the details online when you purchase or ask the camera store you are purchasing from.

Milky Way capture in September 2019 using my D850 and Kirk L bracket
I hope you find using an L bracket to be helpful in your landscape and night photography!
Kristen Ryan is an award winning and published landscape and fine art photographer and educator residing in the Midwest suburbs of Chicago. All images are available for purchase in the Fine Art Store or by request. Kristen leads ladies landscape photography retreats in the Tetons, Chicago, and the Canadian Rockies, offers private mentoring and teaches an online landscape photography workshop, The World Around You.
The next run of ‘The World Around You’ beings April 20th! Registration opens in early March!
9 More Tips for Astrophotography (Part 2)
My last blog post, toward the end of June, shared tips for Astrophotography. Summer travel and family life occupied all my time in the last month and a half, but as promised, here is part 2 with 9 more tips for shooting those starry night skies!
1) Check the Moon Phase calendar when planning your Astrophotography. The less moonlight, the more stars you will see and the brighter the Milky Way will be. New Moon will be the darkest time of the month. This is when there is no moonlight at all. During other moon phases, you may still be able to shoot the stars and Milky Way without moon interference, but you’ll need to check the moonrise and moonset times. I love to use the Sun Surveyor app to find out the moon phase plus rise and set times. Sun Surveyor also gives the times the Milky Way core will rise and set and when it is visible without moon interference in your location. I highly recommend checking out this helpful app.
2) Use an app like Photopills to plan your Milky Way shooting. Photopills will help you to find out where the Milky Way will be located at any time in any location. At home or away, you can put the pin on any location and see where the Milky Way will be at midnight, 1:00 a.m, 3:00 a.m., etc. For this June’s Teton Retreat, I had our 2:00 a.m. String Lake Milky Way shoot planned when I chose the dates of the retreat knowing the Milky Way would be in the ideal position from 2:00-3:00 a.m. Using an app such as Photopills allows you to know what to expect and plan for success.

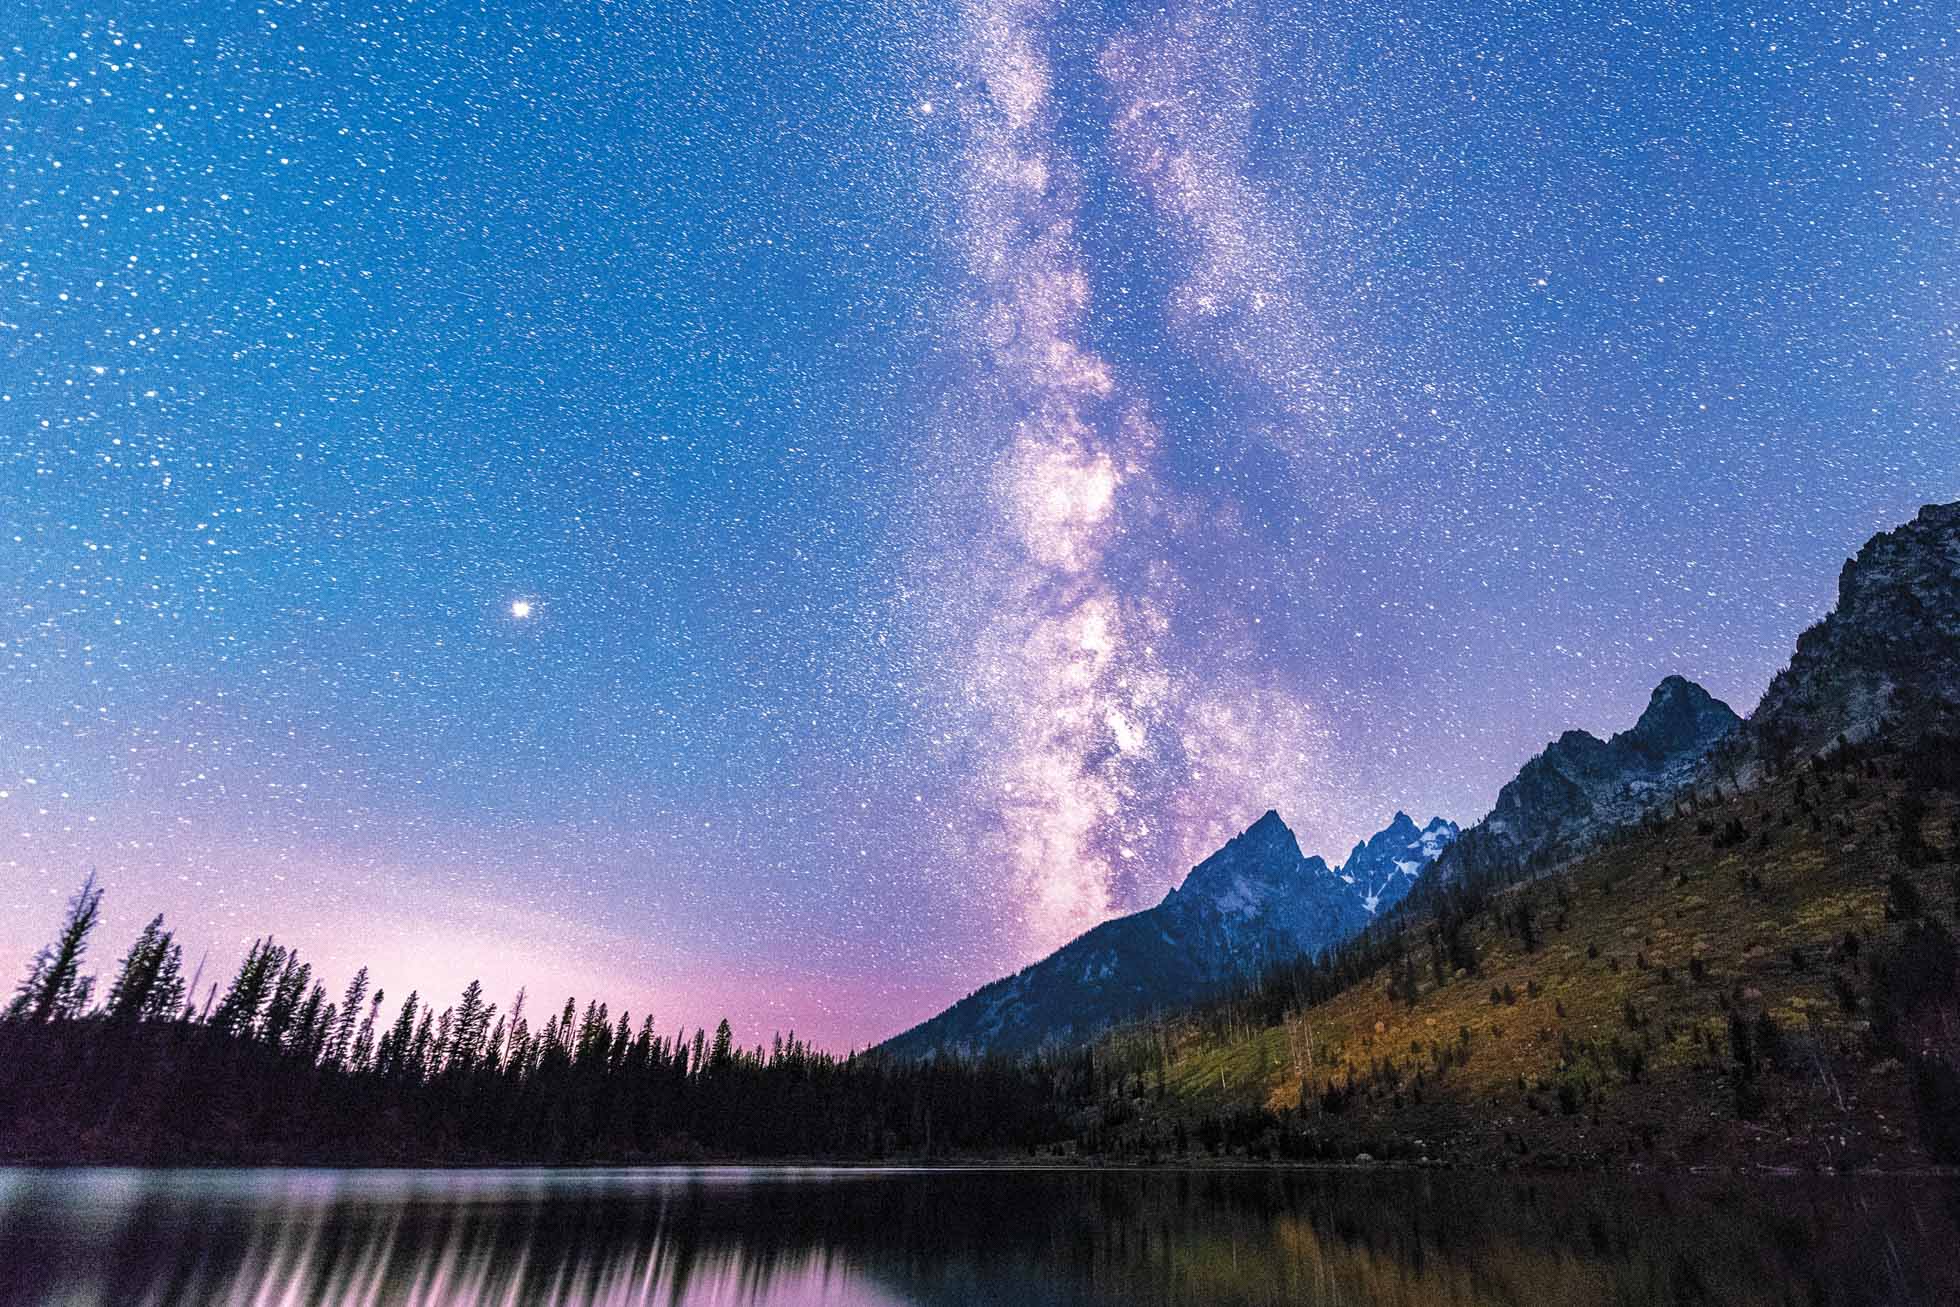
Milky Way over the Grand Teton at String Lake in June 2019 at the Magic in the Tetons Retreat
3) Get To Know Your Gear In The Dark - The very dark skies are great for capturing millions of stars, but this also means you can’t see your gear without a flashlight. If you are shooting with a friend or a group, turning on flashlights can ruin the exposures of your fellow photographers. Being able to put your camera on your tripod in the dark, adjust your tripod and check your LCD without turning on your flashlight is extremely helpful. Additionally, the longer you keep lights off, the more your eyes adjust to the dark.
4) Watch Your Histogram & Expose To The Right - In evaluating your exposure, check your histogram rather than relying on your LCD screen. Exposing as bright as you can without blowing the highlights will produce the best quality image with the least noise. Noise is inevitable in the dark conditions with high ISO. The better exposure you have, the less noise there will be. Check to see that your histogram is as far toward the right as it can be without it climbing up the right wall. There will be more tones toward the left because it is so dark, but keeping them as far as possible off the left wall of the histogram will capture a better quality image.
5) Consider Foreground Exposure - The foreground of your scene will be much darker than the sky full of stars. There are a couple options for getting a well exposed foreground image to composite with a great exposure of the sky. The first is to get out before the sun sets and capture the frame you want with a well exposed foreground before sunset or during blue hour when a little more light will light the scene. Be sure to choose your composition and leave the frame and focus where it is before shooting the night sky. The second option depending on the foreground scene is to light the foreground with a flashlight or headlamp. The foreground will need to be close enough, and your light strong enough, to be lit with your supplemental light source. Light painting must also be allowed where you are shooting. Grand Teton National Park, for example, does not allow light painting so during my retreats we do not light the foreground. The third option, if you arrive in the dark, is to take a brighter exposure of the foreground to composite with the sky by taking a longer exposure. This will create star trails in the sky, but you can composite your longer foreground exposure with your static star exposure in Photoshop.

A starry evening at the Three Sisters in Canmore, Alberta Canada
6) Consider Stacking to Reduce Noise - One technique to try for less noise in astrophotography is taking multiple exposures of the same frame and stacking them in a program called Starry Landscape Stacker. This program is very easy to use and stacks multiple exposures of the sky into one by lining up the sky. The resulting image has less noise than editing one single exposure. For example, you can capture 10 exposures at ISO 6400, f/2.8, 15 seconds and stack them in Starry Landscape Stacker. The program is $40 but very worth it!
7) Consider Composition - Just as with landscape images, composition matters in astrophotography too. It can be easier to find a pleasing composition in the daylight, so it can be helpful to scout out a location ahead of time, or get there before dark as mentioned above in the Foreground Exposure tip. Even in daylight, you can use your Photopills app to see where the Milky Way will be in the Night AR part of the app so if you will be shooting the Milky Way, you can think about composition ahead of time. Consider where other aspects of the scene may be comfortably placed in the frame and how you can create balance between the left and right sides of the frame as well as the top and bottom.
8) Look for Interesting Foreground - As you consider composition, look for a location that will have interesting foreground to be part of the scene. Mountain peaks, rock formations, barns, trees, and oceans all are examples of foreground spaces that will add impact to your night sky images.
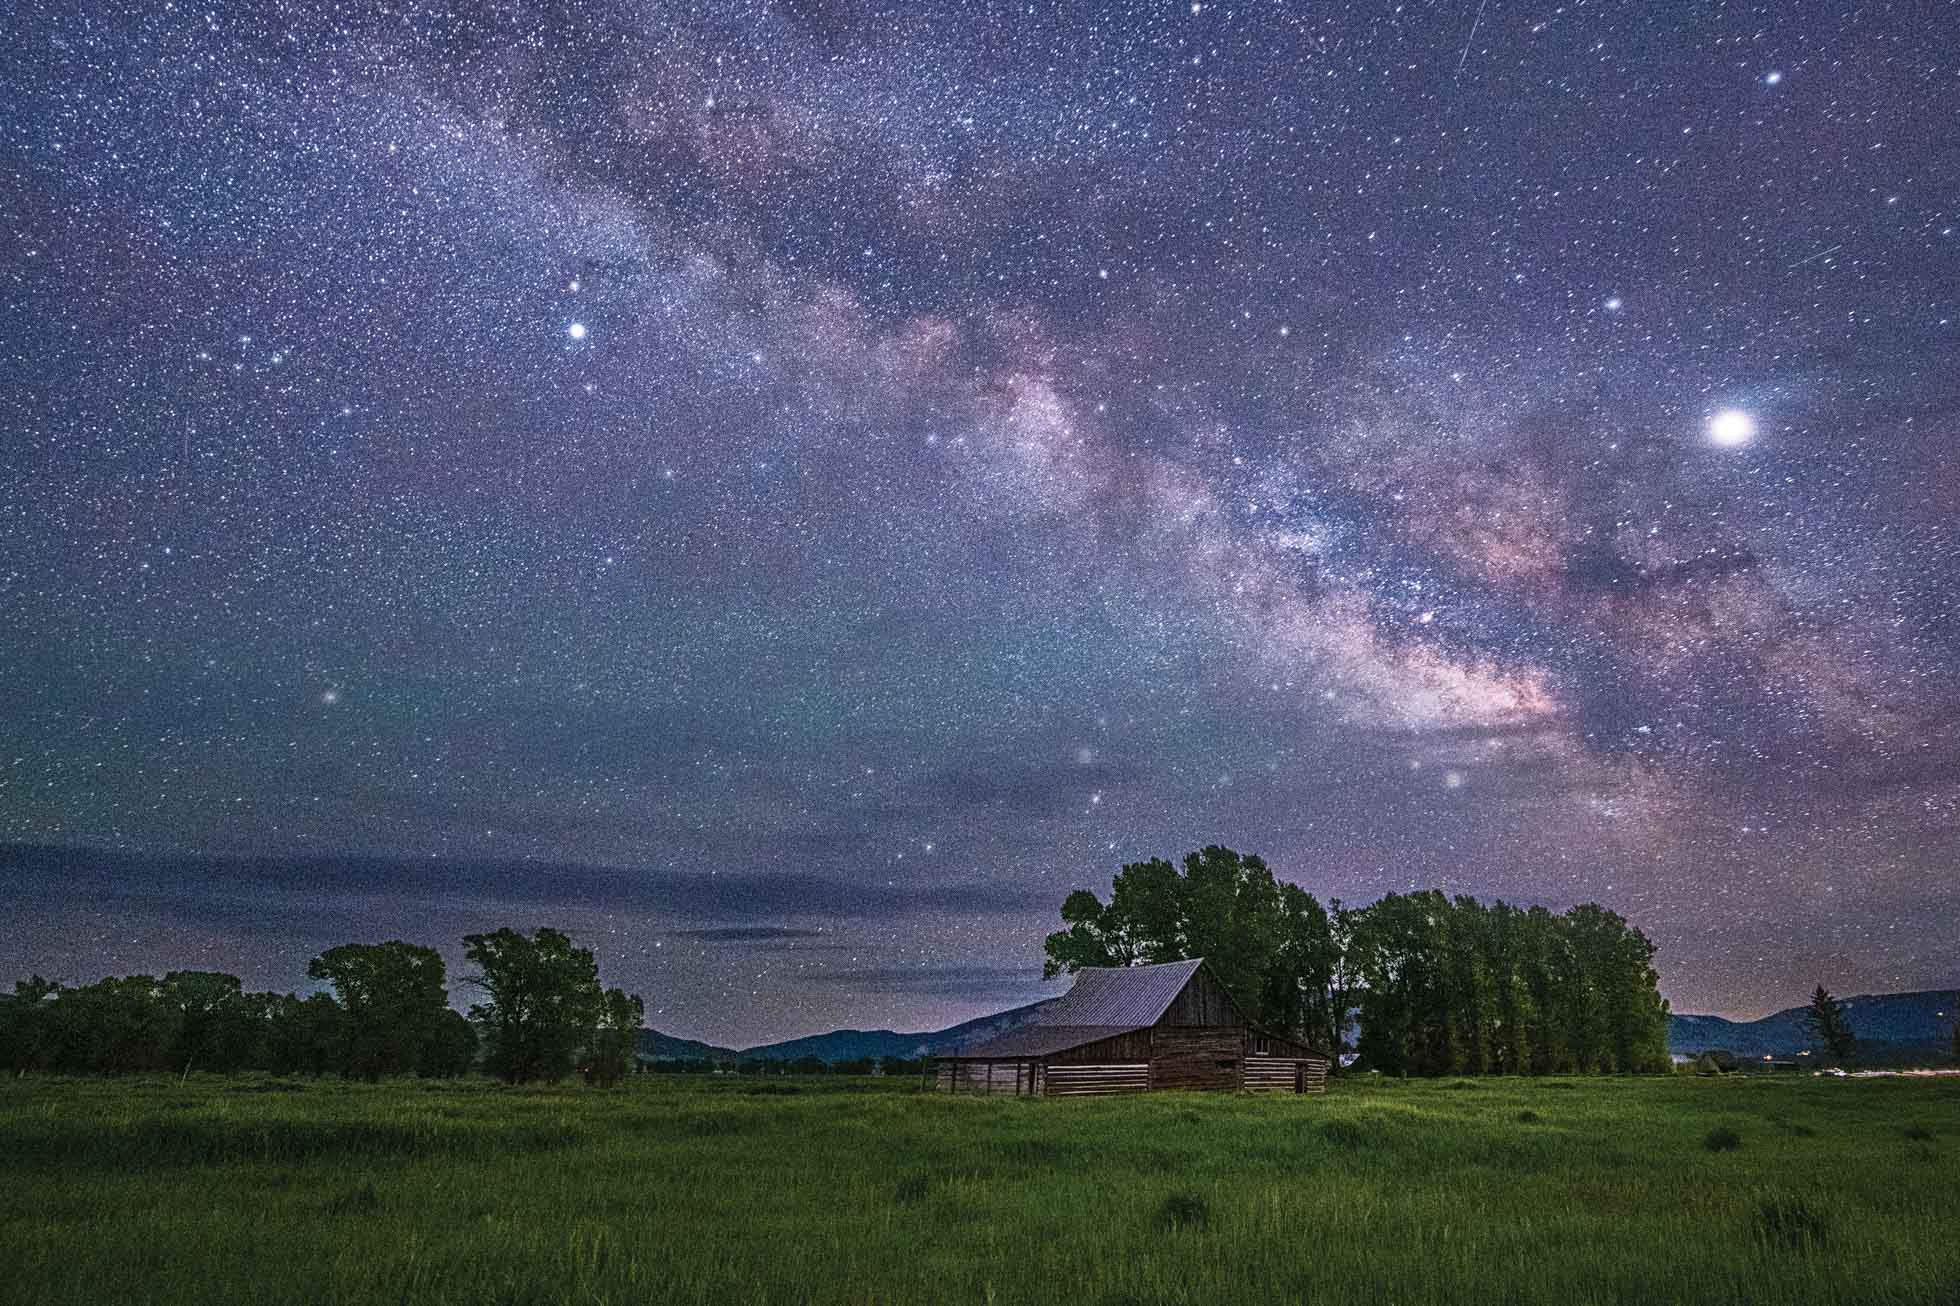
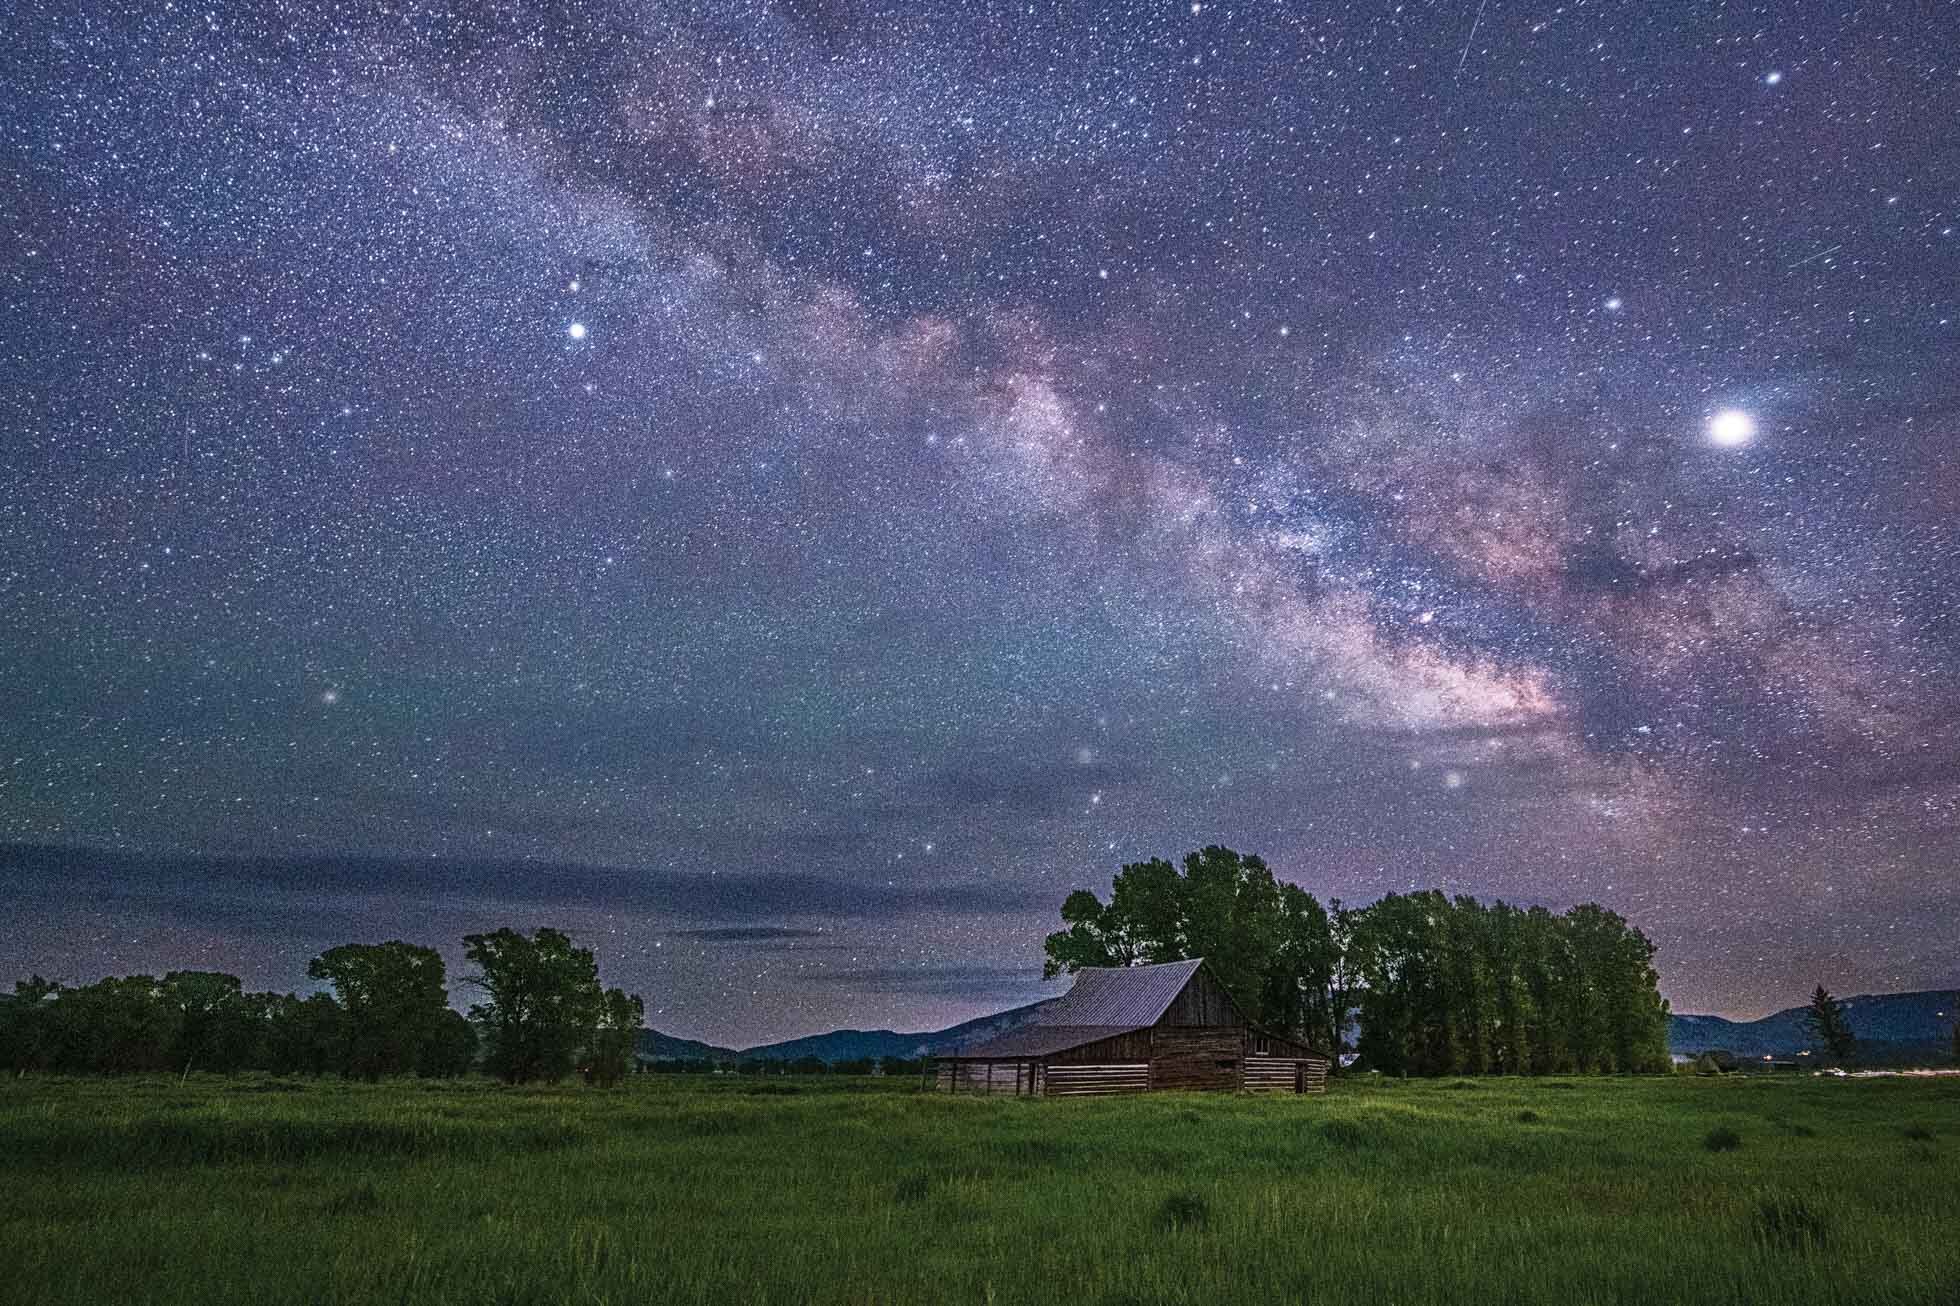
Milky Way over the Moulton Barn in Jackson Hole, Wyoming at the June 2019 Magic in the Tetons Retreat
9) Pack Extra Batteries - A final gear recommendation for shooting astrophotography is to make sure to have at least 1 or 2 extra batteries. With (often) cooler temperatures and long exposures, batteries drain more quickly and it is disappointing to be capturing amazing images only to be thwarted by a dead camera battery! Make sure to head out prepared.
It can be challenging to get out to shoot at night, especially when it means giving up your sleep, but I promise it is worth it when you see the Milky Way on the LCD, or even just some beautiful stars!
Kristen Ryan is a landscape and fine art photographer residing in the Midwest suburbs of Chicago. All images can be purchased in the Fine Art Store. Kristen leads ladies landscape photography retreats in the Tetons, Chicago, and the Canadian Rockies, offers private mentoring and teaches an online landscape photography workshop twice a year.
9 Tips for Astrophotography - Part 1
Astrophotography has quickly become one of my very favorite genres of photography. There is something mesmerizing about the night sky and it is incredible the way the camera captures the night in ways that our naked eye cannot see. Being out in the dark under the vast night sky is exhilarating and it is even more so when you see what your camera can capture. That said, it can be a bit nerve-racking being out in the dark and a bit overwhelming trying to figure out the best techniques to capture it well.
Today I’m sharing Part 1 of two blogs posts with tips on capturing the night sky.
1. A Tripod Is Essential - Ambient light at night is extremely low and in order to capture the scene, a slow shutter speed will be necessary. A tripod is required to keep your camera steady throughout the long exposure. Choose one that is sturdy and comfortable for you to use. This will be essential working with it in the dark.
2. Use a remote shutter - Triggering the shutter with a remote will take away the chance that manually pressing the shutter will create movement and reduce sharpness of the image. An intervalometer will also be useful for programming if you want to try shooting star trails.

3. Shoot in RAW - Shooting in RAW will give you more ability to work with the exposure and white balance in post processing than a JPEG. It is always best to get exposure and white balance correct in camera but shooting in RAW maintains all the information from your file so you can work more creatively while editing.
4. Choose a wide angle lens - The night sky is vast and a wide angle lens will allow you to capture a much larger expanse. A 24mm lens or wider is ideal for astrophotography. My two favorite lenses for astrophotography are my Sigma 14mm f/1.8 and my Nikon 14-24mm f/2.8.
5. Shoot in Manual Focus - In the extreme low light, your camera cannot autofocus so you must focus manually. Make sure you have your camera and lens set to manual focus so that your shutter doesn’t try to focus once you have achieved a sharp frame. Focusing is the trickiest part of astrophotography. A few options for finding focus in the dark are 1) Get to your location earlier in the evening and find your composition and focus and stay there until dark without changing your setting. 2) Find where your lens focuses at infinity and remember it so you can manually set focus. Keep in mind that zoom lenses will not focus in the same spot relative to the infinity symbol for all the focal lengths in the range. 3) Use a very bright flashlight or car headlights to focus on an area as far from you as possible to set focus. After setting focus and taking a test shot, zoom in and check your focus. If it is not quite sharp, manually tweak the focus just slightly left or right until you get it in sharp focus. Once you get focus, leave it!

6. Use a wide & fast aperture - Ideally the wide angle lens you are using will be able to open wide to f/2.8 or wider. This will allow you to let in as much light as you can in the dark shooting conditions. Because the sky is so far away, the stars will still be in focus with a wide aperture.
7. Choosing a Shutter Speed - For static stars, you want to choose a shutter speed that gives you sharp pinpoint stars. At longer shutter speeds, the stars begin to look like trails in the sky. If this is your vision, you can play with various shutter speeds for creative effect. For static stars, you can start with the 500 rule which says to take 500 divided by the focal length to give you the maximum shutter speed. So for 24mm, 500/24 = 20. 20 seconds would be the longest exposure time you can choose before your stars begin to trail. I generally find 15-20 seconds is the ideal range. If you are shooting on a crop sensor, take your focal length and multiply it by 1.5 to get the full frame equivalent and then do your 500 rule division. So a 16mm lens on a crop X 1.5 = 24. Then 500/24 = 20 seconds.
8. Set your White Balance on ‘Daylight” - The Daylight white balance setting, or around 5500 Kelvin, is a good starting point for your white balance. If it looks too warm at that setting, adjust from there. If you are shooting in RAW, you will also have the ability to tweak it in post processing.
9. Look for Dark & Clear Skies - Ideally, a very clear night will be your best bet for capturing the stars in the night sky. Dark skies without a lot of light pollution will also reveal the most stars. A few wispy clouds in the sky can also be beautiful though, so don’t get discouraged if it isn’t 100% clear. Also, some clouds move through the sky more quickly than others. More about dark skies and planning coming in Part 2.

10. Be safe and bring a buddy with you! The most important thing is always to be safe and make wise choices. The darkness prevents us from easily seeing what is around us and dark skies are often found in the middle of nature where you always should be prepared for the unexpected. It’s always smart to shoot with a buddy or bring a friend with you to keep you company. Safety is always more important that any images.
Look for “Tips for Astrophotography” part 2 coming up in the next couple weeks!
Kristen Ryan is a landscape and fine art photographer residing in the Midwest suburbs of Chicago. All images can be purchased in the Fine Art Store. Kristen leads ladies landscape photography retreats in the Tetons, Chicago, and the Canadian Rockies, offers private mentoring and teaches an online landscape photography workshop twice a year.

