
Welcome to my blog! Thank you for clicking into my little corner of the online world where I share my landscape passion through my images and tips for other landscape photographers! Sign up for my newsletter and get your free ebook with 25 Tips for Impactful Landscape Photography.
Links to Check Out!
Looking for filters to add to your creativity? Check out MAVEN FILTERS!
Listen to my podcast episode with Jen Ritchie on Wildlife Conversations or watch on YouTube HERE.
Listen to my episode HERE with Austin James Jackson on his podcast, Master the Moment.
Listen to my episode on the Landscape Photography World podcast, hosted by Grant Swinbourne.
Listen to my conversation with Brenda Patrella on the Outdoor Photography Podcast from October 4, 2022
Check out my podcast episode over on InFocus Women - with Sarina Jackson and Steph Vella
Listen to my conversation with Allison Jacobs on “The Creative Frame” podcast.
Read Kristen’s article, “The Allure of Nature”, in the December, 2020 issue of Outdoor Photographer.
Listen to Kristen & Matt Payne’s conversation on the F Stop Collaborate & Listen podcast aired January 6, 2021.


Wide Angle to Telephoto Case Study - Waimea Canyon
Recently I wrote an article for Click Magazine and Sigma about Why I love my Sigma 150-600mm Contemporary Lens for Landscape Photography. Shortly after writing this article, my family flew off to Kauai for spring break. When thinking of photographing the scenery of Kauai, I suspect a wide angle lens comes to mind for capturing the spectacular mountains and coasts of this garden island. And while a wider focal length was a great choice for many scenes, I frequently grabbed a longer focal length to tell the stories that caught my eye.
Carrying a range of focal lengths from 14mm to 600mm allowed me to photograph a variety of unique images that tell a more complete story of the beauty I saw than if I was limited to wider angle lenses.
Today I want to share a small collection of images from my last morning on the island. While my family slept in, I awoke at 4:30 a.m., grabbed my gear and necessary coffee and headed out on an hour and 20 minute drive from my hotel to the famed Kalalau Lookout, arriving shortly before sunrise. My first attempt visiting this view was met with rain and fog and I hoped the early morning would allow me to get a glimpse of the NaPali Coastline. We’ll save these images for another day.
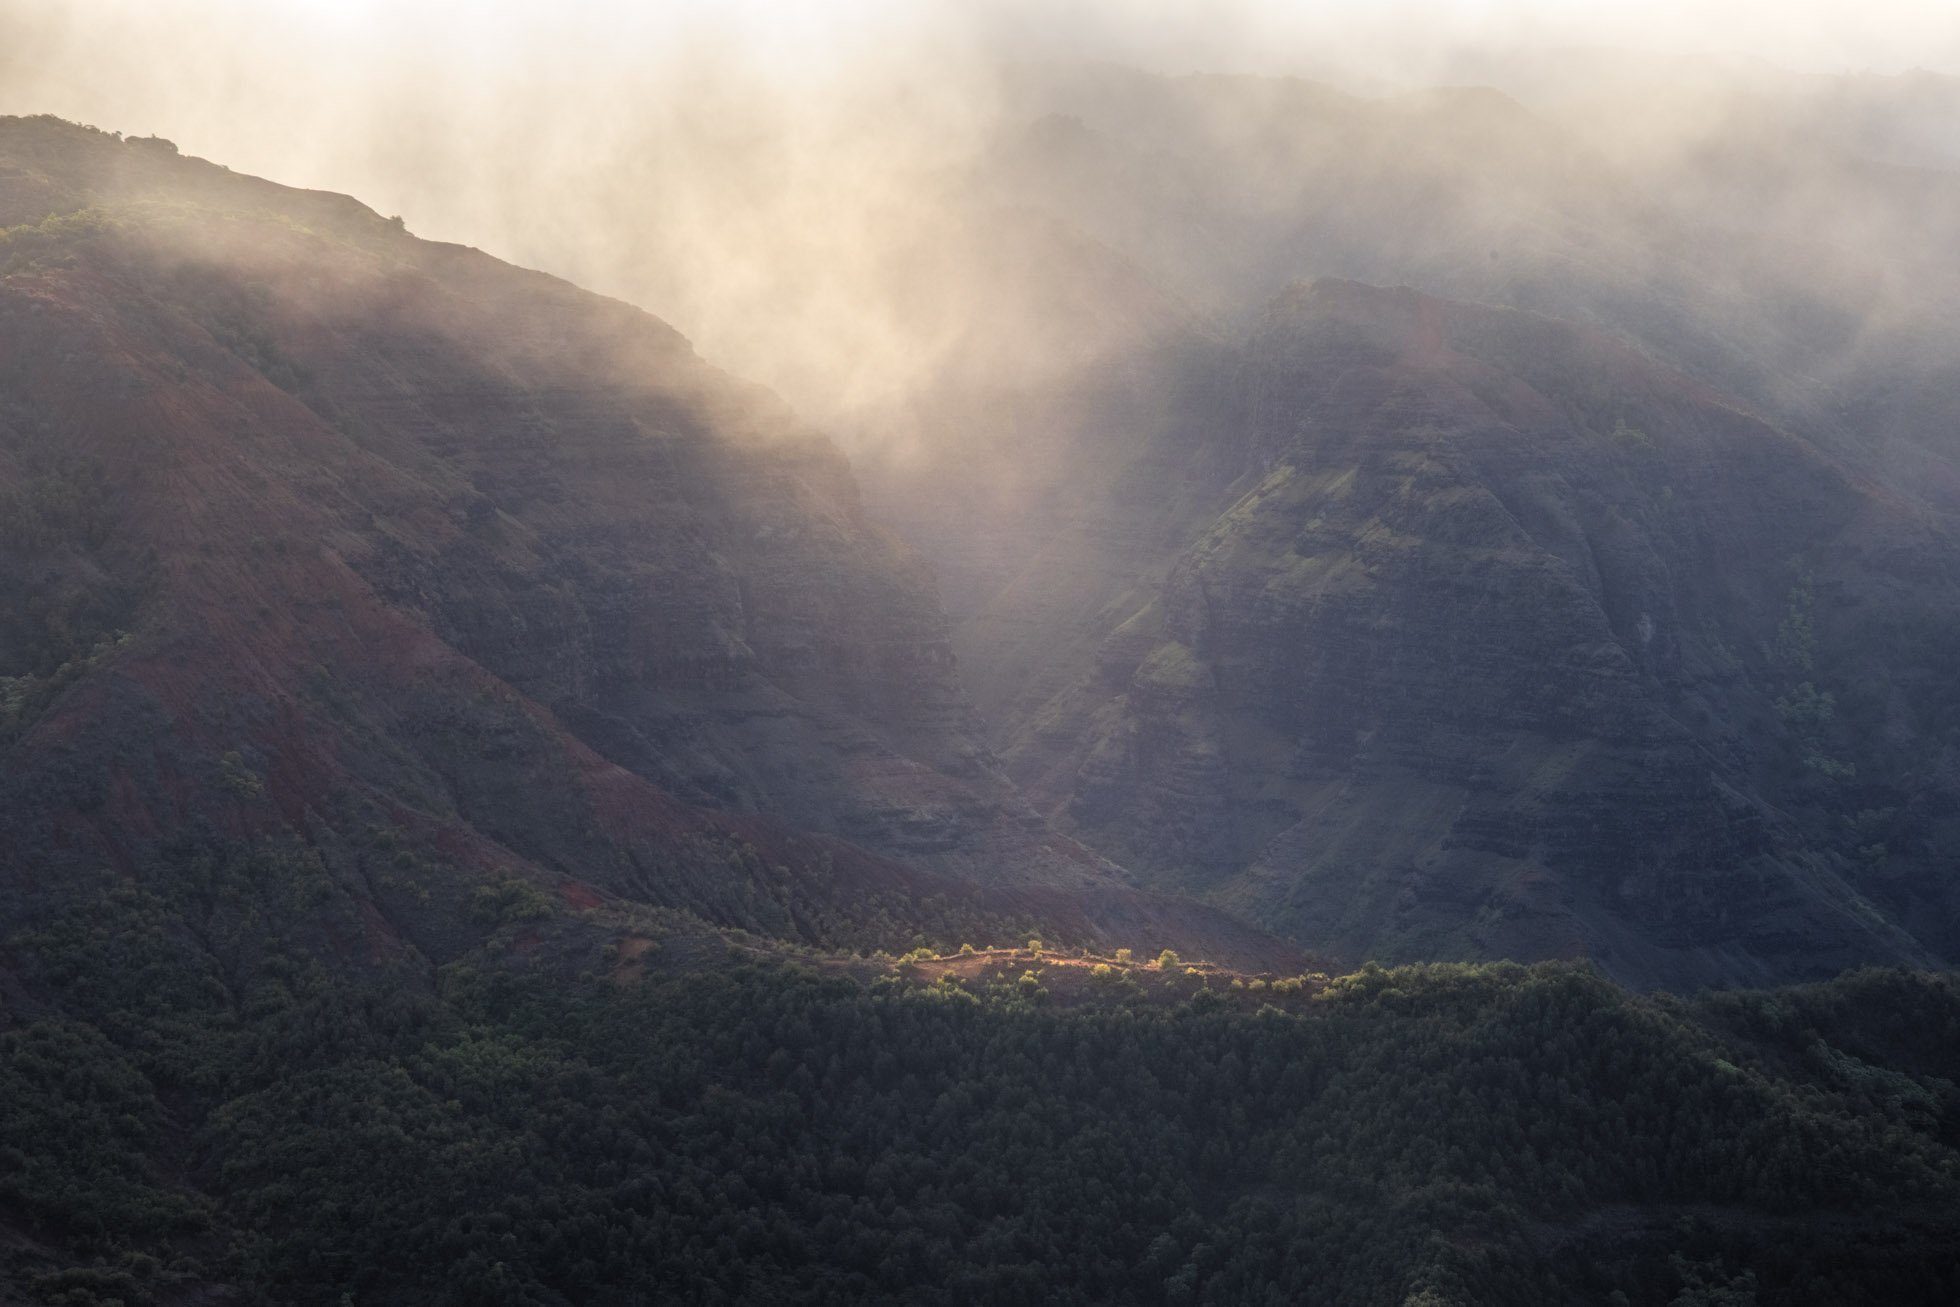
After experiencing the beauty of the Kalalau Lookout, I headed back down the road to Waimea Canyon where the clouds were minimal and the sun was already shining brightly. I pulled into the empty parking lot and walked out to the platform where I enjoyed the view by myself for awhile.
Looking out over the canyon, I was wowed by the vastness and the way the sun streamed into all the pockets, highlighted the many layers and led my eye to the river below. This was not my first time visiting Waimea but the beauty still amazed me!
I took a moment to grab my widest angle lens, the Sigma 14mm f/1.8 to photograph the vast and grand beauty of the canyon.

Grand view of Waimea Canyon with the Sigma 14mm f/1.8 lens
While I love the wide view the 14mm provided, with the many layers from foreground to sky, I could see so many smaller stories within the canyon. Additionally, with the sun as bright as it was, I did not want to include it in all of my images.
I grabbed my Sigma 24-105mm f/4 to get in a little closer. In this first one, shot at 82mm, I zoomed in on this area of the canyon where the light was streaming down and illuminating the ridge below.
And then I zoomed in more at 105mm to capture the way the light was streaming into the canyon below!

And then I moved on and grabbed the Sigma 150-600mm to get in a little closer and isolate some light and layers in the canyon.

310 mm to focus in on the layers of ridges from foreground to background

150mm focusing in on the light streaming into this pocket of the canyon

150mm giving a close up view of the river flowing through the canyon

440mm gets in close to the details of this ridge as the light hits the edges of the rock
Having a range of focal lengths in my bag with the Sigma 14mm, Sigma 24-105mm, and Sigma 150-600mm lenses allowed me to explore the canyon with my eyes and to isolate various peaks, ridges and light play that grabbed my attention. The longer focal lengths were the perfect tool to zoom in on the highlights, excluding other areas that might have distracted from the story I wanted to tell.
Next time you’re out, consider bringing a variety of lenses to photograph both the grand and intimate stories of the landscape!
Kristen Ryan is an award winning and published landscape photographer and educator residing in the Midwest suburbs of Chicago. All images are available for purchase in the Fine Art Store or by request. Kristen leads ladies landscape photography retreats in the Tetons, Glacier NP, Hilton Head, Chicago, and the Canadian Rockies, offers private mentoring . New online educational materials are coming soon!
4 Tasks to Prepare Camera Gear for a Photography Trip
Are you getting ready for a photography trip coming up soon? I’m just getting started with my 2022 travels and thought I would share the 4 things I do to prepare my gear before I travel so I’m prepared when I get out in the field.
1) There is one thing that I do before almost every trip I take and I cannot recommend it highly enough. I clean my camera sensor. If you have gone on a trip and come home to upload your images only to find that you have tons of little sensor dust spots, then you know how truly annoying it can be. It is a tedious and thankless job to have to clone out all those spots.
I know that cleaning my sensor a week or two before a trip is one small thing I can do to start out with my gear in the best shape. And clean gear is one factor that plays a part in creating high quality images.
If you have a camera store near you, you should be able to get your sensor cleaned there. (Note: Take it in with a fully charged battery!) You can also get sensor cleaning kits that allow you to clean your sensor yourself. There are a lot of tutorials out there to show you how to do this for your specific camera.
In addition to cleaning my sensor, as I get ready to travel, there are a few more things I do as I get ready to travel or prepare for a day of shooting.
2) As I gather and organize my lenses and filters to pack in my bag, I spend a little time cleaning them and checking them for smudges and spots. Just like camera sensor spots, dirty filters and lenses can also ruin image quality.
3) I charge up my batteries and make sure I start with a full battery in my main camera, my back up camera and an extra one for each. Then I put my charger right into my bag or suitcase so I don’t forget it!
4) Since I want to start out with an empty memory card with lots of space for my new images, I check to be sure all the images are uploaded and backed up in two places. Then I format my card so it’s ready for more exploring! While it is my typical workflow to upload and back up upon return from a shoot, it’s always a good idea to double check before formatting a card.
These steps set me up for success with clean gear ready to start off my next photography outing in the best possible way. I hope they serve as a helpful reminder to you for your next trip!

Kristen Ryan is an award winning and published landscape photographer and educator residing in the Midwest suburbs of Chicago. All images are available for purchase in the Fine Art Store or by request. Kristen leads ladies landscape photography retreats in the Tetons, Glacier NP, Hilton Head, Chicago, and the Canadian Rockies, offers private mentoring . New online educational materials are coming soon!
Make Your Tripod Work For You
As landscape photographers, our closets and bags are filled with gear and gadgets to help us photograph the beauty of the world around us. Among these, a tripod is one of the most useful tools we use, but one of the most cumbersome as well. We often have a love/hate relationship with our tripod. It adds weight to carry and can be annoying to set up, adjust, and pack back up! But it helps us to stabilize the camera and create sharper images especially when we are photographing with slow shutter speeds or shooting focus stacked or bracketed exposures.
In many cases, the tripod is crucial for the success of creating our visions. But it can also get in our way and hold us back in some ways if we don’t use it right. And I don’t mean whether we tighten the legs properly or adjust the ballhead right.
When we walk up to a location, it can be really easy to take out the tripod and set it up at the first thing we see. Then proceed to put the camera on the tripod and get stuck right there in that spot, at that height, and then forget to move around and change our perspective. Because it can be cumbersome at times to adjust the tripod, sometimes we get stuck in that one position we set it up in the first place. No doubt when I started out in landscape photography, I made this mistake, only to kick myself later as I reviewed my images.
As I learned to explore my locations more thoroughly before setting down my tripod, I have also learned to make my tripod work FOR me rather than against me. Using all my senses and my camera (handheld), I look around and find the perspective, height and composition that satisfies my vision. Then if my vision requires the use of the tripod, I set it up to put my camera in the position that I found through my exploration.
Additionally, after exploring a particular area or composition for a bit, make sure to pick up your tripod and go explore other compositions, once again using your tripod as a tool to photograph what calls to you.
So next time you head out, don’t work in the constraints of the tripod, make sure your tripod is one of the tools helping you photograph the composition that speaks to you! While you’re at it, there are MANY tripods out there - if the one you use makes you want to throw it in a lake, find a camera store and play with some until you find one that you’ll be happy to take along on your next hike or photo outing!

Kristen Ryan is an award winning and published landscape photographer and educator residing in the Midwest suburbs of Chicago. All images are available for purchase in the Fine Art Store or by request. Kristen leads ladies landscape photography retreats in the Tetons, Glacier NP, Hilton Head, Chicago, and the Canadian Rockies, offers private mentoring . New online educational materials are coming soon!
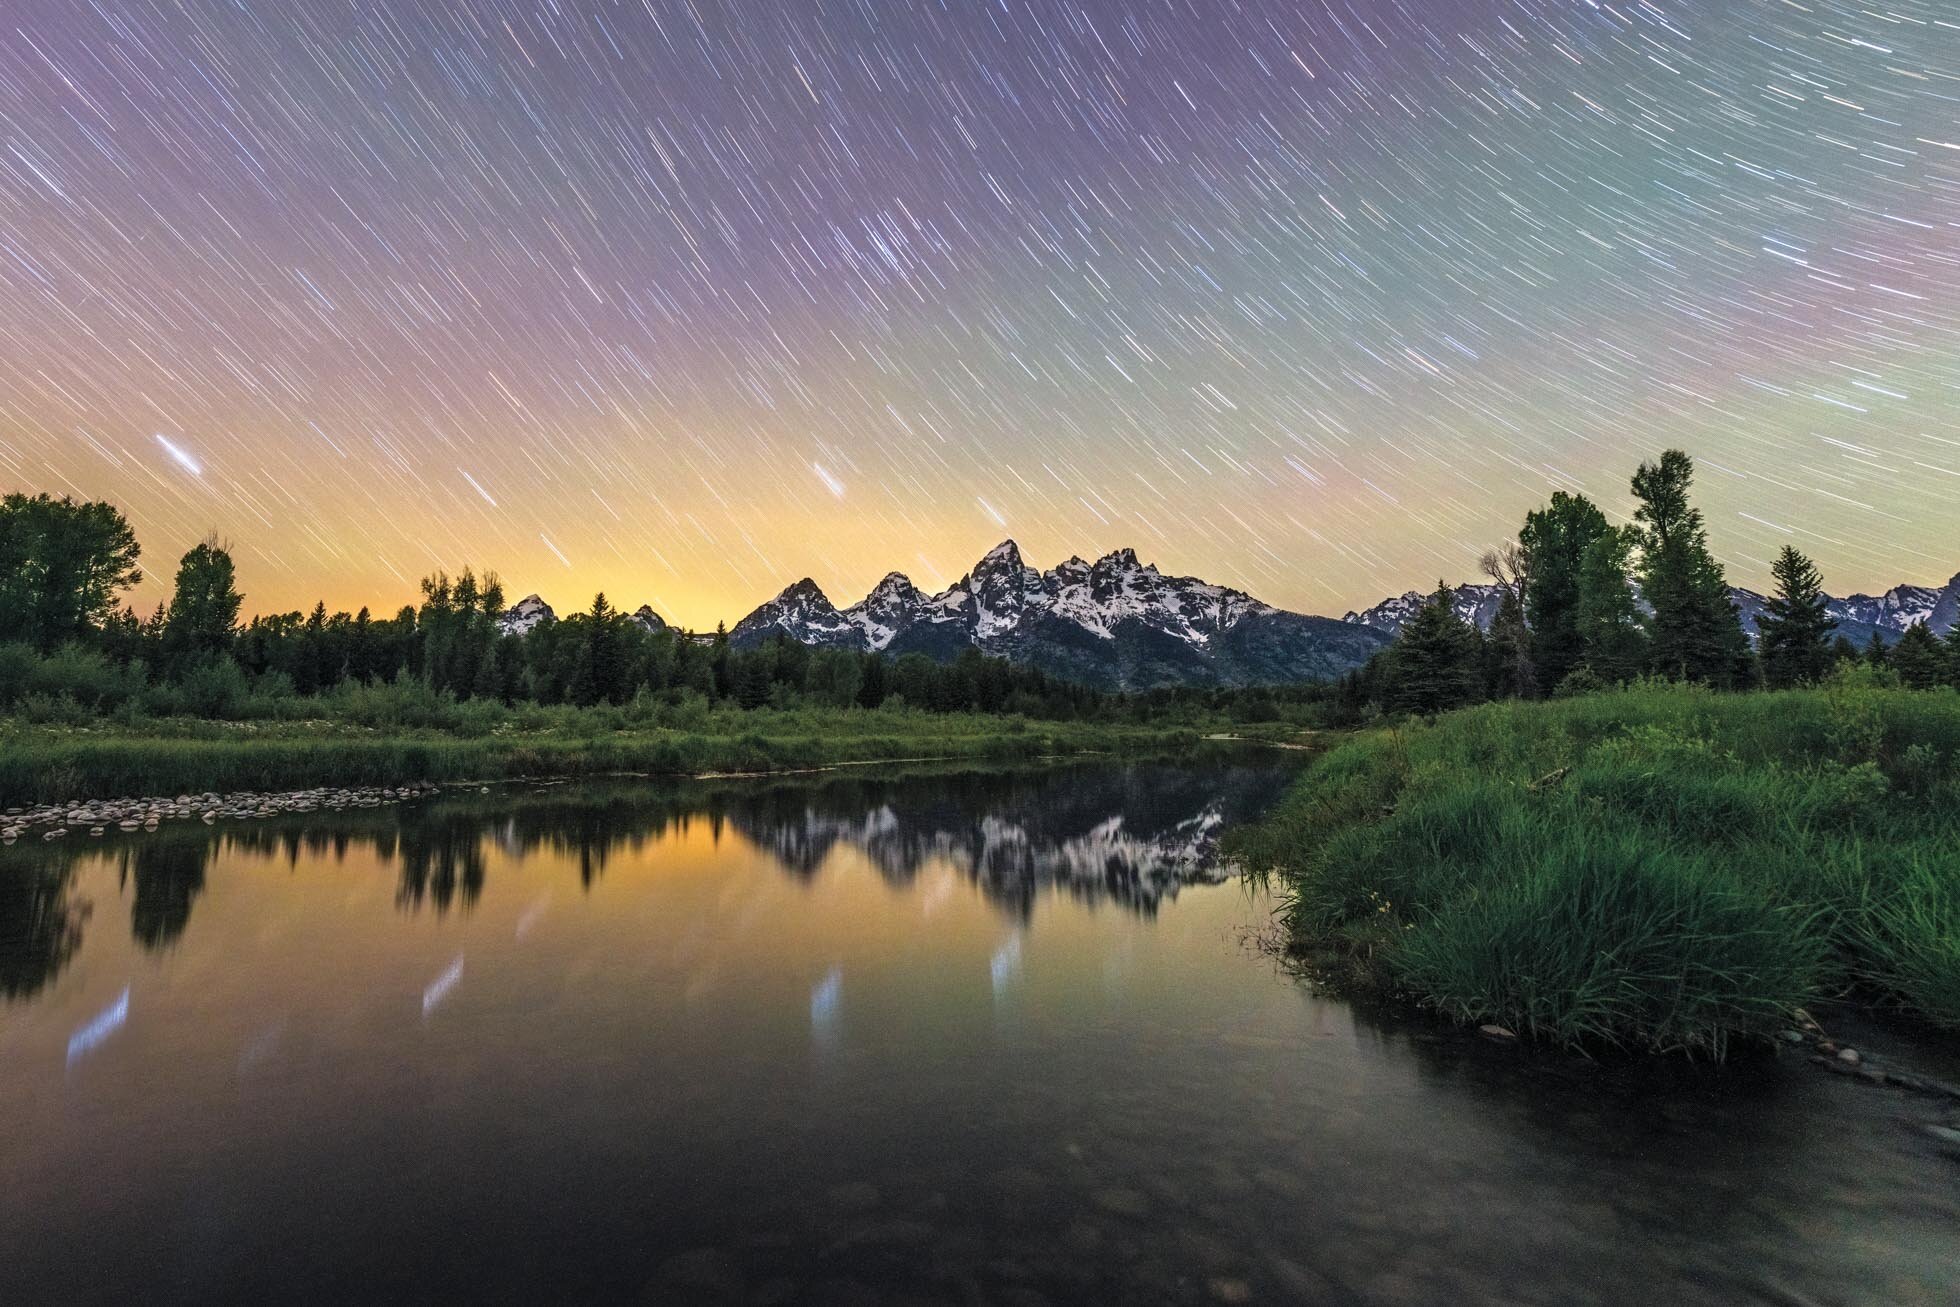
Night Photography Part 4: Star Trails
Creating star trails can be a fun and creative way to add interest and intrigue to your night sky images. They do take quite a bit of time and patience to create in the field as well as in post processing, so keep that in mind as you prepare for the task. Below are a few tips as you shoot star trail images.

Star Trails at Oxbow Bend in June 2019
1) Prepare the right Gear: A sturdy tripod is essential for shooting star trails as you will need your tripod to stay solidly in one place for extended periods of time. An intervalometer is also a recommended tool for star trails. If shooting 30 second exposures, you can use your in camera intervalometer but if you want to shoot longer than 30 second exposures, you’ll need to be in bulb mode and use an external intervalometer. A wide angle lens will be the best choice for capturing those vast night skies.
2) Find Dark Skies & Clear Nights - Dark and clear skies are needed for bright star trails against a dark night. Look for nights without moon interference and no clouds. I love using the Sun Surveyor app to find information for the moon phase, rise and set. Despite clear skies being ideal, I wouldn’t shy away from shooting if there are a few clouds about. This image below is one of my very favorite star trail images and there were clouds interspersed with the stars.

Star trails amongst the clouds at Vermilion Lakes in Banff National Park
3) Long Trails or Short trails? Choose the effect you are going for. If you want to get many long and continuous trails of stars, you will need to shoot for a long time, at least 30 minutes but ideally an hour or longer. For shorter trails where the star trails are broken and just little lines across the sky, you can shoot a single exposure in the 8-15 minute range. (Such as the Vermilion Lakes shot above)
4) Exposure Time - To decide on your exposure time, consider what effect you are going for. You could shoot one very long exposure, or you could shoot many 30 second exposures and stack them together in Photoshop to create the trails. There are a few benefits to the shorter exposures. First, you can more easily check your exposure with a test shot and adjust before you set the camera to shoot for minutes, or hours. Second, if random light comes in and messes up an exposure, it can be easier to fix than if you have had your exposure running for an hour’s time. And third, you also have static star shots in addition to the trails. This leaves you more options for using these various exposures in post processing from static star images, short trails, longer trails or even a time lapse.

Star trails captured over an hour of time in Wyoming. 30 second exposures stacked into one image.
5) Turn off in Camera Noise Reduction - While the in camera long exposure noise reduction can be helpful for avoiding hot spots, it must be off when shooting star trails because the exposures need to be continuous with the least amount of time between them as possible to avoid breaks in the trails.
6) Switch to Manual Focus - Make sure you have your camera in manual focus so that your camera is not trying to focus during the many star captures.
7) Scout Location during the Day - Use the daytime to find a great location with interesting foreground to add to your star trail image. Heading out with a plan will greatly increase your chances of success!
8) Be Creative! While there are techniques that will help you succeed in getting focused and well exposed star trail images, don’t be afraid to experiment and be creative.
For more tips on Astrophotography see Astrophotography Tips Part 1 and Part 2. Also check out Part 1 in the Night Photography Series: Preparation for more general tips.
Kristen Ryan is an award winning and published landscape and fine art photographer and educator residing in the Midwest suburbs of Chicago. All images are available for purchase in the Fine Art Store or by request. Kristen leads ladies landscape photography retreats in the Tetons, Chicago, and the Canadian Rockies, offers private mentoring and teaches an online landscape photography workshop, The World Around You. The next run of The World Around You begins August 17!
Night Photography Part 2: Cityscapes
Last week I shared some tips for getting prepared for night shooting whether cityscapes or astrophotography. Night is one of the most beautiful and dynamic times to shoot in the city. I hope these technical tips will help you to capture some incredible night city scenes.
1) Shoot in RAW - The best way to get the most information in your files and therefore the best quality photographs is to shoot RAW. Exposure and white balance both can be tricky with night photography and the more information you collect while shooting, the more leeway you will have when you get into post processing for adjustments.
2) Low ISO - While astrophotography generally calls for a high ISO since it requires very dark skies for visible stars, the lights of towns and cities create an overall brighter scene. This allows for a low ISO to help reduce noise in your images. Depending on the available light as well as my aperture and shutter speed choices, my ISO is typically between 200 and 800.

Buckingham Fountain during Blue Hour
3) Manual Focus - Focusing manually is the best way to ensure sharp focus in night photography. If you are close enough to lights and points of contrast, I find autofocus can work quite well, but as it gets darker, when you are further away from the scene, or when you are using a wide angle lens, autofocus will often miss the mark. Even if you think autofocus is working for you, I recommend using live view and zooming in on a point of contrast and manually tweaking the focus until sharp.
4) White Balance - Choice of white balance at night can be a bit tricky. The night shadows tend to be very cool but the city lights are very warm. Be aware of this dichotomy and try to balance out the intensity of the warm lights with the cool shadows. Like all imagery, choice of white balance is subjective for the look and mood you want to portray so you may have a preference for warmer or cooler tones. Using live view can often help me find my happy place with the color. If your camera’s auto white balance does a good job, that can often be a great choice as well.

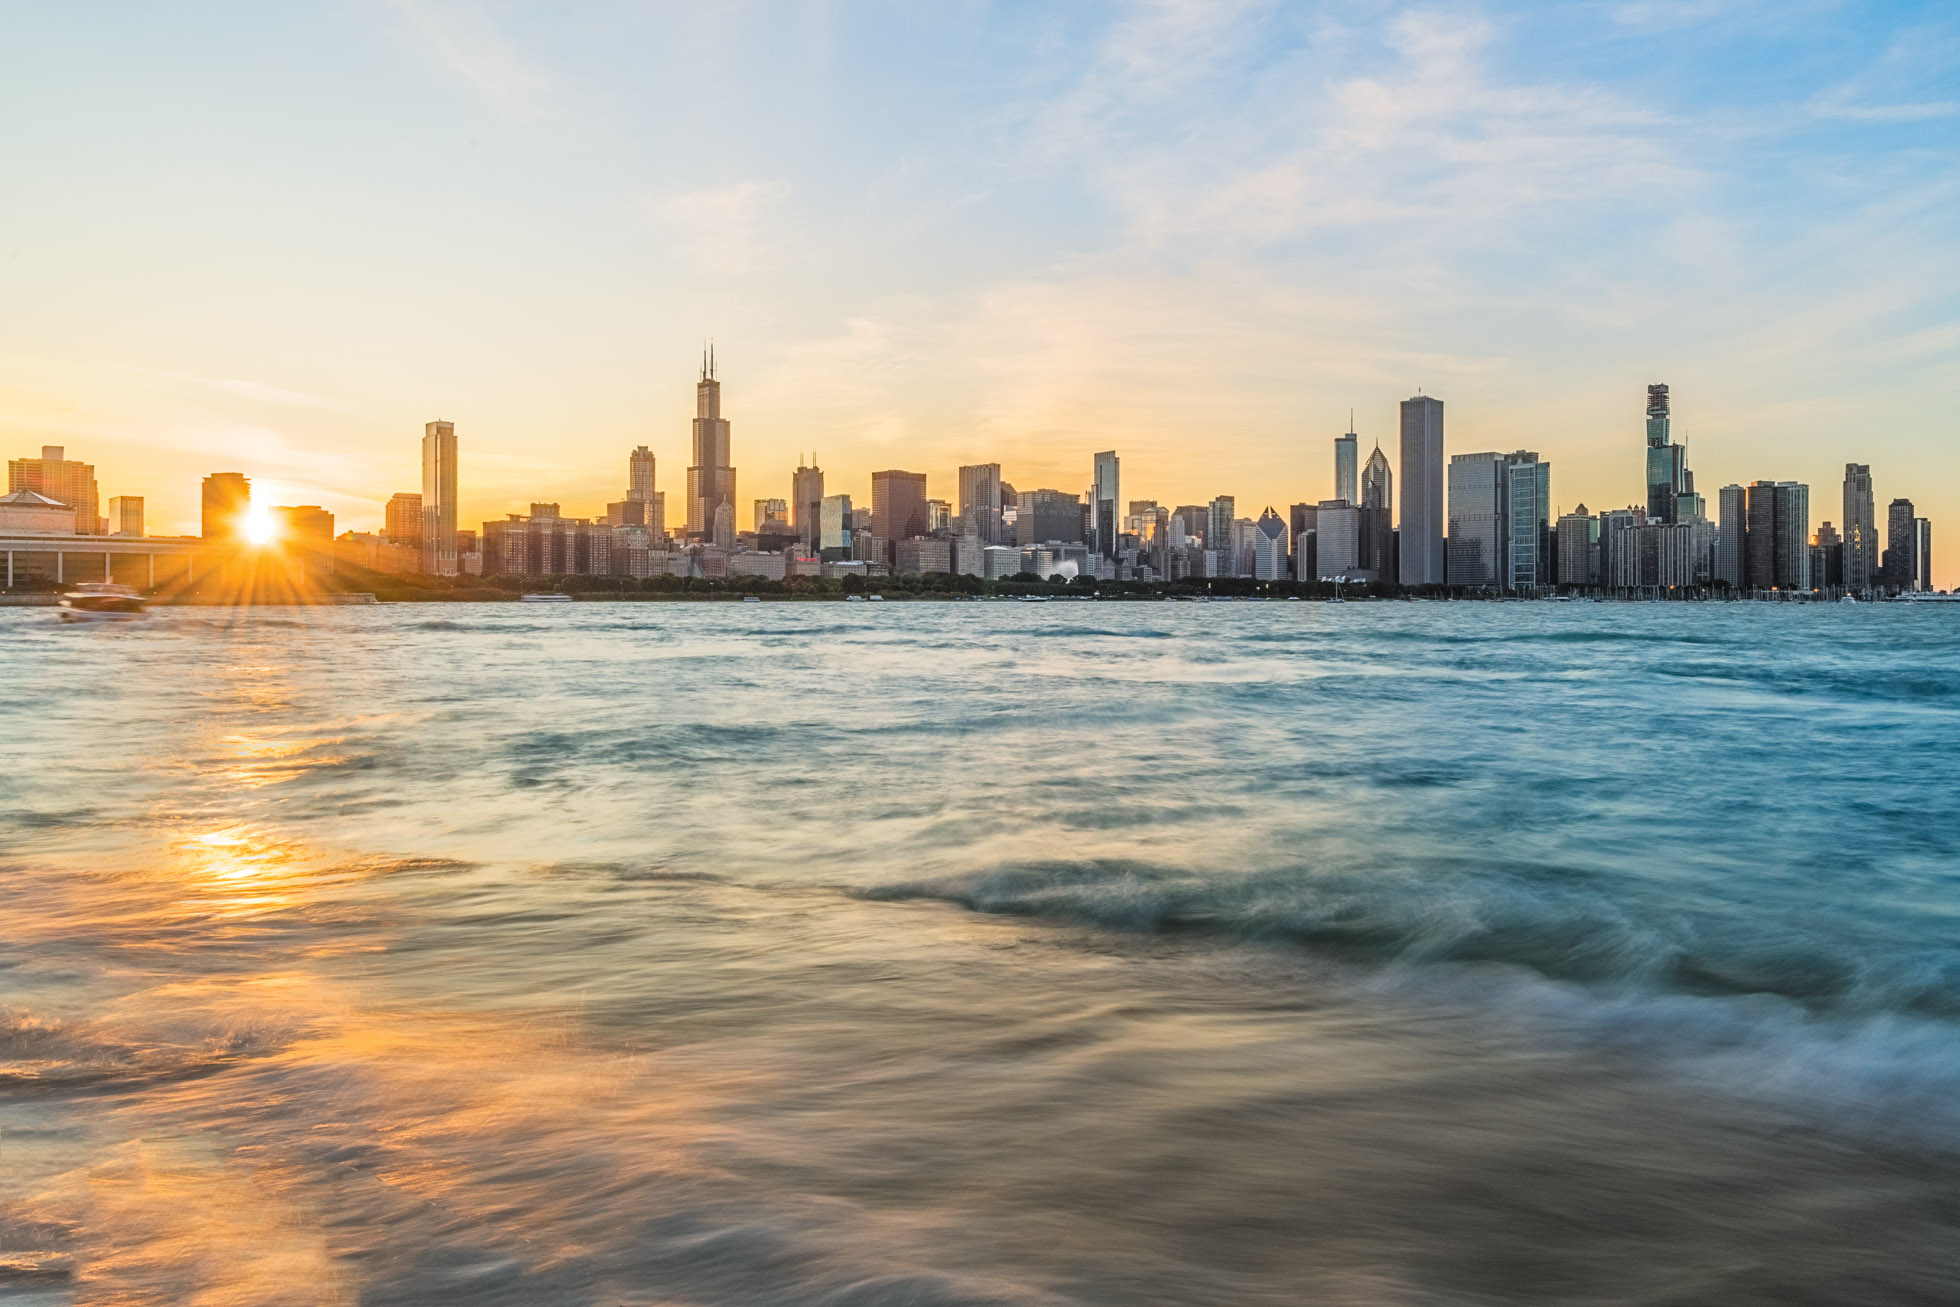
Telephoto capture of part of the Chicago skyline
5) Bracket exposures - Night city scenes present a challenge as they have a high dynamic range to capture. The lights of buildings and vehicles are quite bright while the shadows are dark, making the dynamic range more than cameras can capture in a single exposure. Bracketing exposures by programming your camera or by adjusting your settings manually is the best way to ensure you capture detail in both the shadows or highlights.
6) Histogram - Use your histogram to help you evaluate your exposure. Your LCD screen is not a great way to check exposure which is why I recommended in Part 1: Preparation to turn the brightness down. This way it won’t trick you into thinking you have proper exposure when you don’t. With the high dynamic range, check your highlights and your shadows to ensure you have detail in both. Refer back to those bracketed exposures. If your brightest bracketed exposure still has clipped shadows, brighten it up. If your darkest bracketed exposure still has blown highlights, reduce the exposure. While sometimes you may find you can recover enough information to make a single exposure work, it is always best to gather as much information in the field as you can.

Williamsburg Bridge from Brooklyn
7) Take Test Shots - Don’t be afraid to take test shots and examine them for focus, exposure and white balance. Examine them to consider your composition as well to see if you have included distracting elements or cut off important lines or features. Zoom in to check for sharp focus. Check your histogram for the dynamic range. Check to see if your images are excessively warm or cool.
8) Create Starbursts of City Lights - Close your aperture down to capture starbursts of those city lights. F/16 its a great number to aim for. If you need more light, in this image below I was able to get the starburst of this rotating lighthouse light at f/13.

Harbour Town at night with an aperture of f/13 to get the starburst of the lighthouse light!
9) Arrive Early - Getting to your location for sunset will allow you to take your time in setting up and evaluating different compositions. This will also give you the opportunity to shoot through varying lighting situations of sunset, blue hour and true night skies. A stunning time to capture is when the lights first come on in the city!

Part of the Chicago skyline as the sky transitions to night and the city lights are turning on!
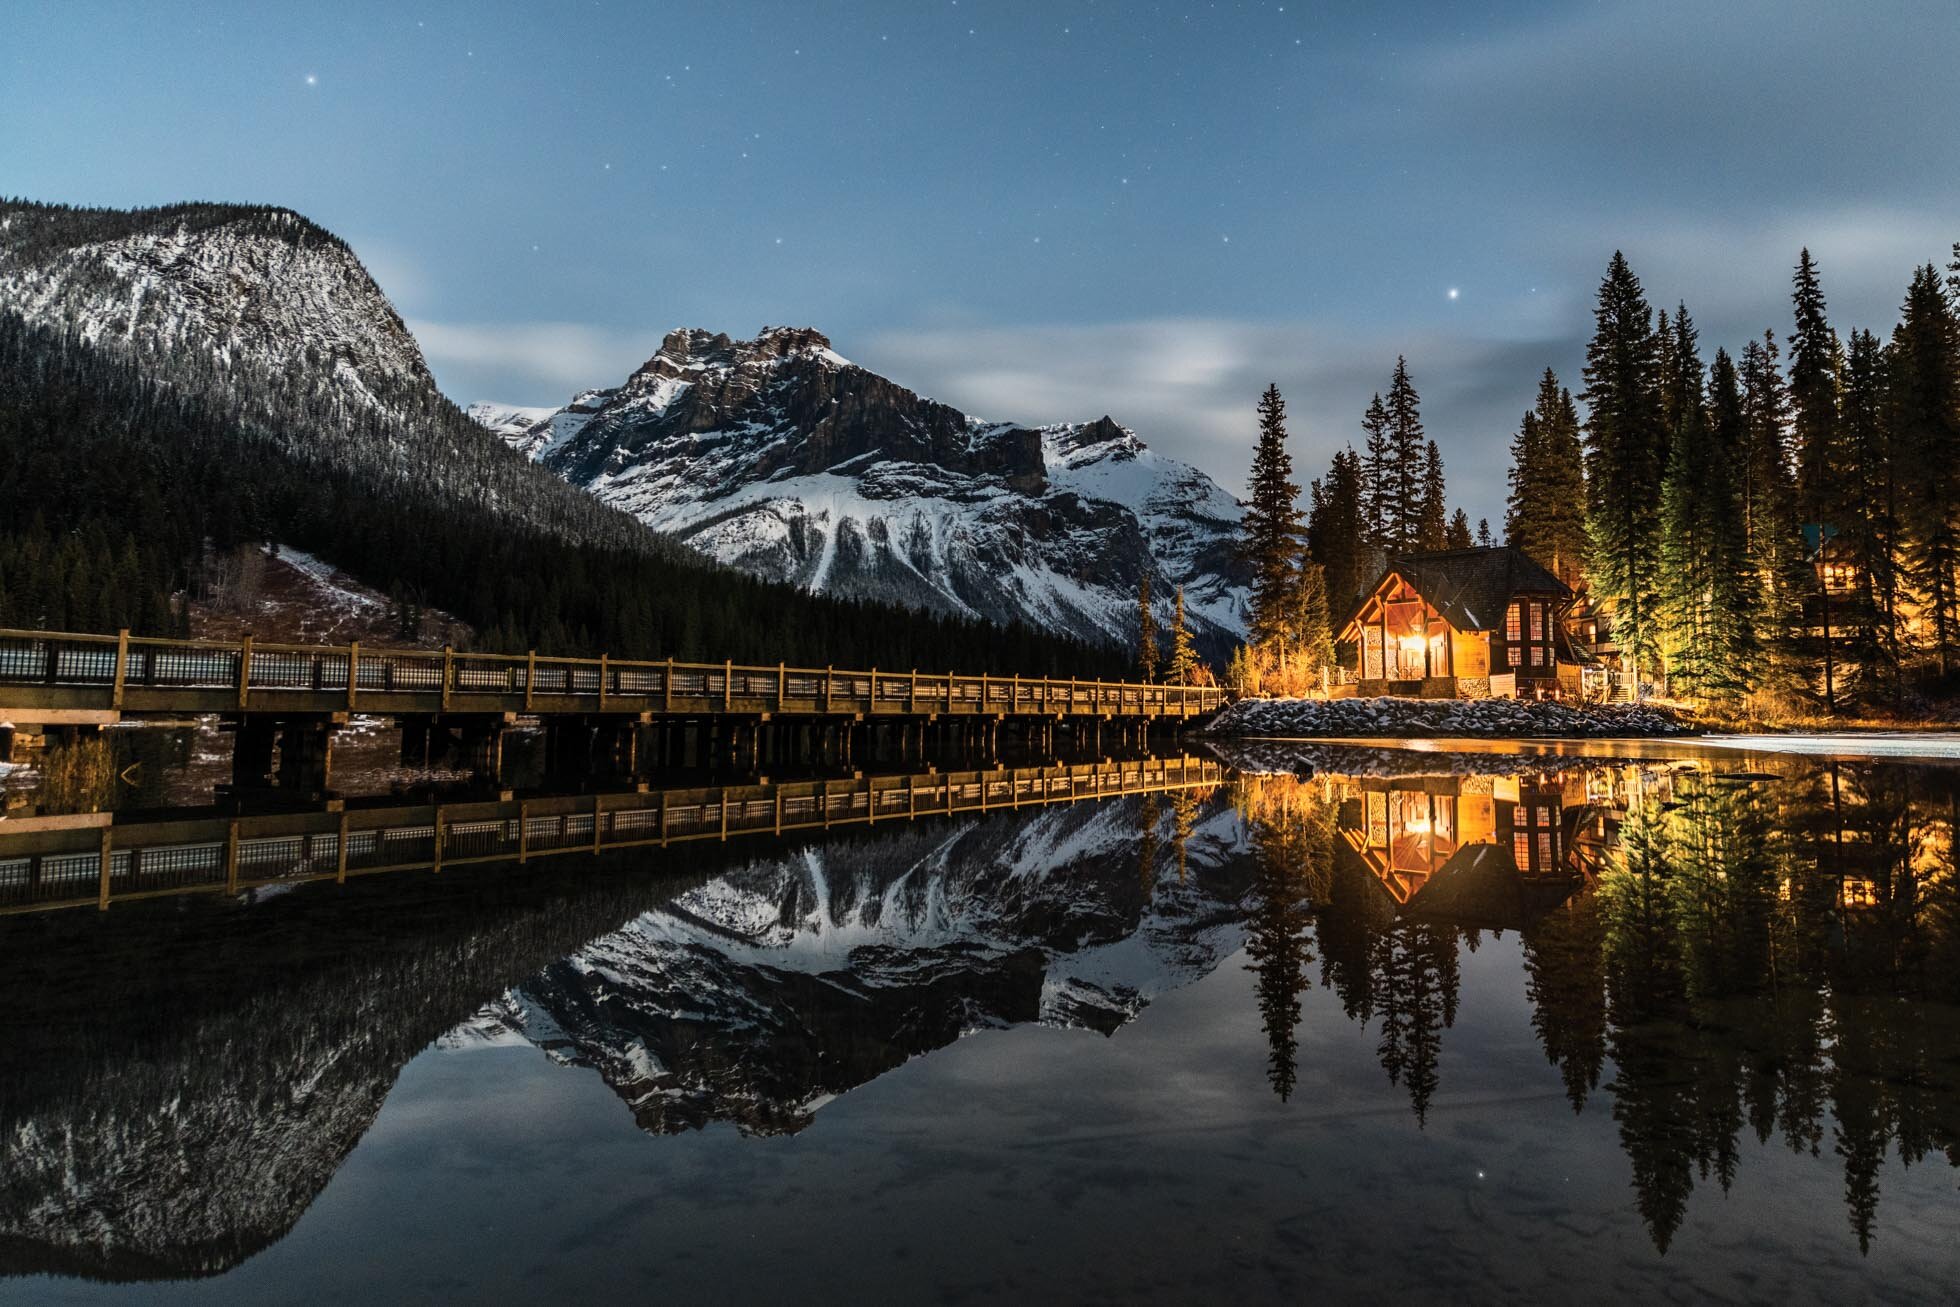
These tips can also be used in a smaller downtown or even in a rural area when shooting a lit up building amongst darker skies such as this scene below at Emerald Lake.
Next week’s topic in the Night Photography Series is Light Trails, so keep an eye on your inbox!
This kind of environment mixes an astrophotography approach with a city scene approach. The ISO in this image is 800. Shooting in this kind of scene without the bright restaurant would require a much higher ISO. Additionally, this is a situation of merging exposures and balancing white balance for the cool sky and the warm restaurant lights.
Kristen Ryan is an award winning and published landscape and fine art photographer and educator residing in the Midwest suburbs of Chicago. All images are available for purchase in the Fine Art Store or by request. Kristen leads ladies landscape photography retreats in the Tetons, Chicago, and the Canadian Rockies, offers private mentoring and teaches an online landscape photography workshop, The World Around You. The next run of The World Around You begins August 17!
Night Photography Part 1: Preparation
Night photography is one of my very favorite genres to shoot whenever I get the chance. And when I say Night Photography, I mean both Astrophotography and general night photography, such as night cityscapes, light trails, and other night scenes. Today’s tips for preparation apply to all areas of night photography. If you are looking for Astrophotography tips in particular you can visit my past blog posts: 9 Tips for Astrophotography Part 1 and 9 More Tips for Astrophotography Part 2. In this series, later posts will be focused on town & city scenes, light trails and star trails.

8 minute exposure of the stars over Mt. Rundle at Vermilion Lakes
I believe that preparation is key to enjoyable and successful night photography. Being prepared with the proper gear, knowing that gear and your location is the best first step toward creating amazing night imagery.
1 -Invest in a quality tripod - If you already shoot nightscapes even occasionally, you know that a tripod is critical to sharp night photography. The longer exposures you are shooting, the more important that the tripod is strong and sturdy so it won’t move if the conditions are windy. In addition to this, it is important to choose a tripod that is intuitive to you in its use. Being able to easily put the camera on the head and shift its position, especially in the dark is so important. If your tripod doesn’t feel easy for you to adjust, find one that is. It will take so much frustration out of working in the dark.
2) Pack Your Cable Release/Remote - When photographing long exposures, whether just 1-2 seconds or longer, a cable release will help eliminate any camera shake from pressing the shutter. Get to know your remote and how it works if you will be programming it for a time lapse or long exposure in bulb mode.
3) Bring a Headlamp and/or Flashlight - Depending on where you will be shooting, be sure to have a headlamp or flashlight to light your way and to help you work with your gear if you get stuck working in the dark. If you are shooting with other photographers, you’ll want to all get set up and try to avoid turning on any lights once you get shooting. Even a little light shining into the foreground can ruin a fellow photographer’s exposure.
4) Know Your Gear Well - Being able to work with your gear in the dark is so important for an enjoyable night shooting experience. If you can adjust your camera on your tripod and access the buttons you need on your camera without fumbling around, you’ll save yourself so much frustration. Know how to change your settings, playback and zoom in to check focus without having to turn on a flashlight. Spending a little time mindfully noticing where all these buttons are can make a world of difference.

Harbour Town on Hilton Head Island as Blue Hour transitions to night.
5) Scout your location - Spend time during the day scouting out your location. Being able to see where you will be walking and setting up will help you when it is dark. Additionally, it can help to envision the composition you want to shoot in the daytime. Taking this time will create familiarity with the scene, minimize unexpected obstacles, and aid success in finding an intriguing composition.
6) Lower Your Screen Brightness & Turn on your Highlight Blinkies - One of the most frequent difficulties with night photography is underexposed images. It is easy to look at your LCD screen on playback and think your image is well exposed when in reality is it underexposed. Lowering the screen brightness is helpful in preventing this mistake. Checking the histogram for proper exposure is the second important step. Using the highlight blinkies on your LCD is another helpful tool to use to ensure the brightest areas of your night scene (e.g. stars, city lights, etc) are not blown out. Check your camera manual to learn how to turn down the brightness and enable the highlight warnings.
7) Prepare for the Elements - Depending on where you are shooting you may run into various weather conditions. In the summer months, some areas could get buggy at night so you may want to have bug spray on hand. In cooler months, and even in some climates, such as the mountains, the night temperatures get far cooler than the days. Be prepared with layers to keep yourself warm. If you will be in wet areas, waterproof shoes might be helpful, or hiking boots for slippery and uneven terrain.
8) Be safe - In the city or the wilderness, night time has its dangers. In both cases, it is important to be safe by being aware of your surroundings and it is always best to have a friend for shooting partner with you.

Chicago River at Night
Night Photography Part 2 coming next week!
Kristen Ryan is an award winning and published landscape and fine art photographer and educator residing in the Midwest suburbs of Chicago. All images are available for purchase in the Fine Art Store or by request. Kristen leads ladies landscape photography retreats in the Tetons, Chicago, and the Canadian Rockies, offers private mentoring and teaches an online landscape photography workshop, The World Around You. The next run of The World Around You begins August 17!
5 Tips for Capturing Beautiful Reflections
One of the most compelling elements you can include in landscape imagery is a strong reflection. Reflections add interest, often create symmetry and help to add depth in a simple scene. Reflections are a great way to capture a more intriguing image when the skies are uncooperative, such as full overcast or completely clear.
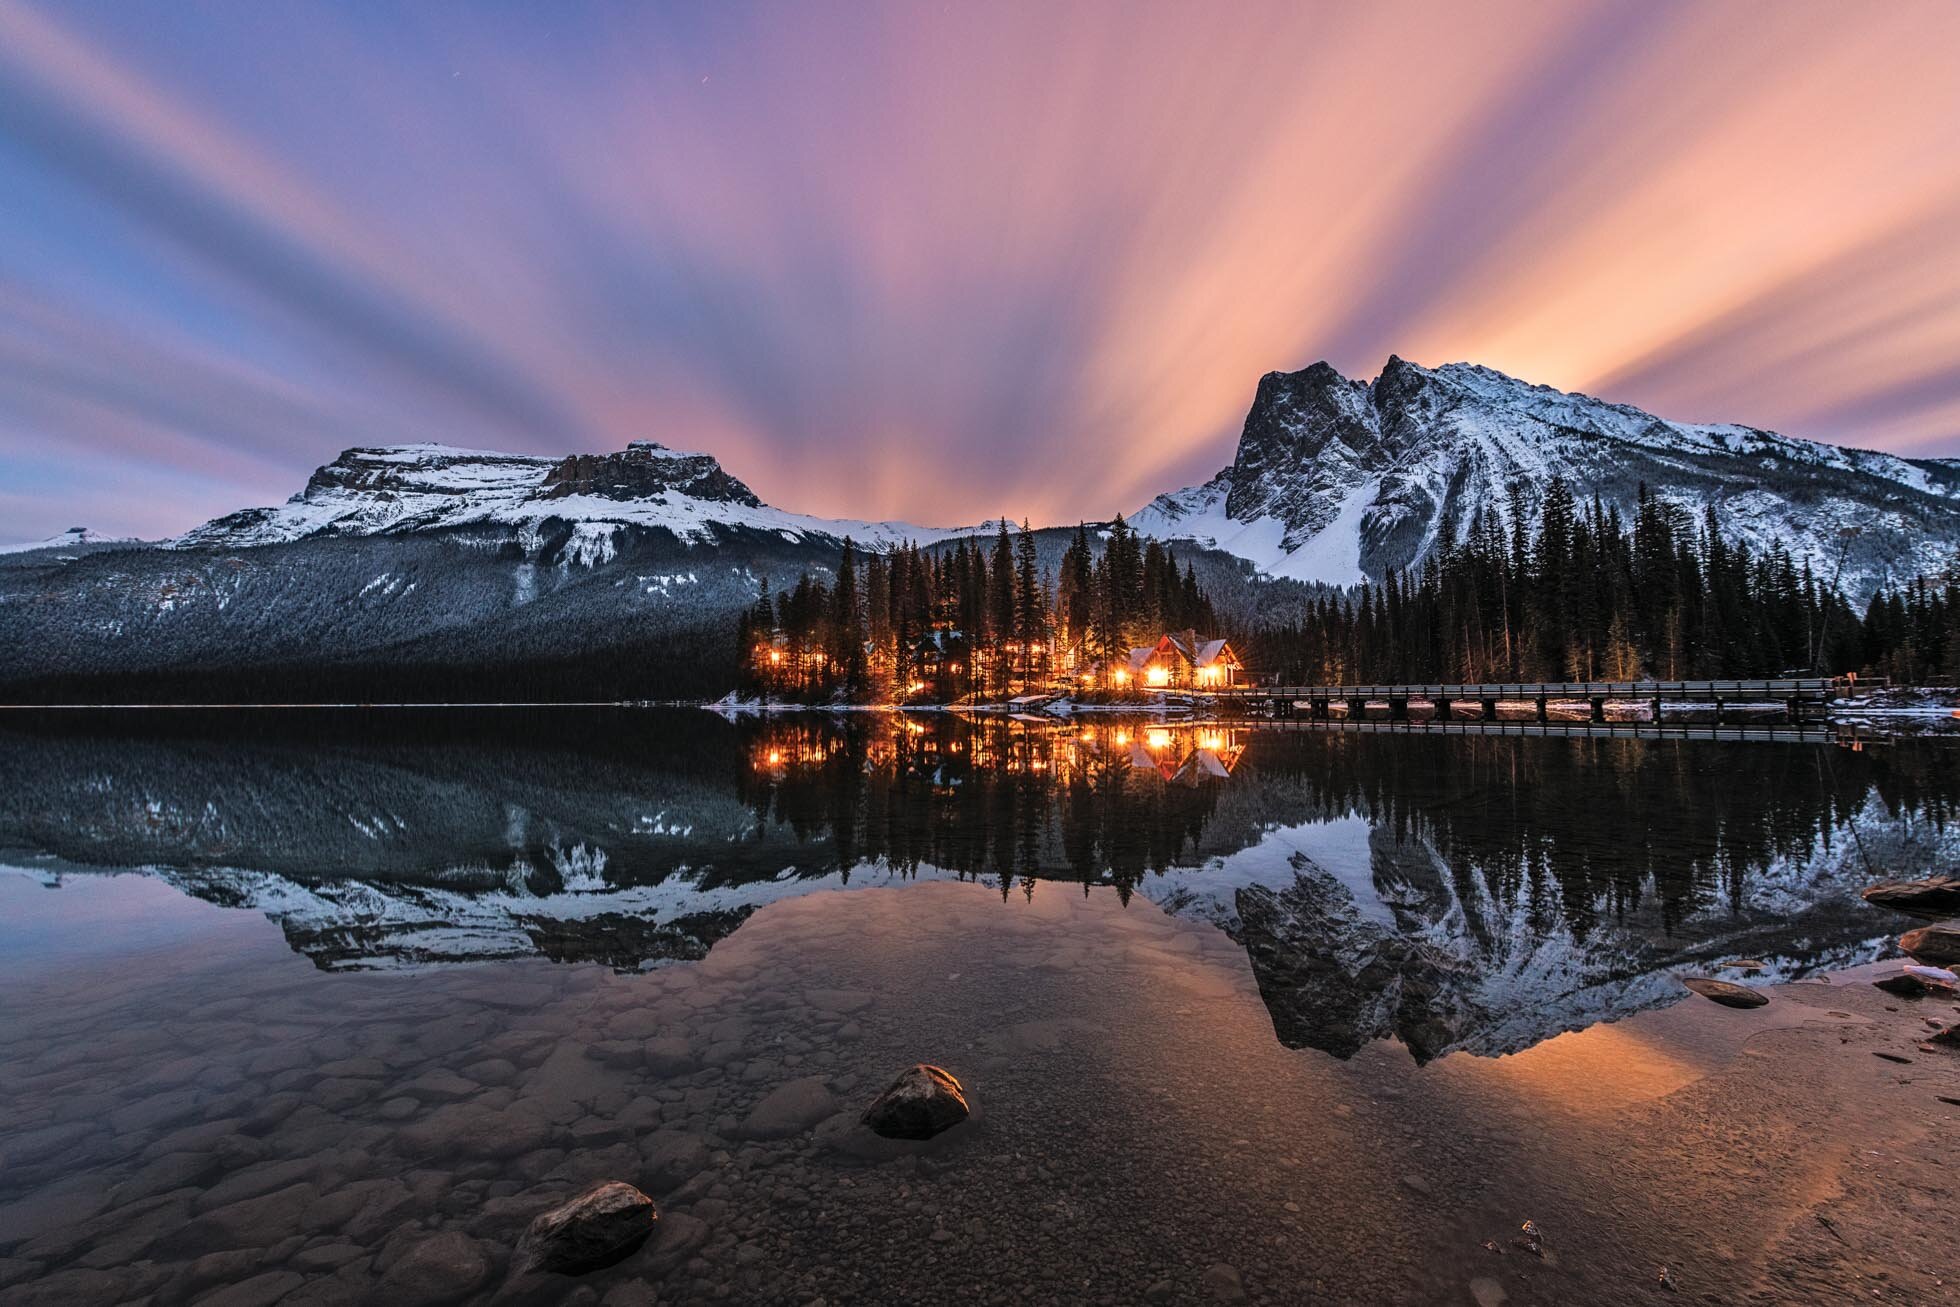
Calm waters in Emerald Lake in Yoho National Park as the sun sets and moon rises.
You can find reflections in any water source that is still such as a pond, lake, calm area of a river, a puddle, or even the wet sand along the shore. Reflections of mountains, trees, city buildings and skies are all compelling subjects to find reflections of in your scenery.
Some tips for finding and capturing the best reflections and most compelling images:
1) Find Calm Water ~Calm water is a necessity for the clearest reflections. Smaller and shallower bodies of water will often be easiest to find calm water though even larger and deeper lakes can be calm enough for clear reflections if you catch them at the right times. Early morning or later evening will often be the best times for finding calm water. Check your weather forecast and choose days and times with low wind.

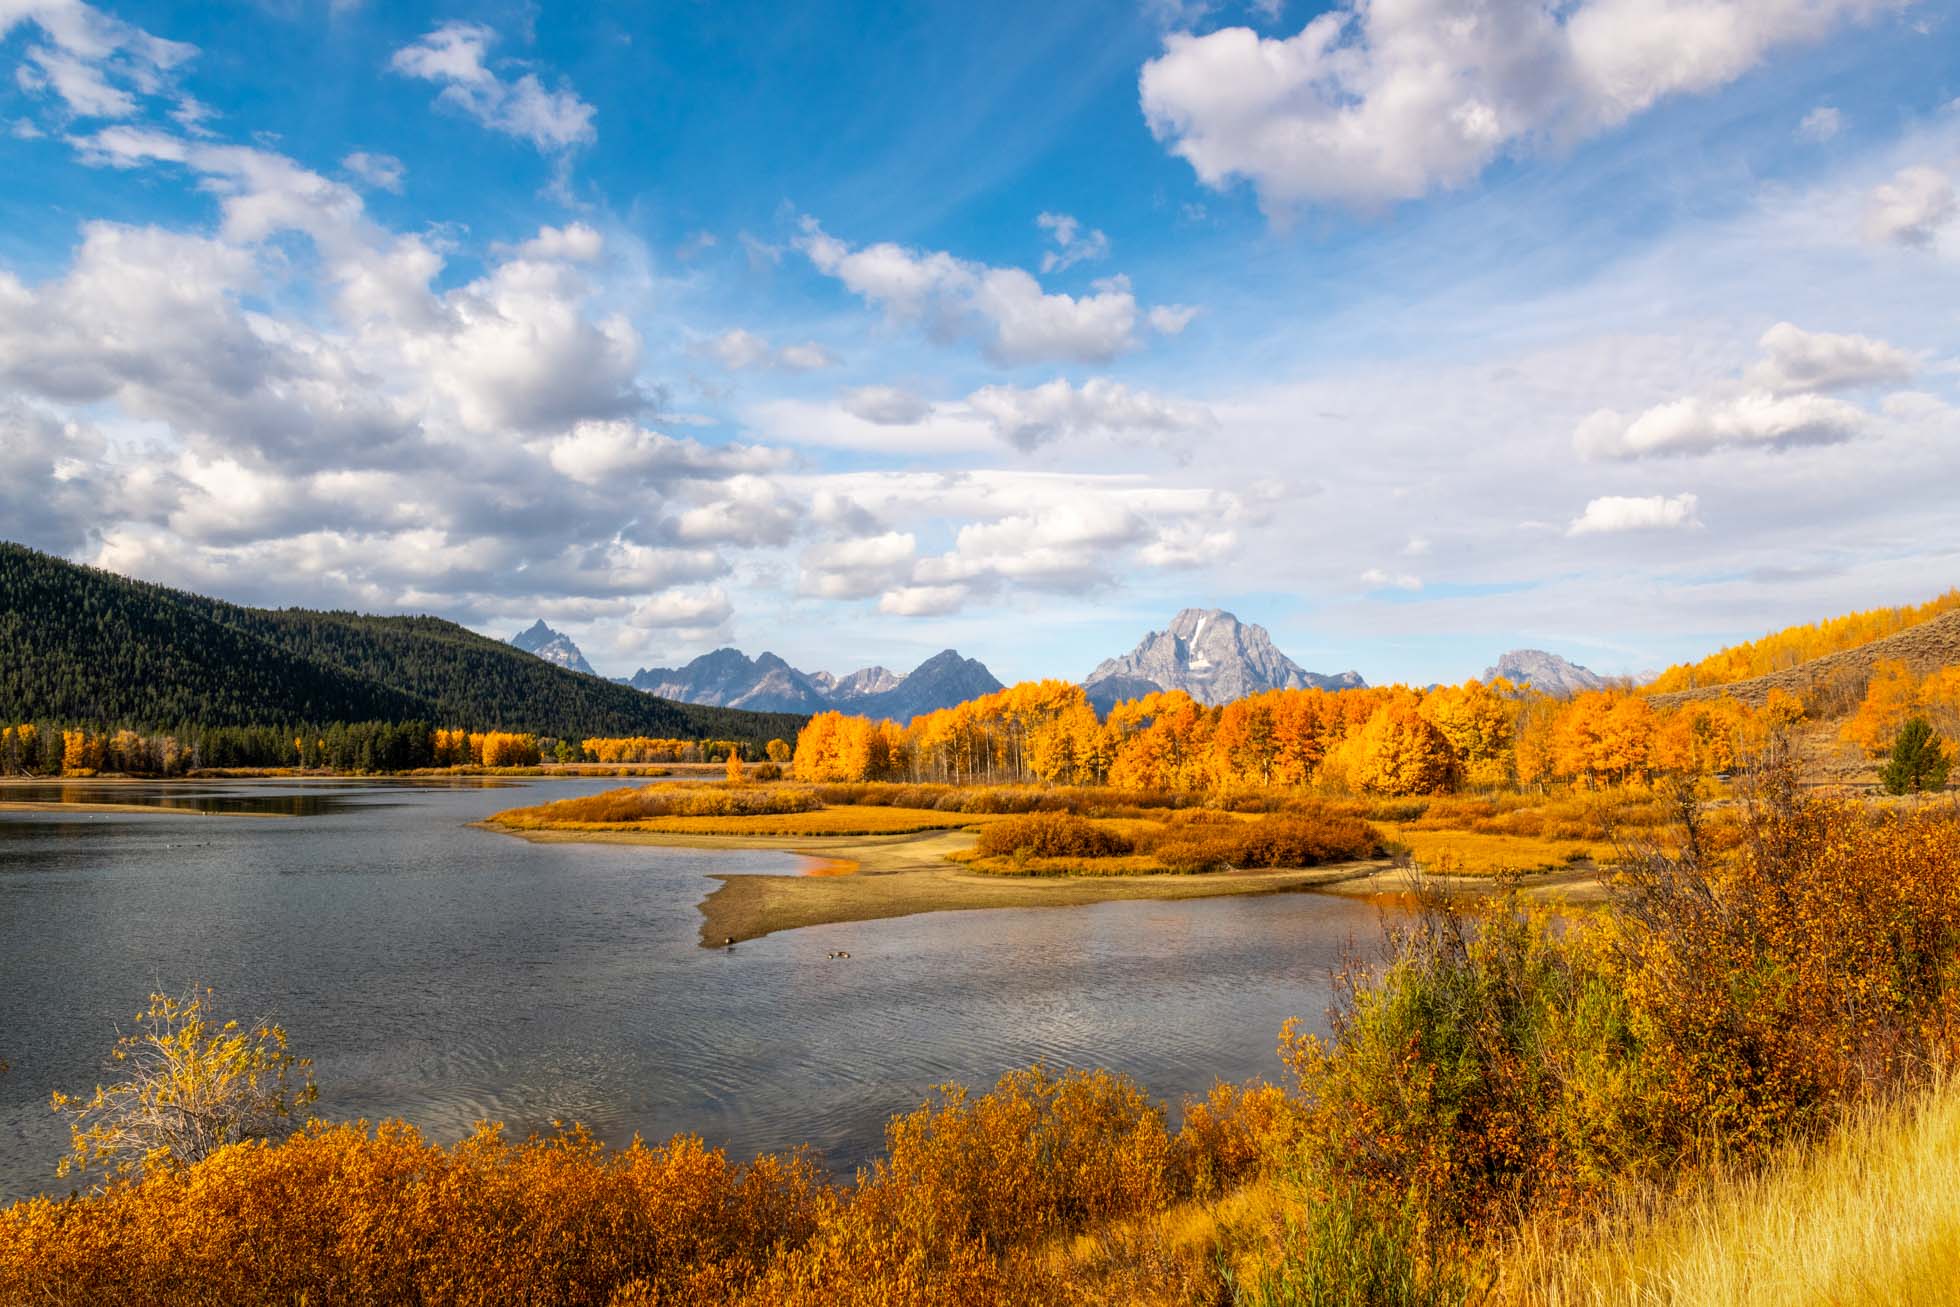
Pretty calm waters at Oxbow Bend in Grand Teton National Park. The 10 second exposure smoothed the water a bit.
2) Consider the light ~ The best reflections will be captured when the light is behind you and a bit to the right or left. With that in mind, be aware of how the sun can cast a shadow of your body into the scene. Unless you are going for a shadow self portrait, then go right ahead 😊

Calm waters in the Snake River with the sunrise light behind me.

Calm morning waters at Lake Marmo at Morton Arboretum with the sun behind me.
3) Find the best perspective ~ Sometimes the the reflection is obvious in the scene but other times the best reflection can take a little exploring angle and perspective. Get low and see if you can get more reflection than at eye level. It’s also important to consider how you are composing the scene to avoid chopping your main subject AND its reflection in an awkward way. Be sure to leave comfortable space above the subject and below its reflection.

The reflection of the sky and clouds in the wet sand and very shallow waters at Cannon Beach in Oregon is enhanced by my low perspective very close to the sand. Getting low also helps to add depth in the image.
4) Consider using a Graduated Neutral Density filter - The reflection is often much darker than the subject above. A graduated neutral density filter can reduce the exposure of the top of the frame to neutralize the dynamic range so you can better expose the shadowed reflection. This is especially the true in a situation where the sun is setting behind your subject and not illuminating the reflection such as in the Teton images above.
5) Experiment with long exposures ~ If the water is a bit rippled and the reflection is lacking, shooting a long exposure will smooth the water and sometimes bring out a hint of reflection as well.

This sunset at Oxbow Bend had an incredibly beautiful reflection for evening. The water was nice and calm. This is a situation where a GND could help to decrease exposure on the sky a few stops and allow the foreground to be exposed brighter without overexposing the sky.

In this scene, the water was extremely choppy from the wind in the late afternoon on a blustery November day. The 30 second exposure brought out some reflection of the mountain in Bow Lake.
I hope these tips help you capture stunning reflections in your local scenery and in your travels. If you’re looking to purchase filters for creative effects including long exposures, my go to filters are from Maven Filters *. They are great quality and do not add a color cast.
Kristen Ryan is an award winning and published landscape and fine art photographer and educator residing in the Midwest suburbs of Chicago. All images are available for purchase in the Fine Art Store or by request. Kristen leads ladies landscape photography retreats in the Tetons, Chicago, and the Canadian Rockies, offers private mentoring and teaches an online landscape photography workshop, The World Around You.
*Affiliate Link
One Piece of Gear that is a Game Changer
One thing we discover as we get into landscape photography is that it tends to encourage more and more gear accumulation. Tripods, filters, remotes, etc. It seems there is always something more to purchase and add to our ‘need’ or ‘want’ list! It can be hard to decide which gear is truly worth the expense.
If you are into long exposure photography or astrophotography, there is one piece of gear that is a total game changer. That item is an “L Bracket”. This little piece of metal is in the shape of an L and it screws onto the bottom of your camera where you would screw on the tripod plate. It replaces the plate and stays on your camera tightly unless you take it off. It adds a small amount of weight and bulk but minimally so and is well worth the benefit.
The L Bracket allows you to place your camera securely in either horizontal OR vertical orientation. In my experience, long exposures with a typical tripod plate are frequently lacking sharpness, especially with a heavy camera and lens combination. This is because when the ball head is turned to shoot vertically, the weight of the camera causes it to slip and even the slightest movement will create blurriness in our images. The L bracket allows the camera to sit securely on top of the tripod without moving during long exposures.
The ability to shoot portrait orientation long exposures is especially helpful in situations such as shooting tall waterfalls or astrophotography when you want to capture the height of the sky and Milky Way. It is also helpful in keeping the camera composition steady when utilizing focus stacking in a vertical orientation. As a bonus, I find my camera is more secure on my tripod with the L bracket than the tripod plate regardless of whether I’m shooting horizontally or vertically.
The L bracket also means you don’t have to worry about forgetting your tripod plate because it will always be ready to mount on the tripod. The little allen wrench fits in a space at the bottom of the L bracket so it is always there if an adjustment is needed. Be sure to purchase an L bracket specific to your camera model and make sure it works with the ball head on the tripod. Just check the details online when you purchase or ask the camera store you are purchasing from.

Milky Way capture in September 2019 using my D850 and Kirk L bracket
I hope you find using an L bracket to be helpful in your landscape and night photography!
Kristen Ryan is an award winning and published landscape and fine art photographer and educator residing in the Midwest suburbs of Chicago. All images are available for purchase in the Fine Art Store or by request. Kristen leads ladies landscape photography retreats in the Tetons, Chicago, and the Canadian Rockies, offers private mentoring and teaches an online landscape photography workshop, The World Around You.
The next run of ‘The World Around You’ beings April 20th! Registration opens in early March!
When, Why & How to Use a Circular Polarizer
One of the top filters used by landscape photographers is a circular polarizer. This filter screws on to the end of your lens and twists to create a polarizing effect. What does this mean exactly? Think about looking at a scene with your naked eye and then putting on a pair of sunglasses. Notice the way the glare is diminished and colors are enhanced? That is what the polarizing filter does for the view your camera will capture.

Image colors and sky enhanced by using a circular polarizer.
Why would you want to use a polarizer? Here are a few desirable ways the polarizer will impact your landscape imagery:
Enhance color and contrast in the sky - Using a polarizer will turn light blue skies to deep blue skies. It will add beautiful contrast to daytime skies and bring out the definition in the clouds against the blue sky.
Reduce unwanted glare & reflections -In reducing some of the rays of light, the polarizer reduces glare and reflections. This is extremely beneficial when working in scenes with water. Using a polarizer helps to bring a crispness and remove glare from foliage allowing the colors to shine.
Cuts through haze - In some cases, polarizers can help with hazy skies and scenes. Details and colors will be enhanced.
When purchasing a circular polarizer, it is important to buy one that fits the diameter of your lens. For example, many of my Nikon lenses are 77mm in diameter, so I have a 77mm circular polarizer that fits those lenses. If you have lenses of varying diameters you can purchase step up rings to use a bigger filter with lenses of smaller diameters. For example I have an 82mm filter that fits my Sony 16-35mm lens and I use a 67mm step up rings to use the same filter with my 24-70 lens.
How do you use a polarizing filter?
To use a polarizing filter, you screw the filter onto the end of the lens. There is a second ring on the filter that twists to create the polarizing effect. As you twist, you can see the change in your scene. Twist until you get the desired result. It is important to note that the polarizer works best facing 90 degrees from the sun. So sun at your left or right when you are shooting. Be careful with wide angle lenses too as the polarizing effect will be inconsistent through the frame and you can end up with a sky that is really dark in some areas and less so in others.
It’s also important to keep in mind that because the polarizer blocks some rays of the sun, it reduces the exposure by a stop or two. You will want to account for this exposure change by reducing the shutter speed, increasing ISO or opening up the aperture.
When might you want to use a circular polarizer?

Without polarizer
Photographing Waterfalls - Polarizers are an invaluable tool for waterfall photography. The polarizer will help cut glare off the water and enhance the colors of the surrounding scenery. See the two examples of this small waterfall at Waterfall Glen in Illinois. You can see very clearly the way the polarizer helped cut the glare on the leaves in the foreground and allowed its autumn color to shine.

With polarizer
2. Daytime photography - Daytime photography is a perfect time to pull out the circular polarizer. Enhance the colors of the landscape and bring out the definition of white puffy clouds again the blue sky.
3. Shooting through glass - If for any reason you are shooting through glass, the polarizer will help to cut out the glare and reflections.
Looking to purchase a polarizer or other filter? Check out Maven Filters!*
Have any questions about polarizers or other filters, feel free to reach out!
Kristen Ryan is an award winning and published landscape and fine art photographer and educator residing in the Midwest suburbs of Chicago. All images are available for purchase in the Fine Art Store or by request. Kristen leads ladies landscape photography retreats in the Tetons, Chicago, and the Canadian Rockies, offers private mentoring and teaches an online landscape photography workshop, The World Around You.
*Affiliate Link
6 Tips for Capturing Winter's Beauty Part 2
Last week I shared some tips for preparing your camera gear and clothing to survive the cold while shooting in the winter landscape. If you don’t prepare well enough, the shooting adventures are likely to be cut short due to cold and discomfort!
Now that you are well equipped to manage the cold and snow, I have some tips for photographing the winter beauty! There is the most magical feeling that comes with fresh fallen snow or beautiful hoar frost covering the trees and grasses. Winter landscapes are some of my most favorite scenes to photograph.

Falling snow in Grand Teton National Park
1 - Exposure - As always, I recommend watching your histogram to make sure not to blow out the highlights of the scene to keep texture and detail in the snow. I always look to expose snowy scenes a little bit brighter than my camera tells me to. Exposing at zero, your camera will make the snow look more gray instead of white. I always look to expose snow about +1 to +1 2/3 stops. You can do this manually or by using exposure compensation if you shoot in aperture mode. One easy way to ensure a great exposure is to bracket three exposures at 0, +1, and -1. Again, keep an eye on your histogram to expose to the right without letting it climb the right wall.
2- White Balance - While snow is white, it won’t always appear pure white in a photograph or in real life. Snow reflects the colors and light of a scene. In very low light, the shadows will be quite cool and the snow will have a bluish hue to it. However, in warm sunrise, sunset or golden hour light, the snow may reflect golden, orange, or pink tones. You may want to choose a white balance that enhances these colors or you may want to choose a white balance that neutralizes them somewhat. You’ll likely want to choose a white balance that is representative of the scene and helps to enhance the mood and atmosphere of that moment you clicked the shutter. Unless you are shooting a warm sunrise or sunset, a cooler white balance will typically bring out the cool mood of a winter scene. Using live view when adjusting your white balance can help you see whether you are capturing accurate colors and achieving the mood you envision.

Winter Suburban Sunset
3 - Take Advantage of Falling Snow - Even better than fresh fallen snow is snow that is FALLING!! There is something incredibly magical about a landscape captured with snowflakes falling all around. So grab all your protective gear to keep your camera weather proofed and head out to capture the atmosphere.
4- Get Out When the Snow is Fresh - Whenever possible, head out to capture a fresh fallen snow as early as possible. The earlier you get out, the fluffier the new snow and the less car tracks or footprints will have been made in the snow. Additionally, when you consider your composition, avoid walking around aimlessly as you may end up wanting a composition that includes all the tracks YOU just made!

5 - Avoid Condensation & Moisture in Your Gear - Whenever you can, try to avoid changing your lens out in the cold and wet weather. This will minimize any moisture or condensation getting inside the camera. If you have more than one camera body, you could consider choosing a wide angle lens for one body and a telephoto lens for the second. Additionally, while I have never had trouble with my camera having condensation coming in from the cold, placing it in a sealed ziplock bag as it comes to warmer temperatures is recommended.
6 - Pack a Towel - It’s a great idea to keep a towel in your camera bag in case any of your gear does get wet. Choose something soft like a microfiber towel to dry off your gear.
Hope these are helpful tips to add to your winter shooting! Part 3 coming next week! Do you have a favorite winter shooting tip? Tell me in the comments.
Happy Shooting!
Kristen Ryan is an award winning and published landscape and fine art photographer and educator residing in the Midwest suburbs of Chicago. All images are available for purchase in the Fine Art Store or by request. Kristen leads ladies landscape photography retreats in the Tetons, Chicago, and the Canadian Rockies, offers private mentoring and teaches an online landscape photography workshop, The World Around You.

Capturing Winter Beauty Part 1 - Preparation
In the northern part of the world, the leaves are gone, the air is crisp and snow may be falling! Winter is upon us! Wintry scenes can be some of the most beautiful of all, and some of my favorite. The sparkle of snow and ice can truly be magical but getting out in the freezing cold temperatures can make it uncomfortable to say the least. So for part 1, let’s first think about getting our gear ready so we are prepared for the cold.
When I say gear, I am not only referring to our cameras and lenses but also what we need for our physical comfort in these conditions. Before you head out locally or travel for winter photography, make sure you are prepared for it. I remember anticipating my first winter trip to the Tetons with so much excitement. I couldn’t wait to capture their snowy beauty, but I was very nervous about being able to handle the frigid conditions, my fingers in particular. In the end, my husband and I had prepared ourselves with the proper clothing necessary and the trip was a great success. Since then I have gathered various items of clothing and gear that I love as well as some general tips for surviving the cold & capturing the winter beauty.
1 - Layers! Layers are your very best friend in the winter. This is not only because lots of layers keep you warm, but because when you get warm, you can shed a layer. Getting too hot under all your layers can be dangerous because when you start sweating, you can get very chilled. A merino wool base layer top and bottom is a great place to start. On top of that I like to add a merino wool hoodie, lightweight down coat and then my heavy winter coat as my final layer. In extremely cold weather a fleece is a great additional extra layer. On top of my base layer on my legs, I add some leggings and then warm snow/ski pants.
2 - Warm insulated and waterproof boots plus wool socks! These are so very important to keeping your feet warm. Fingers and toes are really the first to get cold so finding a way to keep them warm goes so far! A nice tall waterproof snow boot is perfect for keeping your feet warm and dry and will keep snow from getting into the boot from the top.

3 - Warm gloves and mittens that allow you to operate your camera. My very favorite winter hand protection is from the Heat Company, the Heat 3 Smart gloves that have a thin warm glove perfect for controlling your camera with a nice warm mitten sewn together. My fingers generally get cold SO quickly and with these gloves I can photograph for long periods of time without discomfort. Absolutely worth the price!
4 - Hand & Toe Warmers - Invest in the chemical hand and feet warmers for those cold days! You can also get rechargeable hand warmers. A friend introduced me to them a year or so ago and I love them. These are the ones that I have by OCOOPA. They even come along in my pockets when I walk my dog on those very cold Chicago days! There are even heated insoles for your boots to keep your feet warm. For example, these by the Heat Company.
5 - Warm hat and scarf! Don’t forget to wear a warm hat since so much of our heat escapes from our head. A scarf goes a long way to not only add warmth to your neck but also your chin. I have trouble with my glasses fogging up if I pull mine over my mouth and nose but it can certainly be helpful for keeping the face warm! Pull up the hood of your coat over your hat in those very frigid temperatures!
6 - Thermos - I always love to bring along a thermos of hot coffee or hot chocolate. My very favorite thermos ever is by Zojirushi as it keeps drinks hot all day or will keep cold drinks super cold all day and it has a lock on the top that has never failed me unless the inside parts were not intact. Sometimes I bring 2 of these when I travel - one for hot coffee and one for my water. In fact every member of my family has one for travel to use for water. No worries about spilling on electronics with the lock!
7 - Microspikes - If you’ll be hiking or walking on ice or icy snow, these spikes that fit on your boots will make sure you keep upright! These ones by Kahtoola are the ones I have!

8 - Snowshoes - If you’re planning to hike in deep snow, you might want to invest in or rent snowshoes! When my husband and I were in the Tetons, we hiked back to the river on my grandparents’ property and the snow was well past our knees. The snow shoes made it manageable!
9 - Rain/Weather Camera Cover - Bring along a cover to protect your camera from the elements. Something like this one or similar will work quite well!
10- Extra Batteries - Your camera batteries will drain more quickly in the cold temperatures. Be sure to carry extra and keep them close to your body to keep them warm. It is a good idea to have extra batteries for your remote/intervalometer as well.
11 - Lens Cloth - It is always a good idea to keep a lens cloth in your camera bag but in the frosty winter weather it can really be essential for wiping off any moisture drops that get on your lens!
12 - Sunglasses - On those sunny days, the glare off the bright snow can be blinding. Remember to bring those sunglasses to protect your eyes!

Hope these tips help you get prepared for some winter photography and look for more winter shooting tips next time!
Kristen Ryan is an award winning and published landscape and fine art photographer and educator residing in the Midwest suburbs of Chicago. All images are available for purchase in the Fine Art Store or by request. Kristen leads ladies landscape photography retreats in the Tetons, Chicago, and the Canadian Rockies, offers private mentoring and teaches an online landscape photography workshop, The World Around You.
5 Reasons I Love My Telephoto Lens for Landscape & Nature Photography
So often when you think of landscape photography, you think of the wide expanse views photographed with wide angle lenses. There is certainly reason for this as quite often, we do reach for those wide lenses to capture a grand view or amazing sky. But sometimes it is only the telephoto lens that can fully capture the story of the details we are drawn to. So here are a few reasons I would reach for my Nikon 70-200 f/2.8 lens or my Sigma 150-600mm lens over a wider angle lens.
1) Your Subject Is So Far Away - Portrait and Lifestyle photographers can usually move their feet to get closer to their main subjects, but in nature & landscape photography, sometimes we can only achieve a closer view of our desired subject by having a lens that can zoom in closer. For example, shooting the top of a mountain peak or across a body of water.
The following 2 images were shot with the Sigma 150-600.
The first captures the tips of the snow kissed Tetons as the clouds float across the sky.

The second captures a tree far off across the Snake River at Oxbow Bend as the light illuminated the fall colors.

2) The Beauty is in the Details - While often the awe of an expansive view is what draws us to a scene, sometimes the strongest beauty is in the details. The long lens allows us to isolate that beauty whether it is the light hitting a mountain peak, an ocean wave, or a single tree (like above). There can be so much intrigue and beauty in the simplicity that comes from picking one element of a scene and focusing on it with a longer lens. It helps bring the eye to the details we see that would otherwise be lost when captured with a wider angle lens.

Captured with my Nikon 70-200mm lens
3) Compression - As a landscape photographer I generally strive to obtain sharp focus throughout the frame, but sometimes a little compression and blur is a beautiful thing. This compression isolates our main subject and can create a soft dreamy quality in the image.

4) Lackluster Skies - When the skies are overcast, drizzly, or even completely clear, they don’t add a lot of interest to landscape images. Using a longer lens to fill the frame with foreground interest can create a more dynamic and interesting image. In this image below, the weather went back and forth between drizzling and overcast. The low clouds floating through the trees, however, were so beautiful. My Sigma 150-600 was perfect to capture the beauty I saw on this otherwise dreary day.

5) Wildlife - While the majority of my photography is landscape imagery, I also love when I’m able to capture wildlife out and about. A longer lens is needed to capture wildlife in order to avoid scaring them off to respect their space. In the case of larger animals, it is also important for your safety.

So next time you head out, don’t forget to bring that telephoto lens with you! I can’t wait to see what you capture!
Kristen Ryan is a landscape and fine art photographer residing in the Midwest suburbs of Chicago. All images can be purchased in the Fine Art Store. Kristen leads ladies landscape photography retreats in the Tetons, Chicago, and the Canadian Rockies, offers private mentoring and teaches an online landscape photography workshop twice a year.
Did you know that The World Around You is now open for registration for the October 7, 2019 run?! Join me for a month of exploring the scenery around you and learn to capture stunning landscape imagery at home and in your travels.
Choosing a Neutral Density Filter
Neutral Density filters block light from the camera sensor. There are many Neutral Density (ND) filters of varying strength which block anywhere from 2 stops to 15 stops of light. In landscape photography, we use ND filters to reduce the light coming into our camera sensor so that we can slow down the shutter speed for creative effect. The ND filters that I always carry in my bag are a 3 stop, 6 stop, and 10 stop filter from Maven Filters. The one that I need at any given time depends on the light of the scene, the subject I am photographing and the creative effect I am envisioning in my frame.

1 second exposure in Oahu using a 6 stop Neutral Density Filter
6 Stop Filter
A 6 stop filter is perfect for a number of situations where you want to reduce your shutter speed in the .4 second to 5 second range. I use my 6 stop filter when I want to create abstract photos of water or trees by using a panning technique. The 6 stop filter is perfect for photographing waves and water when I don’t want to freeze the motion but I want to keep some shape, texture and detail in the water. This is a technique I love to use at the ocean, lakes or rivers. It is also perfect for smoothing the water of waterfalls to create a soft flow. The longer exposures of 5-10 seconds will create a very smooth effect while less than 5 seconds leaves a little more texture in the water. In very low light, the 6 stop can allow an exposure of 10 seconds or more, but in brighter light, the 10 stop will be needed.

.4 second exposure with a 6 stop Neutral Density Filter

1 second exposure capturing the movement of the waves of Lake Michigan using the 6 stop Neutral Density filter

1 second exposure panning the autumn color in Grand Teton National Park using a 6 stop Neutral Density Filter

Shutter Painting at Crystal Cove State Park using a 6 stop Neutral Density Filter

1.6 second exposure with a 6 stop Neutral Density Filter
The 10 stop is my go to filter for exposures 15 seconds and longer. In daylight, the 10 stop is needed for these creative long exposures of water or clouds. Imagine those super smooth waters and wispy clouds. Those are when I pull out my 10 stop filter.

2 minute exposure during sunset with a 10 stop Neutral Density Filter

3 minute exposure during very early sunrise with a 10 stop Neutral Density Filter

30 second exposure at Oxbow Bend with a 10 stop Neutral Density Filter
Stacking a 3 stop and 10 stop filter is the filter combo I need for creating dynamic wispy clouds during the daylight. This filter will allow me to shoot 3-6 minutes of clouds and capture creative clouds even with slow moving clouds.

4 minute exposure with 13 stops of light blocked
Neutral Density filters are an incredible tool for adding creativity to your landscape, seascape and nature photography. I highly recommend Maven Filters* for their great quality. Have more questions about choosing a filter, feel free to reach out and ask me! I’m always happy to help.
Kristen Ryan is a landscape and fine art photographer residing in the Midwest suburbs of Chicago. All images can be purchased in the Fine Art Store. Kristen leads ladies landscape photography retreats in the Tetons, Chicago, and the Canadian Rockies, offers private mentoring and teaches an online landscape photography workshop twice a year.
*Affiliate Link
Photographing Water With Creative Exposures
When first learning to shoot in manual mode, we learn that aperture, ISO and shutter speed create the exposure triangle. If we change one of these settings, we then have to alter another one to achieve proper exposure. In the beginning, when I was learning the exposure triangle, I was shooting more portraits of my kids and loving the beautiful blur that came from wide open apertures. In creating this blur and bokeh, my shutter speed was typically fast to counterbalance the wide apertures in the exposure triangle.
Over time and especially as I fell in love with landscape photography, I learned to consider shutter speed as not only a part of the exposure triangle and important in freezing the motion of my fast moving toddlers, but as a creative choice. In fact, creative shutter speed use is one of my favorite techniques when shooting moving water within a landscape.
There are 3 main choices when it comes to using shutter speed to capture water: 1) A fast shutter speed used to freeze the motion of the water and maintain texture. 2) A slower shutter speed in the range of say .4 seconds - 3 seconds which will smooth the water a bit but maintain some texture and shape and 3) a very slow shutter speed of at least 5 seconds or longer that will smooth the water completely and create a dreamy quality. Each of these exposure times creates a different texture of the water and mood in the overall image.

Chicago Skyline on a windy and wavy day. Captured with a 1/320 shutter speed.
1) Fast Shutter Speed - The image above was captured on a very windy day in Chicago and the waves were crashing hard along the pavement below the steps outside Adler Planetarium. The fast shutter speed freezes the motion of the waves and shows the texture of the water. This exposure choice allows the viewer to see the rough water and feel the mood of the scene captured.

1 second exposure of the rough waves on a windy day in Chicago!
2) Slow shutter speed in the .4 second to 3 second range. This choice of exposure does not freeze the motion of the water and creates a smoother effect than a fast shutter speed. The blur of the movement still maintains some texture in the water and shape in the waves. This choice also maintains a bit of the actual mood of the windy and wavy scene but also adds a creative effect. A shutter speed in this range will typically require the use of a Neutral Density filter unless shot in very low light. This image was captured using a 6 stop Neutral Density filter.

60 second exposure after the sun dipped below the horizon
3) Long Exposure 5 seconds or more. These exposure times will smooth out the movement of the water and the longer exposures (15 seconds+) will create a dreamy and serene feel in the image. This moment felt very serene standing on the shores of Lake Michigan watching the beautiful sunset colors light up the sky. While the image does not show the rough waters that existed, it does represent my mood as I captured the scene. Sometimes creative exposures capture how we feel even if the scene appeared a bit different in reality.
Longer exposures in the range of 5 seconds to minutes require the use of a Neutral Density filter except when shooting in the dark. This 60 second exposure also used a 6 stop Neutral Density filter. Quite often, exposures of this length will need a 10 stop ND filter.
If you are looking for filters, I highly recommend Maven Filters. *
Kristen Ryan is a landscape and fine art photographer residing in the Midwest suburbs of Chicago. All images can be purchased in the Fine Art Store. Kristen leads ladies landscape photography retreats in the Tetons, Chicago, and the Canadian Rockies, offers private mentoring and teaches an online landscape photography workshop twice a year.
*Affiliate Link
7 Tips for a Great Sunburst
One of my very favorite techniques for adding drama and impact to landscape images is creating a sunburst when the sun is in the frame. Sunbursts introduce added interest to any frame and are especially fun to add in when you have a completely clear sky.
A starburst of the sun happens as a result of diffraction. Light goes into the small opening of a narrow aperture of our camera and is then bent around the edges of the blades. This disperses the light rays into a starburst.

Here are some tips and thoughts to think about as you capture sunbursts in your shooting!
1) Choose A Wide Angle Lens - Wider focal lengths will produce more rays in the starburst so your best bet will be a focal length in the 14-35mm range. This is not to say you cannot capture a sunburst with a longer lens, but the wider angles are ideal. Keep in mind that regardless of focal length, different lenses create different looking sunbursts. For example, my Nikon 14-24mm lens produces a bit of a circular flare starburst at 14mm (image below) which is different from my Nikon 16-35mm lens at 16mm. (image above) Experiment with your lenses and focal lengths to see which one produces your favorite burst!

2) Close Down Your Aperture - Closing down the aperture will produce more distinctive rays in the sunburst. It is possible to get a sunburst with an aperture wider than f/16 but f/16 or f/18 are my top choices for a great sunburst.
3) Sky Matters - The best conditions for a good sunburst will be a patch of clear sky for a bright and sharp sunburst! Trying to create a starburst through a thin layer of hazy clouds is like banging your head against a wall. When the sky has some thicker clouds amongst clear sky, when the sun hits the clouds, this can create nice potential for a burst of rays into the sky and over the clouds.
4) Consider the Position of the Sun - When the sun is in the middle of a clear blue sky, a nice sunburst can be achieved. Other times, the best sunbursts are created as the sun hits another object, such as a mountain top, horizon, building, tree, etc. This helps the rays to disperse over the object the sun is hitting. This can require patience waiting for the sun to rise or set to the position desired. And sometimes it can require a little movement on your part to line things up.


When shooting sunbursts through trees, even slight shifts in position can help create a better or more distinct sunburst.
5) Expose for the Highlights - One of the keys to getting a great sunburst with distinct rays is to be sure that the highlights are well contained. Ideally, it is best to avoid blowing any of the sun highlights except for the circle of the sun. Exposing for the bright sun does mean that the overall image is somewhat underexposed and the shadows will be quite dark.
6) Bracket Exposures - Following #5’s tip for exposing for the highlights to get a great sunburst, consider bracketing your exposures and also taking an image exposed for the shadows and one for the midtones. Then combine them in post processing so you have detail in the full tonal range of the scene. You can bracket manually or program the camera to automatically take several images at different exposures.

7) Consider Your Position - As mentioned in tip #4, both the position of the sun and your position matter for creating a strong sunburst. Another thing that is impacted by your position is additional flare. Shooting into the sun can bring creative and desirable flare but it can also create unwanted and distracting flare. Look for this unwanted flare as you shoot and in your test shots and consider shifting your position. Sometimes minor adjustments in your position can remove unwanted flare or position it better in the frame where it is less distracting or more easily cloned out. A lens hood can also be a useful tool to avoid unwanted flare. Though sometimes nothing avoids it completely.

Kristen Ryan is a landscape and fine art photographer residing in the Midwest suburbs of Chicago. All images can be purchased in the Fine Art Store. Kristen leads ladies landscape photography retreats in the Tetons, Chicago, and the Canadian Rockies, offers private mentoring and teaches an online landscape photography workshop twice a year.
9 More Tips for Astrophotography (Part 2)
My last blog post, toward the end of June, shared tips for Astrophotography. Summer travel and family life occupied all my time in the last month and a half, but as promised, here is part 2 with 9 more tips for shooting those starry night skies!
1) Check the Moon Phase calendar when planning your Astrophotography. The less moonlight, the more stars you will see and the brighter the Milky Way will be. New Moon will be the darkest time of the month. This is when there is no moonlight at all. During other moon phases, you may still be able to shoot the stars and Milky Way without moon interference, but you’ll need to check the moonrise and moonset times. I love to use the Sun Surveyor app to find out the moon phase plus rise and set times. Sun Surveyor also gives the times the Milky Way core will rise and set and when it is visible without moon interference in your location. I highly recommend checking out this helpful app.
2) Use an app like Photopills to plan your Milky Way shooting. Photopills will help you to find out where the Milky Way will be located at any time in any location. At home or away, you can put the pin on any location and see where the Milky Way will be at midnight, 1:00 a.m, 3:00 a.m., etc. For this June’s Teton Retreat, I had our 2:00 a.m. String Lake Milky Way shoot planned when I chose the dates of the retreat knowing the Milky Way would be in the ideal position from 2:00-3:00 a.m. Using an app such as Photopills allows you to know what to expect and plan for success.

Milky Way over the Grand Teton at String Lake in June 2019 at the Magic in the Tetons Retreat
3) Get To Know Your Gear In The Dark - The very dark skies are great for capturing millions of stars, but this also means you can’t see your gear without a flashlight. If you are shooting with a friend or a group, turning on flashlights can ruin the exposures of your fellow photographers. Being able to put your camera on your tripod in the dark, adjust your tripod and check your LCD without turning on your flashlight is extremely helpful. Additionally, the longer you keep lights off, the more your eyes adjust to the dark.
4) Watch Your Histogram & Expose To The Right - In evaluating your exposure, check your histogram rather than relying on your LCD screen. Exposing as bright as you can without blowing the highlights will produce the best quality image with the least noise. Noise is inevitable in the dark conditions with high ISO. The better exposure you have, the less noise there will be. Check to see that your histogram is as far toward the right as it can be without it climbing up the right wall. There will be more tones toward the left because it is so dark, but keeping them as far as possible off the left wall of the histogram will capture a better quality image.
5) Consider Foreground Exposure - The foreground of your scene will be much darker than the sky full of stars. There are a couple options for getting a well exposed foreground image to composite with a great exposure of the sky. The first is to get out before the sun sets and capture the frame you want with a well exposed foreground before sunset or during blue hour when a little more light will light the scene. Be sure to choose your composition and leave the frame and focus where it is before shooting the night sky. The second option depending on the foreground scene is to light the foreground with a flashlight or headlamp. The foreground will need to be close enough, and your light strong enough, to be lit with your supplemental light source. Light painting must also be allowed where you are shooting. Grand Teton National Park, for example, does not allow light painting so during my retreats we do not light the foreground. The third option, if you arrive in the dark, is to take a brighter exposure of the foreground to composite with the sky by taking a longer exposure. This will create star trails in the sky, but you can composite your longer foreground exposure with your static star exposure in Photoshop.

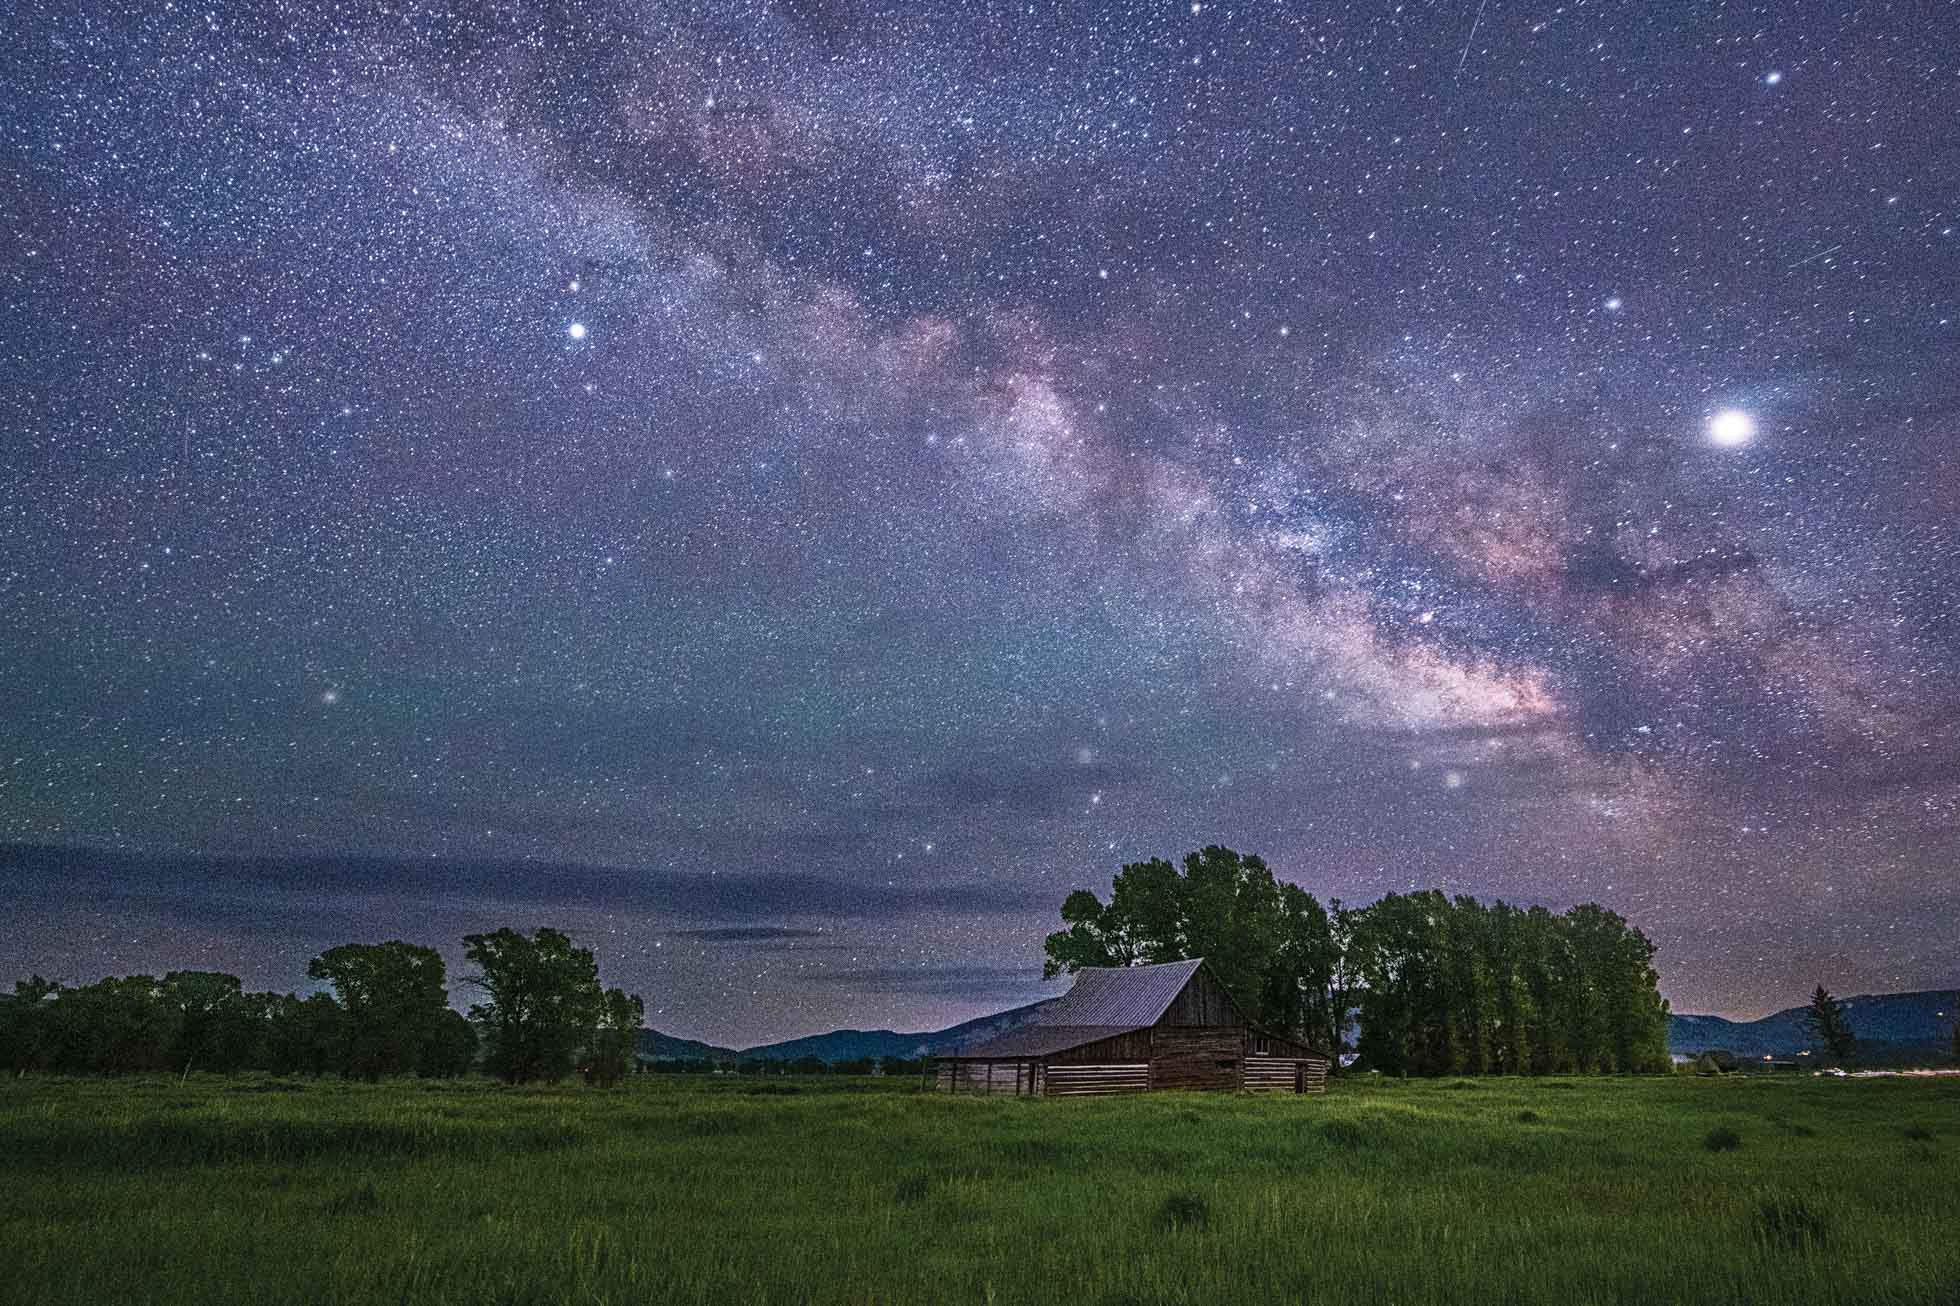
A starry evening at the Three Sisters in Canmore, Alberta Canada
6) Consider Stacking to Reduce Noise - One technique to try for less noise in astrophotography is taking multiple exposures of the same frame and stacking them in a program called Starry Landscape Stacker. This program is very easy to use and stacks multiple exposures of the sky into one by lining up the sky. The resulting image has less noise than editing one single exposure. For example, you can capture 10 exposures at ISO 6400, f/2.8, 15 seconds and stack them in Starry Landscape Stacker. The program is $40 but very worth it!
7) Consider Composition - Just as with landscape images, composition matters in astrophotography too. It can be easier to find a pleasing composition in the daylight, so it can be helpful to scout out a location ahead of time, or get there before dark as mentioned above in the Foreground Exposure tip. Even in daylight, you can use your Photopills app to see where the Milky Way will be in the Night AR part of the app so if you will be shooting the Milky Way, you can think about composition ahead of time. Consider where other aspects of the scene may be comfortably placed in the frame and how you can create balance between the left and right sides of the frame as well as the top and bottom.
8) Look for Interesting Foreground - As you consider composition, look for a location that will have interesting foreground to be part of the scene. Mountain peaks, rock formations, barns, trees, and oceans all are examples of foreground spaces that will add impact to your night sky images.
Milky Way over the Moulton Barn in Jackson Hole, Wyoming at the June 2019 Magic in the Tetons Retreat
9) Pack Extra Batteries - A final gear recommendation for shooting astrophotography is to make sure to have at least 1 or 2 extra batteries. With (often) cooler temperatures and long exposures, batteries drain more quickly and it is disappointing to be capturing amazing images only to be thwarted by a dead camera battery! Make sure to head out prepared.
It can be challenging to get out to shoot at night, especially when it means giving up your sleep, but I promise it is worth it when you see the Milky Way on the LCD, or even just some beautiful stars!
Kristen Ryan is a landscape and fine art photographer residing in the Midwest suburbs of Chicago. All images can be purchased in the Fine Art Store. Kristen leads ladies landscape photography retreats in the Tetons, Chicago, and the Canadian Rockies, offers private mentoring and teaches an online landscape photography workshop twice a year.

Best Lenses for Landscape Photography
Are you wondering what lens is the best choice for landscape photography? I often get asked by my online students and retreat attendees what lens is best for landscape photography and which lens is my favorite. The simple answer is that my favorite lens/focal length is the one that best captures my vision of the image I am seeing in the moment.
The more in depth answer is that there really isn’t a SINGLE best lens for landscapes. It depends very much on the particular location. Sometimes you may need an ultra wide angle to get the entire scene in the frame or the sky is so amazing you want to include as much of it as you can. Other times, you want to hone in on a smaller portion of the scene; just the part that is grabbing your eye. And sometimes you really need reach to grab detail that you cannot get with anything other than a telephoto.
So, what’s the best lens? There isn’t ONE. However, I will give you some thoughts and examples of the several lenses I use and then you can see how these lenses would help you in the areas you photograph.
First off though….zoom or primes? Prime lenses are sharp and fast and will capture high quality images. However, as a photographer with a landscape focus, I am partial to zoom lenses in most circumstances. The reason being that it is not as easy to just ‘move your feet’ to get a different angle in most cases. I often need to zoom ‘out’ or zoom ‘in’ to change the frame. This also allows me to set up on a tripod and get various compositions from one location.
Ultra wide angle
I shoot with both the Nikon 14-24mm, the Nikon 16-35mm, and the Sigma 14mm f/1.8. I also have a 16-35mm for my Sony a7rii. All are fantastic lenses and I know from friends that the Canon 16-35mm f/2.8 is also an amazing lens.
These focal lengths will allow you to really showcase the expanse of the world. Imagine an endless sky, spanning view of mountains, or endless stars at night. The ultra wide angle is your best friend in these situations. If you love sunbursts, a wide angle lens will also give you the most amazing sunbursts!
The ultra wide angle is often my favorite. I love taking in the wide expanse of the world and very often, only the widest angles will truly capture that magic.

16mm was necessary to capture this wide scene of the Chicago Skyline to include the golden morning sunlight shining in from the left.

14mm is my favorite focal length for capturing the night sky. The ultra wide focal length captures the vast sky of stars in addition to the foreground scenery.

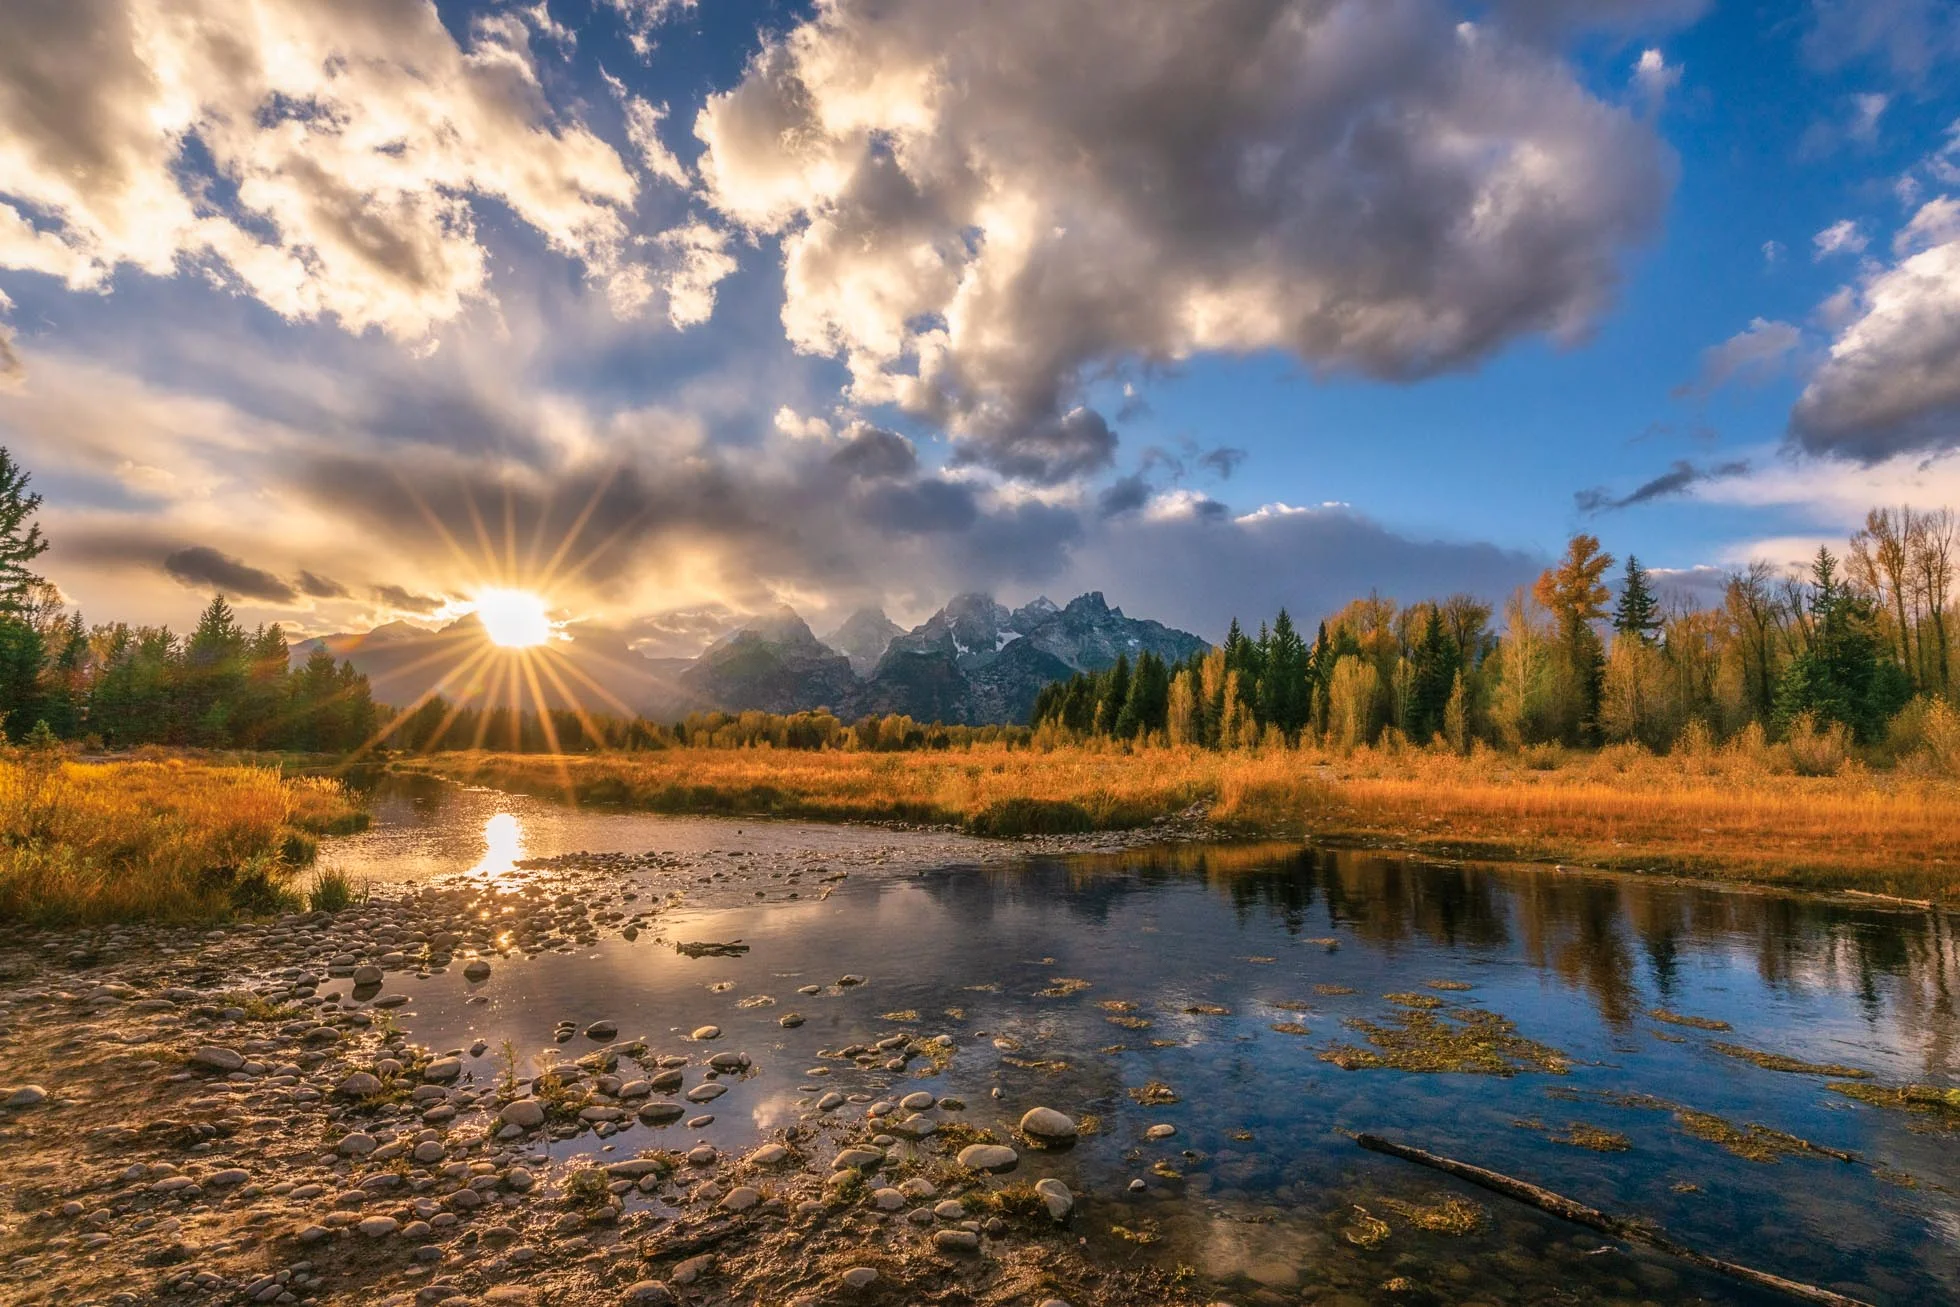
16mm captures the entire sunset scene in the Tetons, including a vivid and distinct sunburst.

16mm allowed me to include significant foreground and ocean in addition to the beautiful sunrise sky.
But, I could not capture the variety that I do with only these widest angles.
Mid Range
I love my Nikon f24-70 f/2.8. If you could only buy or travel with ONE lens, I’d probably say to choose a 24-70 or 24-105 (which I don’t own but there are some great lenses out there in this focal length range)
The 24-70 (or 24-105) gives you a nice wide angle in the 24-35mm range but also allows you to zoom in a bit and grab some closer details. If I am hiking, for example, and want to only carry a camera without extra gear, this is often the lens I will grab. It is so versatile. This mid range gives you a very realistic view of the world’s scenery.
Some examples in this focal range.

48mm focused this frame between the trees. A wider focal length would have added distraction outside of the framed focal point of the waves.

60mm brings me closer to Mt. Moran in this sunrise scene and creating nice symmetry between the mountains and their reflection.

70mm captures the birds and sun rays as the clear main subject of the frame while including the environment around them.

70mm brings the frame closer to the mountains and makes them a more prominent part of the frame than a wide angle
Telephoto
I own both the Nikon 70-200mm and the Sigma 150-600mm. I bought the Sigma more for wildlife and sports, but I also use it for some detailed landscapes.
Focal lengths in the 100+ range allow you to capture details of the landscape that you cannot get close enough to with the wider angles. Such as zooming in on a single mountain in a range, shooting across a body of water, or isolating certain details in a scene.

200mm
The week after Halloween, we got our first big snow. It just so happened I had just been out to the Arboretum the prior week photographing peak fall color. So after the snowfall, I drove through and spotted this incredible scene of seasons colliding. 200mm with my 70-200mm lens allowed me to highlight the detail of these two trees next to each other by filling the frame with the contrast of fall color and snowy branches.

175mm
I used my 70-20mm at 175mm here to isolate the crashing waves in the ocean of the coast of Oahu.

150mm
As the sunset’s golden light hit the Grand Teton, I captured this at 150mm to isolate the light on the Grand complimented by the colorful autumn foliage in the foreground.

550mm
While capturing the sunrise at Oxbow Bend, I noticed the way the light was hitting this beautiful golden tree across the water. I put on my Sigma 150-600mm to isolate the tree against the background of low clouds.
As you can see from the examples above, the best lens & focal length is the one that best captures the beauty speaking to you in that moment. Sometimes it is a wide angle, but other times you need a long focal length to isolate the beauty in the distance.
Hope these examples and thoughts help you to capture all the beauty in front of you at home and in your travels.
Kristen Ryan is a landscape and fine art photographer residing in the Midwest suburbs of Chicago. All images can be purchased in the Fine Art Store. Kristen leads ladies landscape photography retreats in the Tetons, Chicago, and the Canadian Rockies, offers private mentoring and teaches an online landscape photography workshop twice a year.

10 More Tips to Improve Your Landscape Photography
Last week I shared 10 Tips to Improve Your Landscape Photography. I hope it gave you a little inspiration to remember next time you head out to shoot! Today I am sharing 10 MORE tips, plus a bonus tip :)
1. Get out often & early - The more you get out to shoot and practice all of the techniques, the more they will become second nature and your workflow will become fluid. Landscape photography has a variety of creative and technical practices that take frequent practice to become second nature. Getting to your location early allows you to take your time in finding your chosen composition and prevents you from feeling rushed as the light changes.

Sunrise in Oahu, Hawaii
2. Know How to Read Your Histogram - Understanding your histogram and how to adjust settings for the best exposure is so critical to capturing the details throughout the dynamic range. My goal is always to capture detail from the bright highlights to the dark shadows. I aim for my histogram to be as far to the right side as possible without it climbing the right wall.
3. Use a shutter release - A shutter remote is one piece of gear I always have with me. When I use a tripod I always use a shutter release. This will enhance the sharpness of your images and is also useful for shooting long exposures and time lapses.

1.3 seconds of wave action at sunrise in Oahu, Hawaii
4. Invest in good filters - Learn about the various types of filters from polarizers, graduated neutral density filters and regular neutral density filters, and invest in good ones. Polarizers help to cut glare and haze and enhance the vibrance of skies. Graduated neutral density filters cut light in part of the frame to allow you to capture more detailing the shadows without blowing out the highlights. And regular neutral density filters will block light so you can shoot longer exposures for creative effect.

Long exposure of the clouds and water utilizing a 10 stop Neutral Density Filter at Lake Louise, Alberta, Canada
5. Scout out locations - Taking the time to scout out locations for good light and compositions will help you maximize your shooting opportunities when you go during sunrise and sunset. Sometimes the best light and color lasts only mere minutes so making sure you have scoped out the best perspective ahead of time will help you be more successful.
6. Check your frame - Pay attention to what is IN your frame AND OUT of your frame. Examine the edges and consider everything that you include and leave out. Both can be equally important to the viewer’s scan path.
A gorgeous autumn afternoon in Grand Teton National Park
7. Look for leading lines and framing opportunities - Nature has so many lines from trails, shorelines, roads, etc. Use them to lead the viewer’s eye to your main subject. Framing your subject can create depth and impact. I love to look for framing to capture a unique perspective of a frequently photographed location.

Sunrise on a chilly morning on the Chicago Lakefront
8. Less can be more - While many strong landscapes are composed with many elements, sometimes a minimal frame can be just as impactful. Examples of less is more may be an abstract seascape or a simple subject like a tree surrounded by a lot of negative space.

Panning of the Pacific Ocean in Crystal Cove State Park, California
9. Break the rules - There are lots of rules that are rules for a reason, such as using the rule of thirds for composition, not blowing your highlights or clipping your shadows, etc. However, rules are meant to be broken. Know the rules but be willing to break them with intention and creative purpose. For example, not centering your horizon is generally considered a "rule" in landscape photography. But I LOVE a centered horizon

Long Exposure in Grand Teton National Park, Wyoming
10. Maximize foreground interest - Foreground elements are one of the best ways to create depth in your landscape images. Rocks, shells, grasses, flowers, etc. are all great examples of foreground elements. Consider the placement and type of foreground and be intentional. Foreground should add to the frame and lead the eye to the main focal point rather than distract.
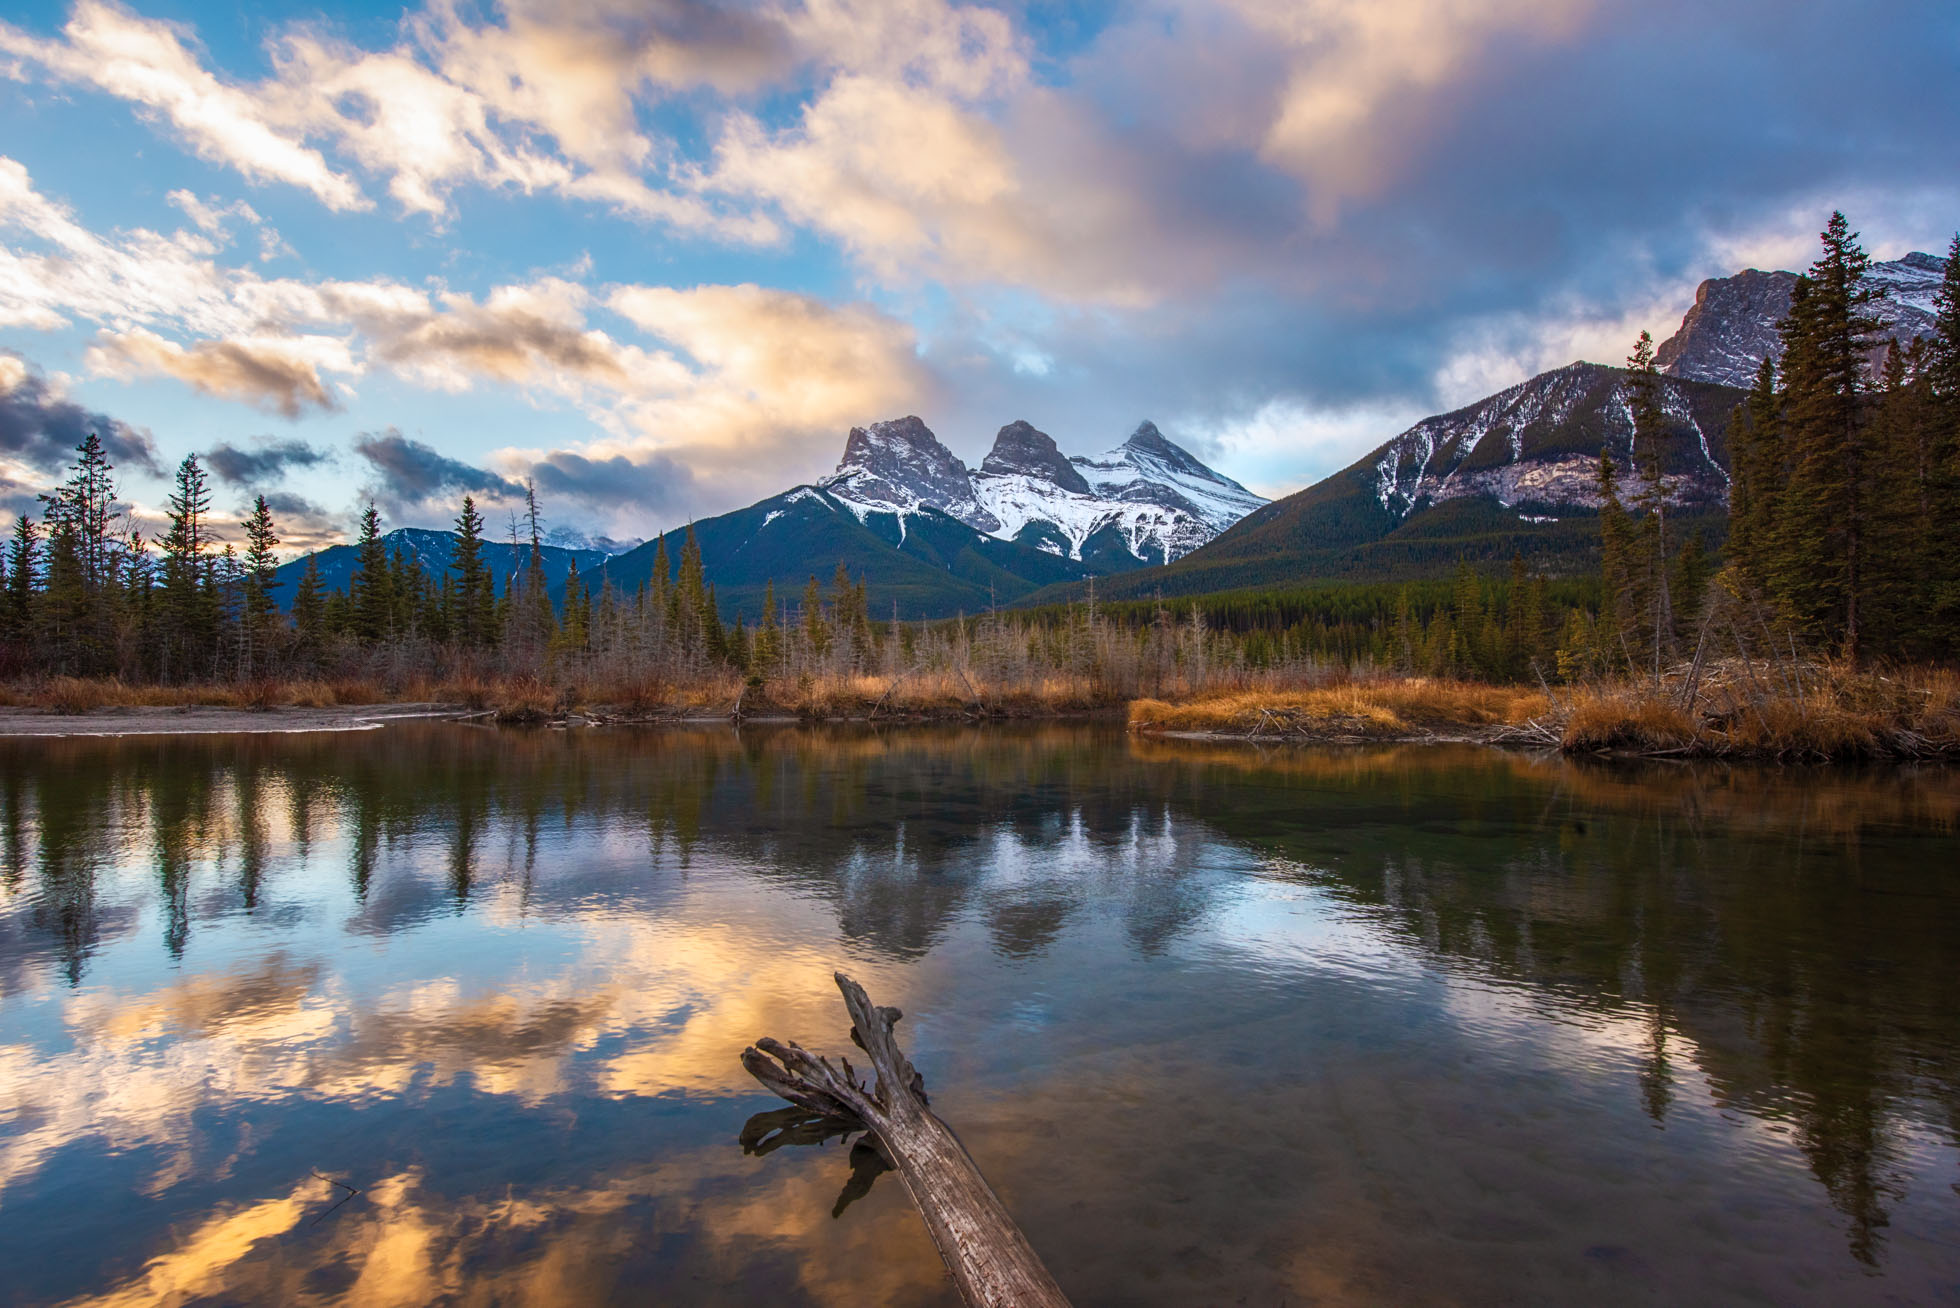
Sunrise at the Three Sisters Reflection Pond in Canmore, Alberta, Canada
BONUS!! #11. Learn from your mistakes & successes -The number one thing that has improved my landscape photography the most is learning from my mistakes and successes while shooting. Every single shoot that I go on, in spending time with my images afterward, I self critique where I made mistakes in exposure, focus and composition. This analysis has helped me to refine my techniques and remember to look for things that I didn’t think to look for when I was first starting out.
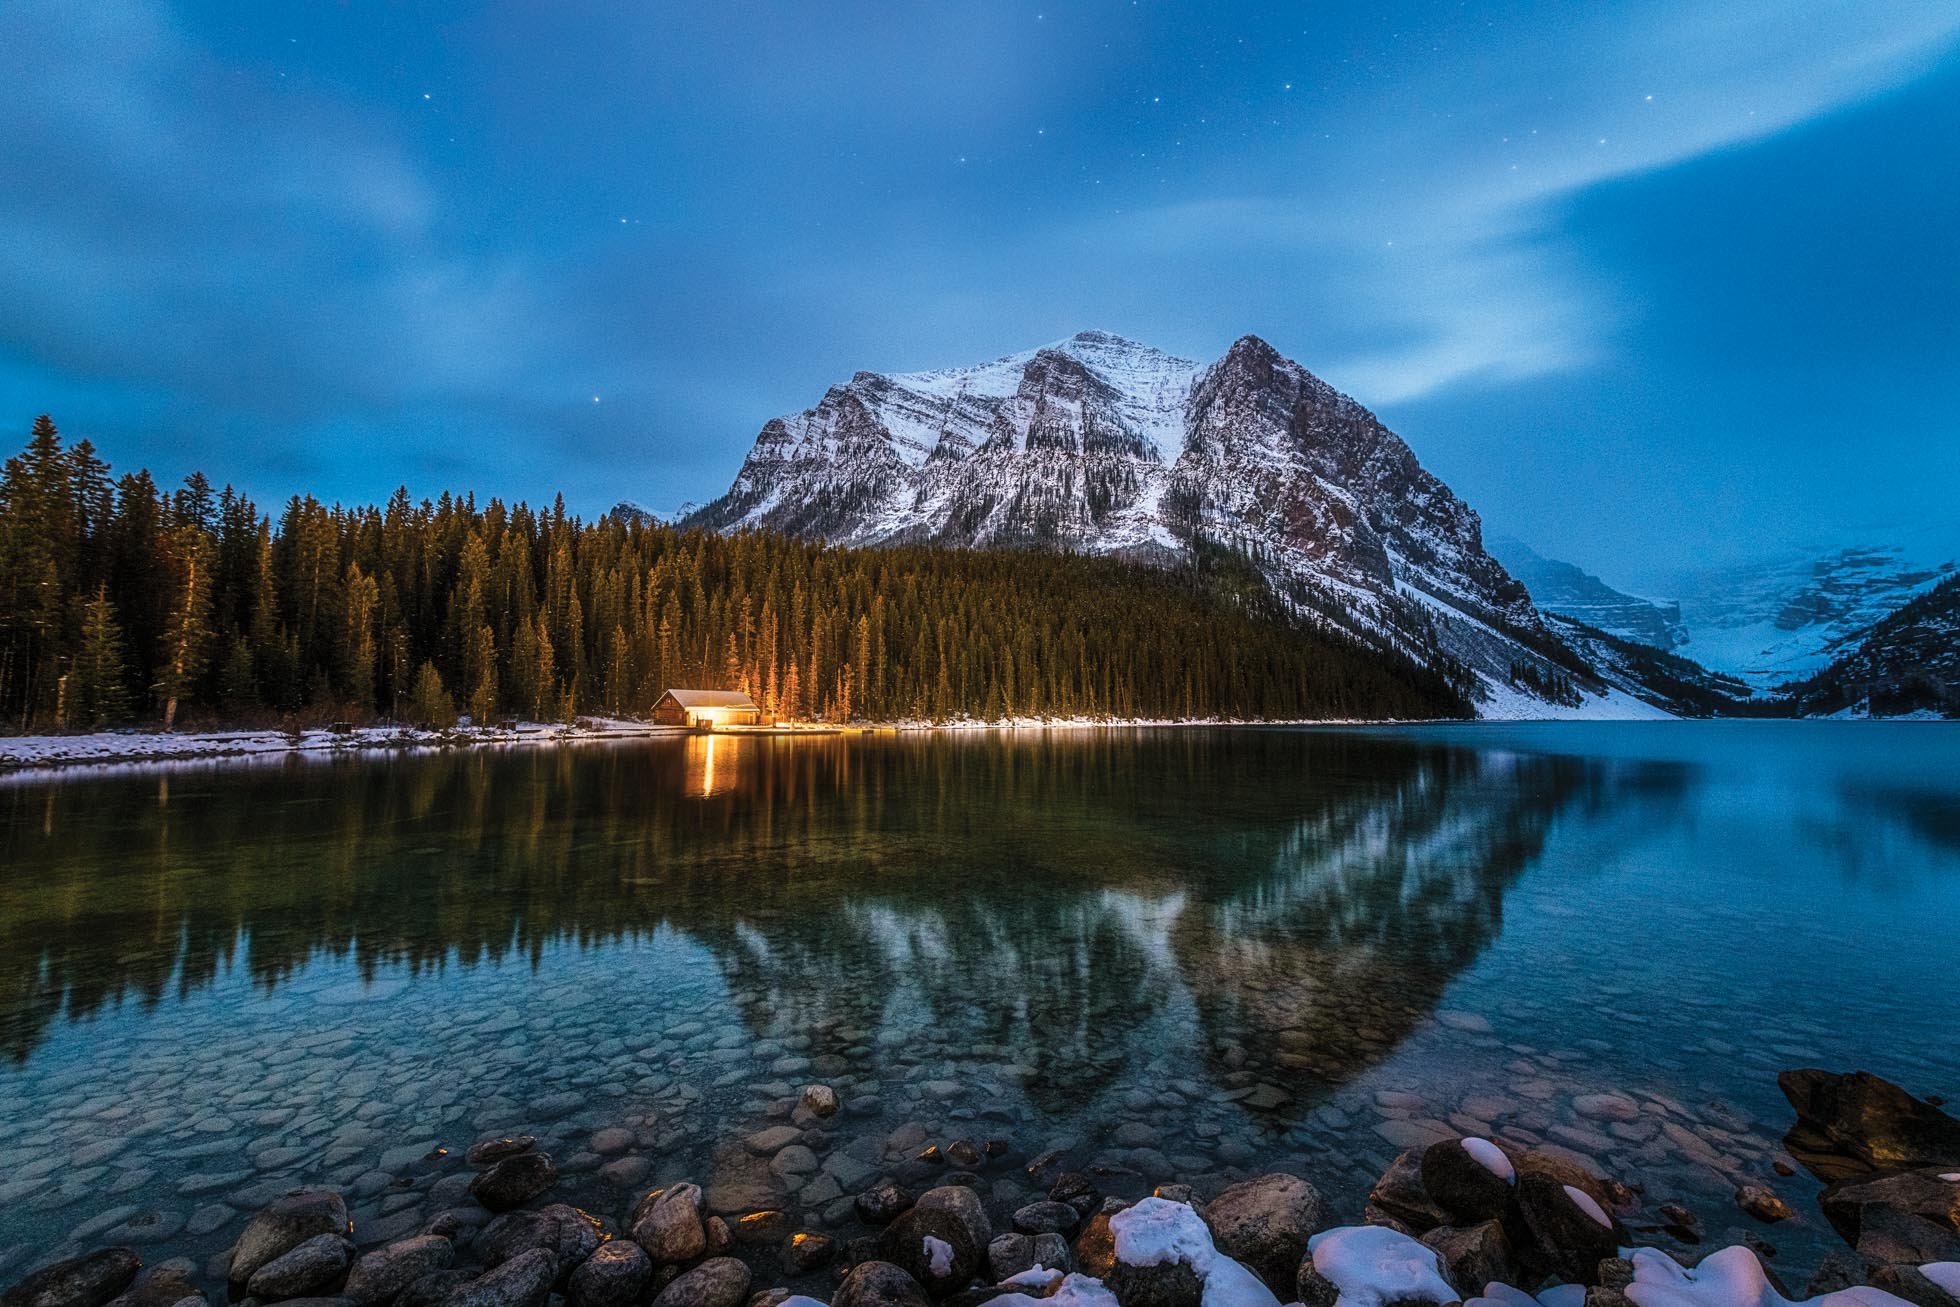
Night capture of Lake Louise boat house in Alberta, Canada. Image is a merge of an exposure for the boat house and another for the rest of the scene.
Kristen Ryan is a landscape and fine art photographer residing in the Midwest suburbs of Chicago. All images can be purchased in the Fine Art Store. Kristen leads ladies landscape photography retreats in the Tetons, Chicago, and the Canadian Rockies, offers private mentoring and teaches an online landscape photography workshop twice a year.

10 Tips to Improve Your Landscape Photography
1. Learn the fundamentals - It is really important to understand all the settings of your camera and have a solid understanding of the exposure triangle and white balance. Having a solid understanding of how to use ISO, aperture and shutter speed will not only create better technical photographs but increase your artistic creativity as well.

2. Buy a great tripod and USE it!
I know no one is excited about another heavy piece of gear to carry but a tripod is one of the best investments you can make in your landscape photography. A tripod will help increase the sharpness of your images by keeping your camera steady. This is especially crucial when bracketing images or using slow shutter speeds. This is such an easy step to achieve in improving your landscape imagery.

This 30 second exposure in the Tetons could not be achieved without a tripod
3. Shoot In RAW
Landscape photography often means shooting in light with a high dynamic range. In order to capture and keep all the details in your image, you want all the information that a RAW file will capture. RAW files are much more forgiving when you make a mistake an underexpose your image. You can often rescue a underexposed image without damaging the image quality with a RAW file, but not with a JPEG.
4. Learn Basic Post Processing
Learn to process those RAW files so that you can bring out the scene you captured. Even the most basic RAW adjustments can go a long way to transforming the straight out of camera file you captured. Lightroom is excellent for cataloging and quick adjustments and is easy to use. Remember that often just some small adjustments are all you need to take an image to that next level.
See BEFORE & AFTER below of the Three Sisters in Canmore, Alberta Canada.
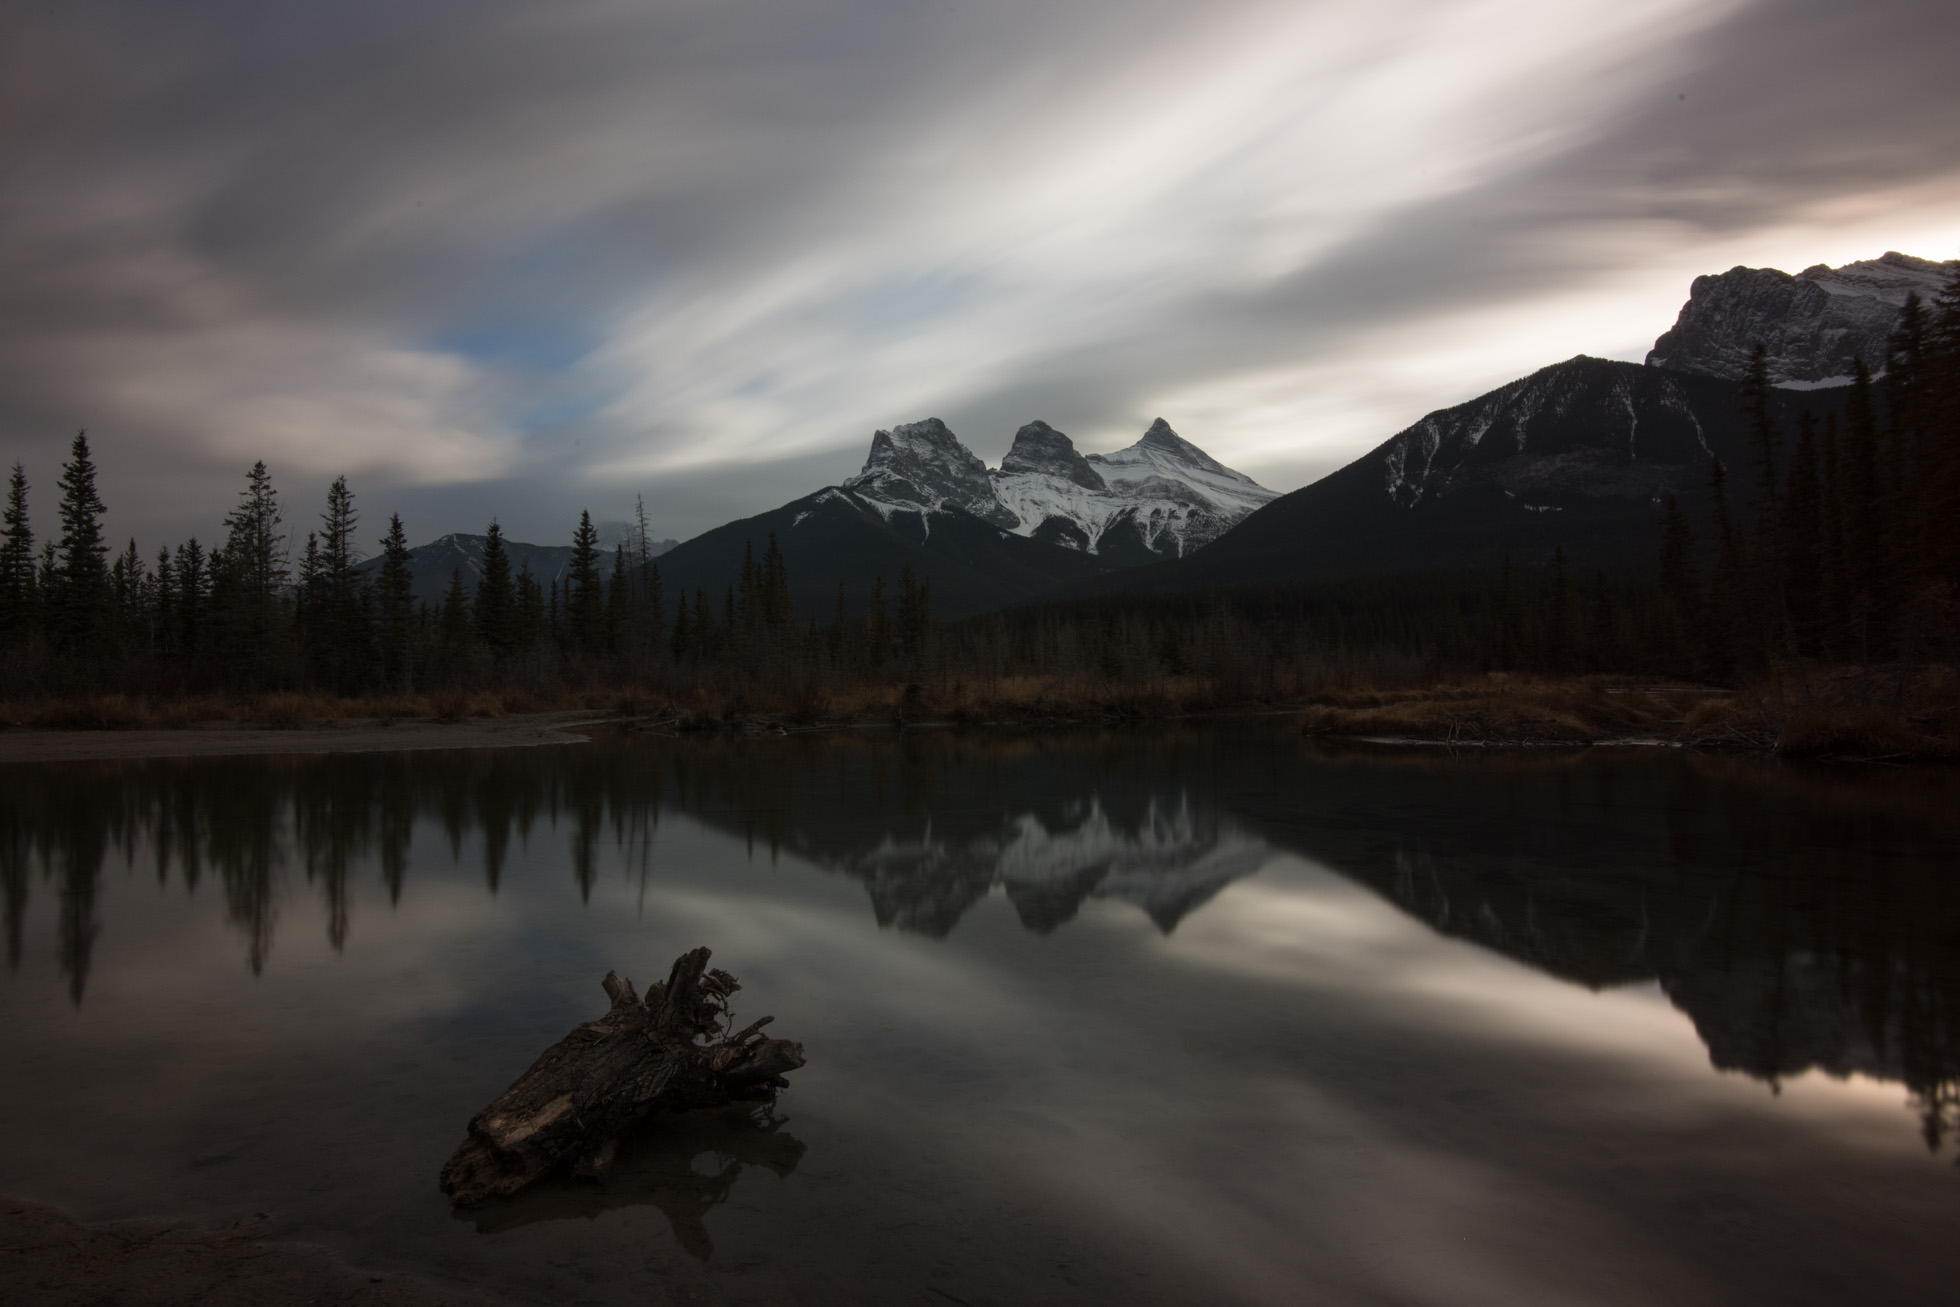
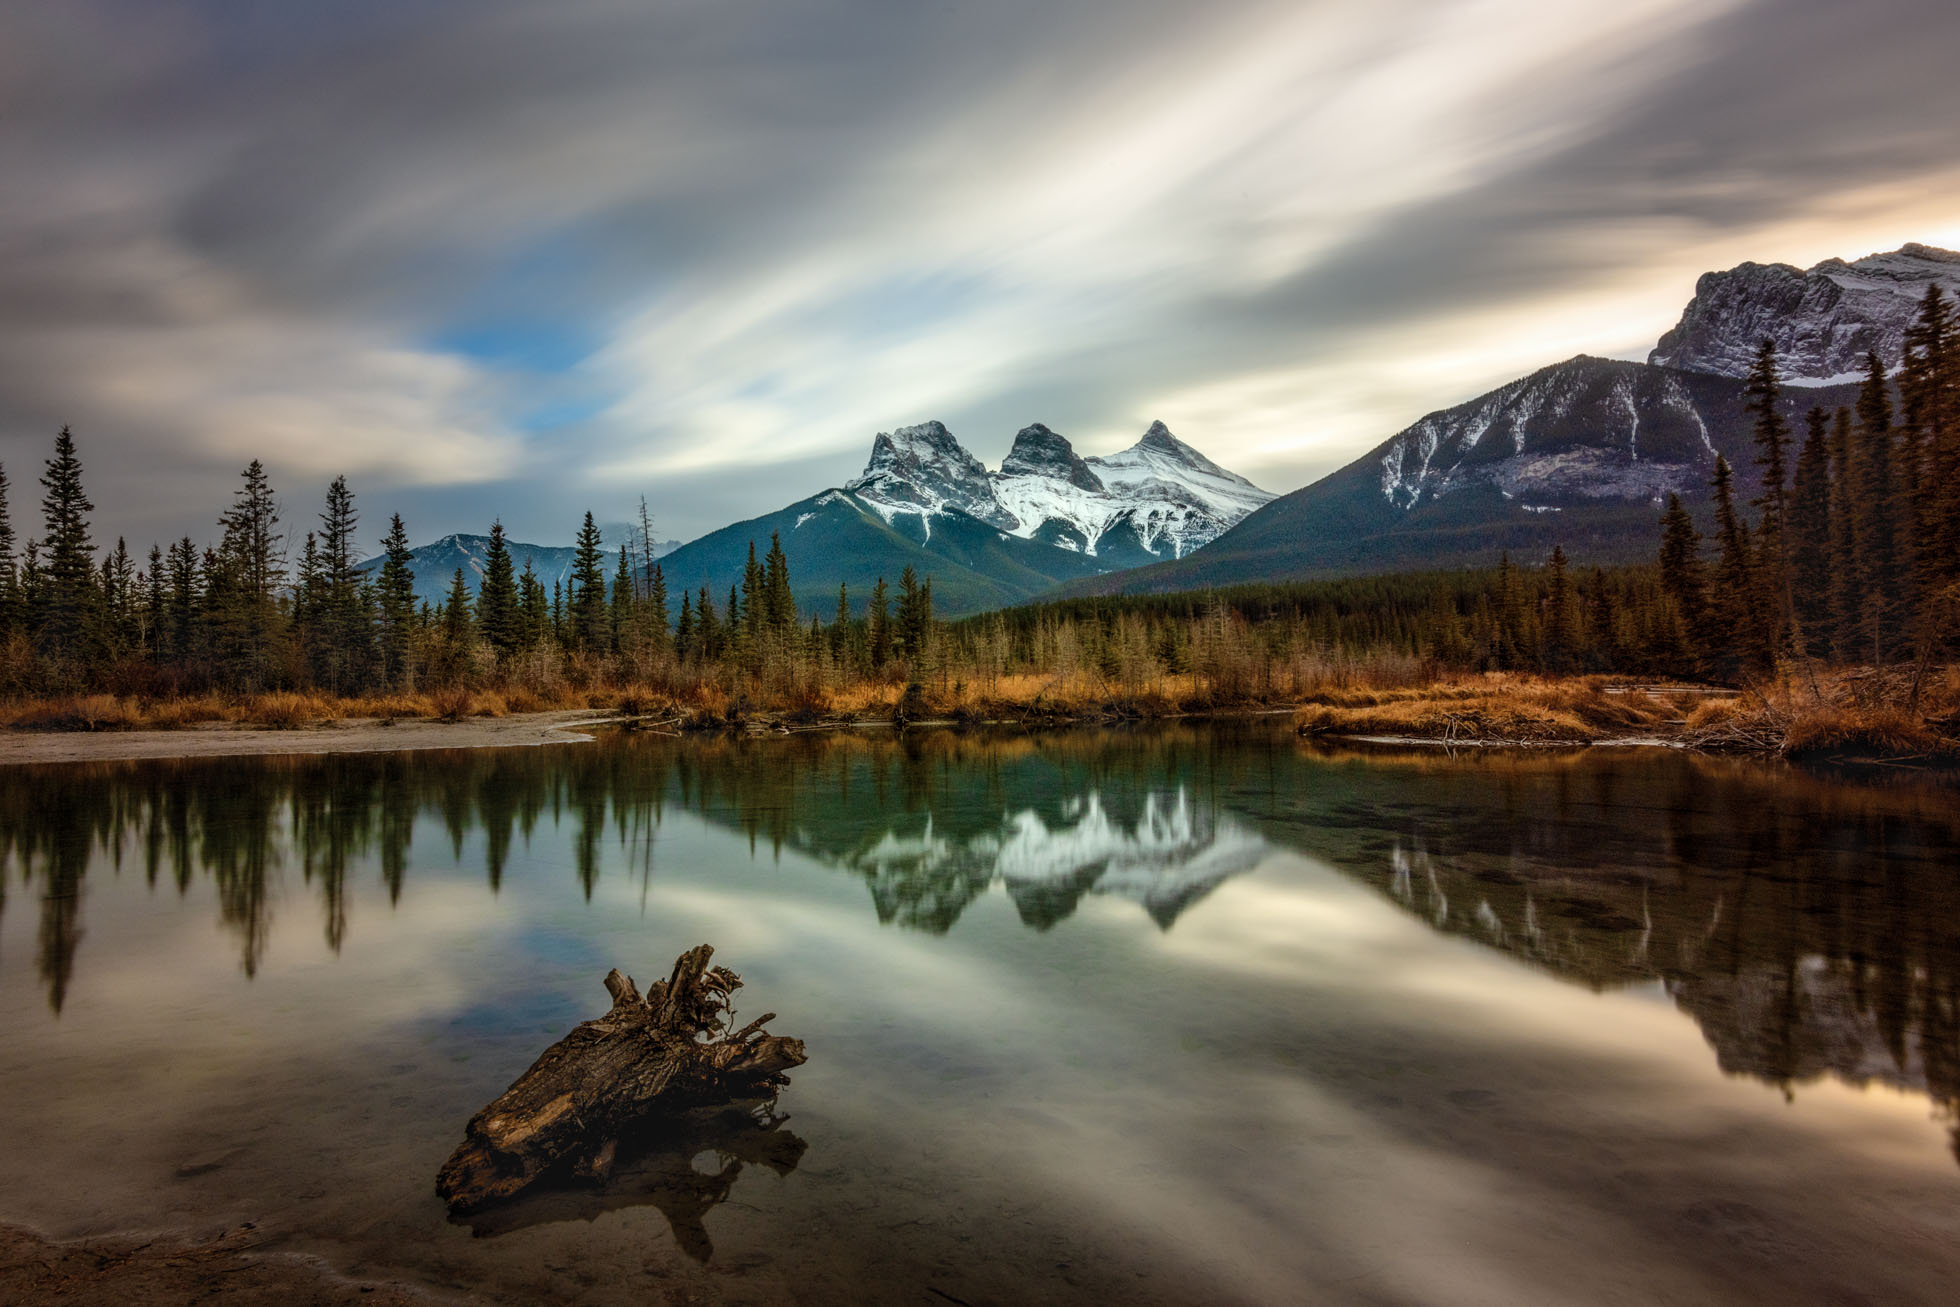
5. Get out in the right light
There is a reason landscape photographers get up early and stay out late. The light at these times will create more compelling and dynamic images. Yes, it is possible to create incredible photographs in the daytime hours, but more often than not, those golden hours into night time will raise the interest in your landscape imagery.
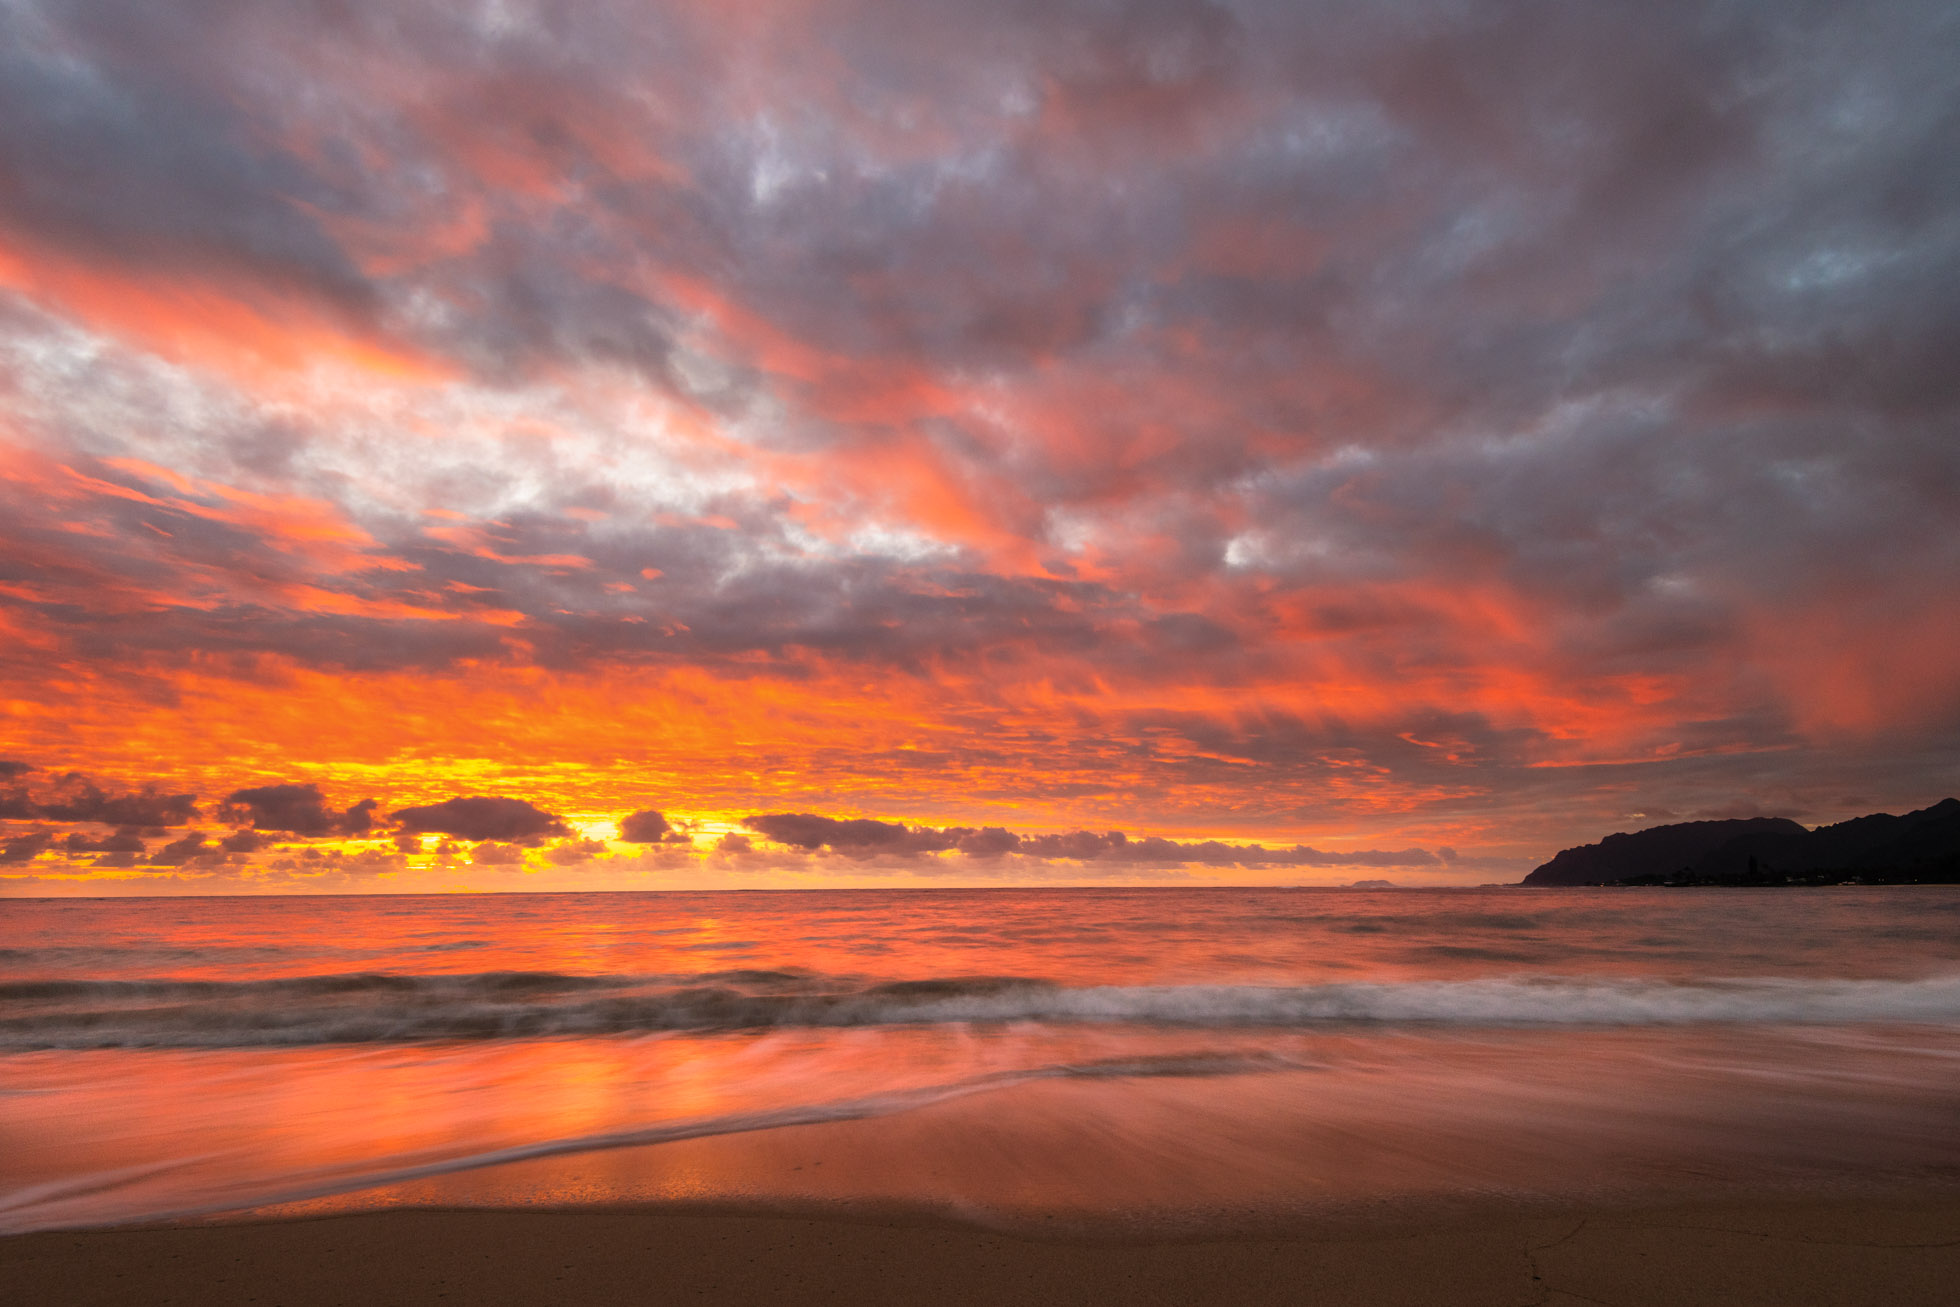
Sunrise in Oahu, Hawaii
6. Experiment with perspective
You got the tripod, set it up, and stay there shooting away, right?! NO! Always vary your perspective. Get high, get low (even if that means taking the camera OFF the tripod), find some framing, look for leading lines and foreground interest. Perhaps there is a perspective that grabs you right away. Capture it. Then move around and find another one.

In this image, I used the ice in the foreground to create depth, a unique perspective and a greater sense of season and story.
7. Be creative with your shutter speed
In landscape photography, creative use of a shutter speed is often what takes an image from pretty to WOW! When photographing water or clouds in particular, a creative shutter speed allows you to put your own artistic spin on a scene that makes it unique. Finding the ‘right’ shutter speed for your vision can be a process but a fun creative experience.

.4 seconds of waves in Oahu, Hawaii
8. Vary your focal length
Often with landscape photography we naturally think the widest angles are best. And often this is true, but not in every case. Sometimes the widest angle will make our subject appear too small in the scene and we need a middle focal length. Other times it is details that draw our eye which can only be captured by a telephoto lens. Many times I try to capture a scene with various focal lengths to create several unique images from the same location. In the grid below the images are focal lengths as follows:
35mm. 70mm
130mm 200mm
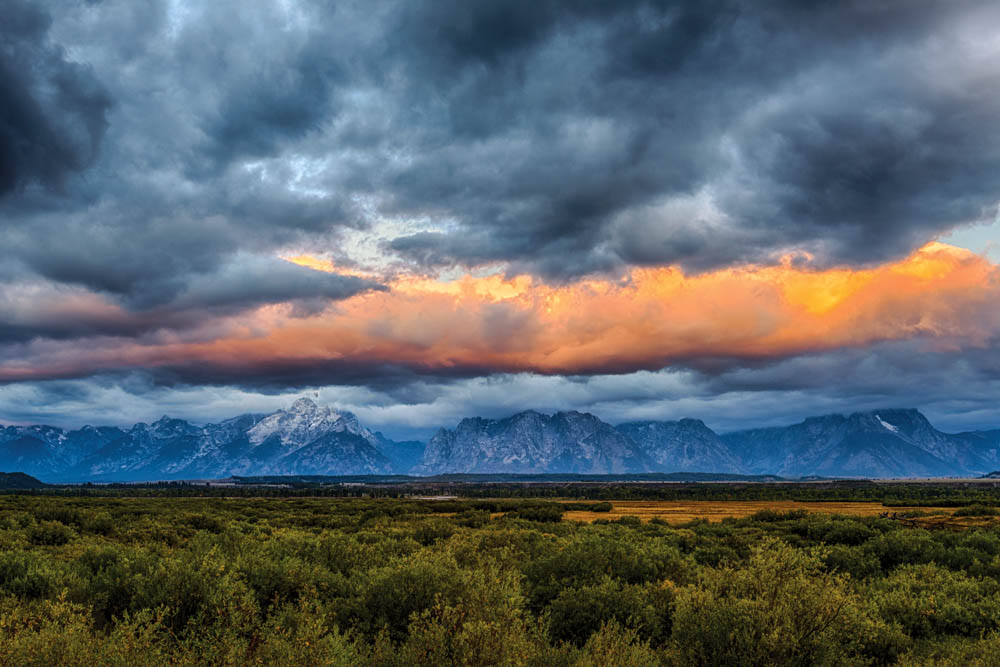
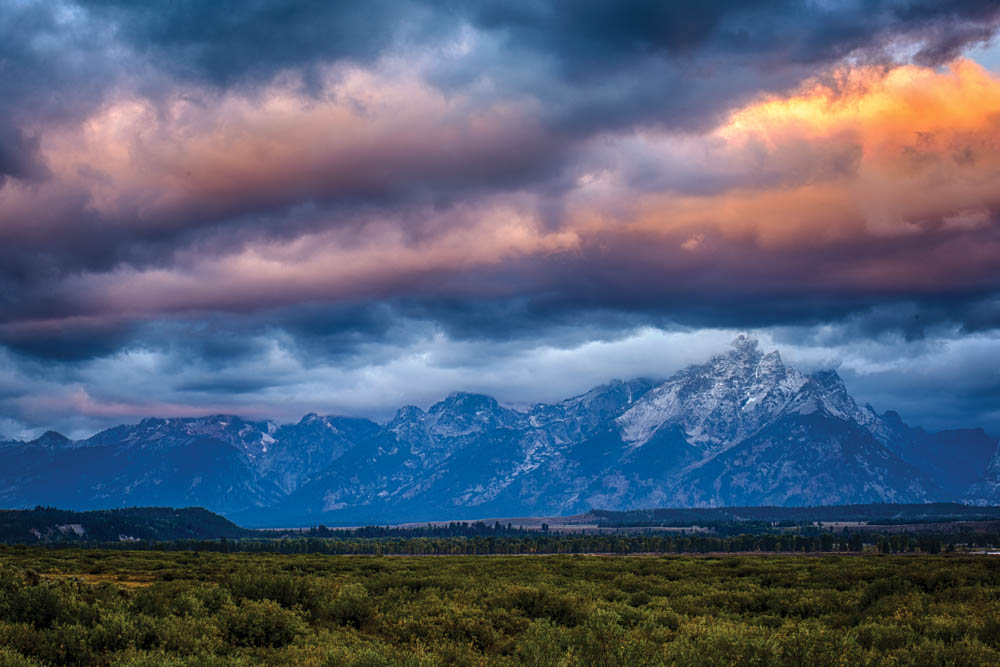
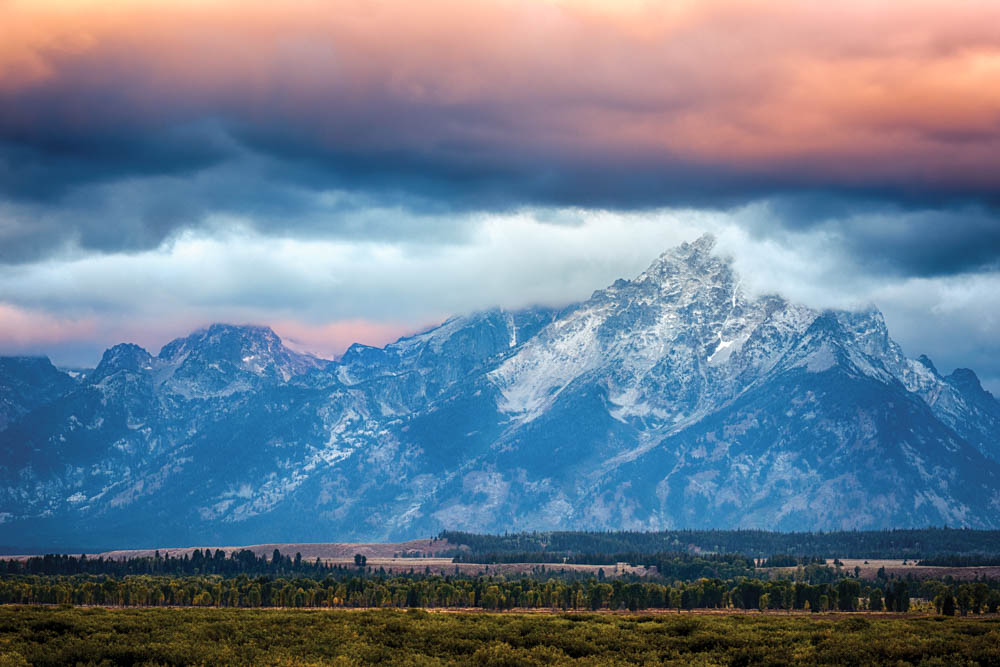
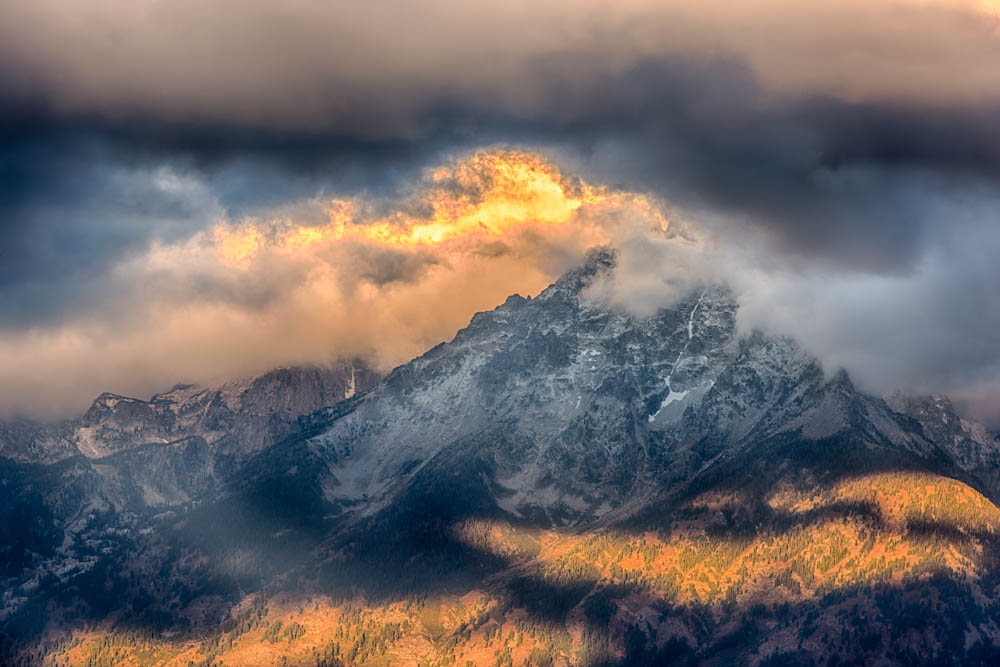
9. Slow Down
Instead of quickly snapping the shutter, slow down and take in the scene in front of you. Consider the light. Thing about what is drawing you to the scene and why. Think about how you are feeling. Look for a unique perspective and take your time setting up the shot.
10. Capture what speaks to you!
In any scene you are capturing, there is something or some number of things that are drawing you to that scene. Perhaps it is the overwhelmingly wide expanse of the land, the way the light is hitting the trees, the curve of a wave, or the formation of the clouds at the tip of a mountain. Hone in on the beauty that is speaking to you and use your tools to capture the scene in a way that highlights those details. Listen to your inner voice and follow it. Always shoot for yourself, to satisfy your own inner artistic voice.
Check back next week for more tips to improve your landscape photography!

A beautiful icy and snowy afternoon in the Midwest
Kristen Ryan is a landscape and fine art photographer residing in the Midwest suburbs of Chicago. All images can be purchased in the Fine Art Store. Kristen leads ladies landscape photography retreats in the Tetons, Chicago, and the Canadian Rockies, offers private mentoring and teaches an online landscape photography workshop twice a year.
Seascape Panning
One of my favorite techniques to play with at the beach is horizontal panning. It is really simple and can create a beautiful dreamy effect of the water, sand, and sky in any combination.
You will want to use a shutter speed between about 2 seconds up to around 1/30 of a second or so. To do this, you’ll need to set your ISO quite low and close down your aperture significantly. If during the day, you may need a Neutral Density Filter to block some light. A 6 stop or 3 stop filter would be best in this situation. A 10 stop filter will be more than you need and just make things harder.
You can use a tripod or shoot handheld. A tripod may keep you steadier horizontally but handheld works too so definitely don’t hesitate to try this without a tripod. In either case, you’ll want to frame your shot and focus on your scene and then after you press the shutter, or AS you press the shutter with the faster shutter speeds, just pan the camera to the right. When I shoot handheld I hold my arms close to my body and just turn my body to keep steady. If shooting around 1/30 of a second, you’ll need to move quicker to get the effect. With a second or two you can go slower as you have more time.
Sometimes it helps to start moving and then press the shutter, or you can also try putting your camera on continuous mode and as you twist your body press the shutter and let it take several shots as you move left to right.
The fun thing is that you get a slightly different effect each time. You may get a bunch you don’t like along with one or two that you really love. The painterly effect is subjective so choose the ones that YOU love!
Have questions, feel free to reach out!


Looking for a 6 stop filter to help you reduce the shutter speed? Check out Maven Filters. * I always have a 6 stop in my bag for capturing this effect and others!
Kristen Ryan is a fine art landscape photographer from the suburbs of Chicago. You can purchase prints in the Fine Art store or contact her for custom orders. She teaches an online landscape photography workshop, “The World Around You” and hosts in person ladies’ landscape photography retreats.

