Welcome to my blog! Thank you for clicking into my little corner of the online world where I share my landscape passion through my images and tips for other landscape photographers! Sign up for my newsletter and get your free ebook with 25 Tips for Impactful Landscape Photography.
Links to Check Out!
Looking for filters to add to your creativity? Check out MAVEN FILTERS!
Listen to my podcast episode with Jen Ritchie on Wildlife Conversations or watch on YouTube HERE.
Listen to my episode HERE with Austin James Jackson on his podcast, Master the Moment.
Listen to my episode on the Landscape Photography World podcast, hosted by Grant Swinbourne.
Listen to my conversation with Brenda Patrella on the Outdoor Photography Podcast from October 4, 2022
Check out my podcast episode over on InFocus Women - with Sarina Jackson and Steph Vella
Listen to my conversation with Allison Jacobs on “The Creative Frame” podcast.
Read Kristen’s article, “The Allure of Nature”, in the December, 2020 issue of Outdoor Photographer.
Listen to Kristen & Matt Payne’s conversation on the F Stop Collaborate & Listen podcast aired January 6, 2021.


6 Tips for Capturing Winter's Beauty Part 2
Last week I shared some tips for preparing your camera gear and clothing to survive the cold while shooting in the winter landscape. If you don’t prepare well enough, the shooting adventures are likely to be cut short due to cold and discomfort!
Now that you are well equipped to manage the cold and snow, I have some tips for photographing the winter beauty! There is the most magical feeling that comes with fresh fallen snow or beautiful hoar frost covering the trees and grasses. Winter landscapes are some of my most favorite scenes to photograph.

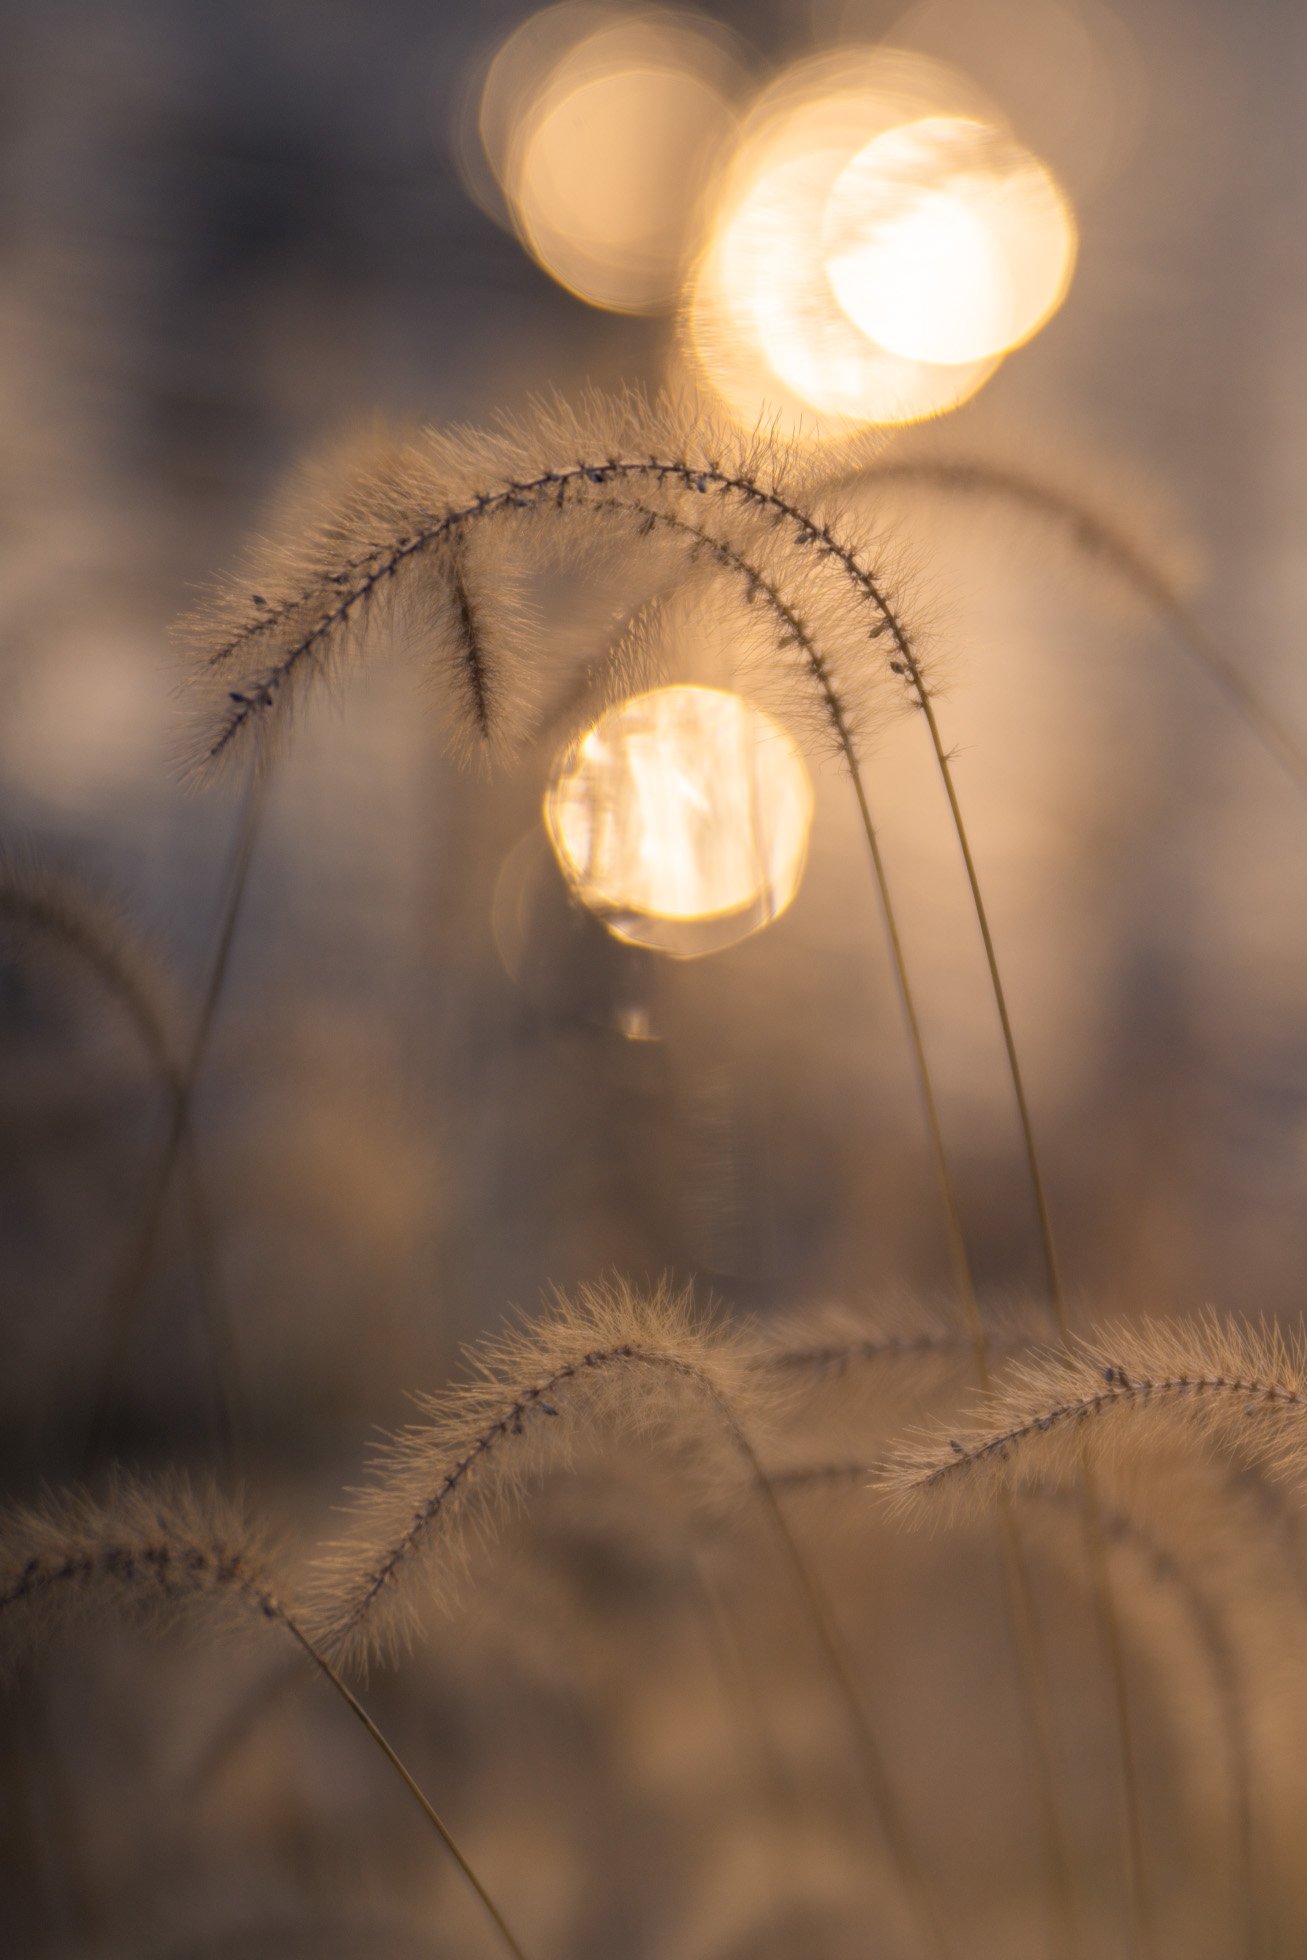
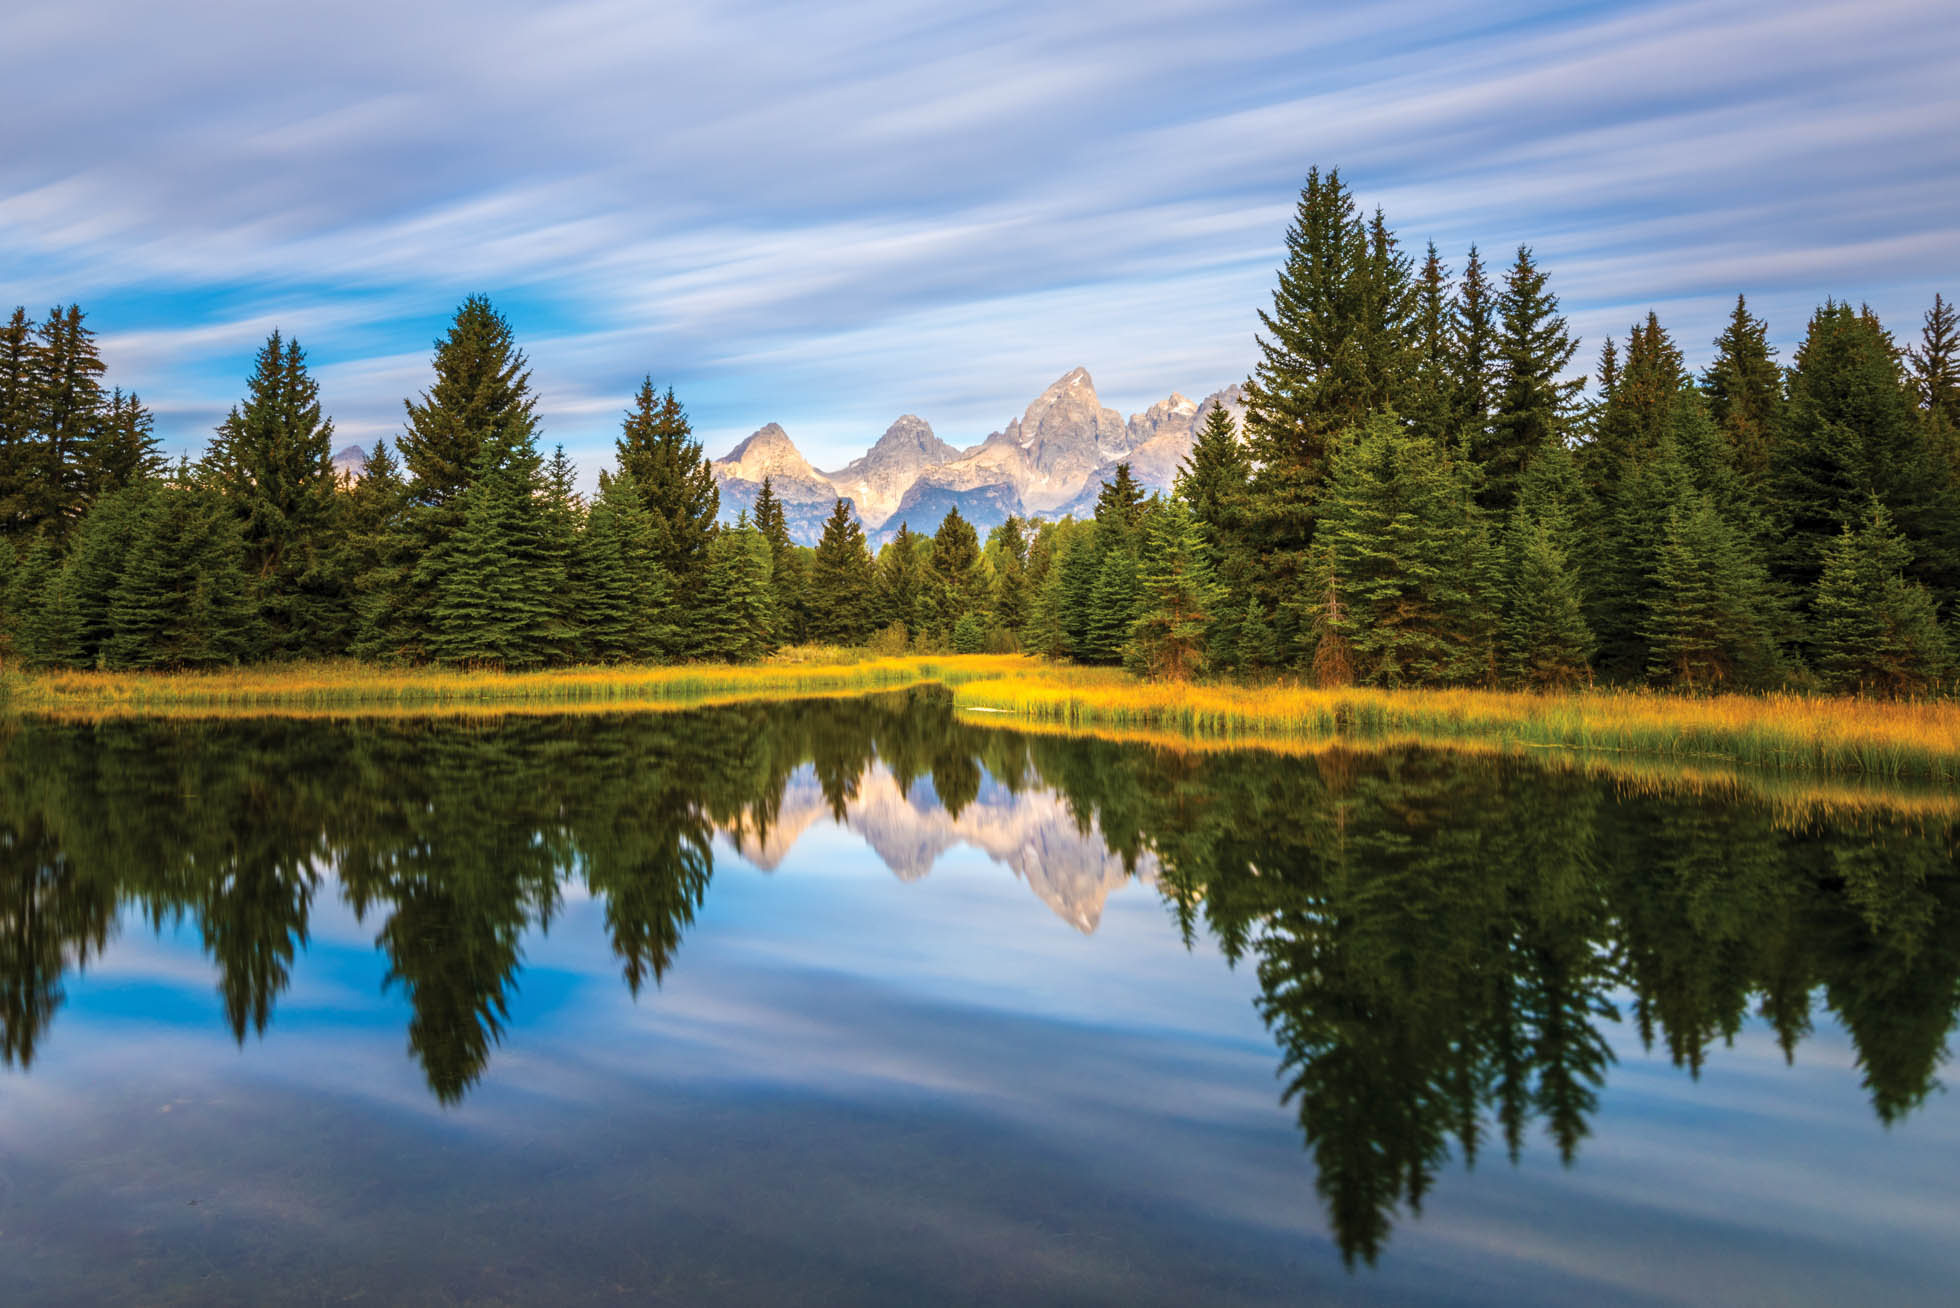
Falling snow in Grand Teton National Park
1 - Exposure - As always, I recommend watching your histogram to make sure not to blow out the highlights of the scene to keep texture and detail in the snow. I always look to expose snowy scenes a little bit brighter than my camera tells me to. Exposing at zero, your camera will make the snow look more gray instead of white. I always look to expose snow about +1 to +1 2/3 stops. You can do this manually or by using exposure compensation if you shoot in aperture mode. One easy way to ensure a great exposure is to bracket three exposures at 0, +1, and -1. Again, keep an eye on your histogram to expose to the right without letting it climb the right wall.
2- White Balance - While snow is white, it won’t always appear pure white in a photograph or in real life. Snow reflects the colors and light of a scene. In very low light, the shadows will be quite cool and the snow will have a bluish hue to it. However, in warm sunrise, sunset or golden hour light, the snow may reflect golden, orange, or pink tones. You may want to choose a white balance that enhances these colors or you may want to choose a white balance that neutralizes them somewhat. You’ll likely want to choose a white balance that is representative of the scene and helps to enhance the mood and atmosphere of that moment you clicked the shutter. Unless you are shooting a warm sunrise or sunset, a cooler white balance will typically bring out the cool mood of a winter scene. Using live view when adjusting your white balance can help you see whether you are capturing accurate colors and achieving the mood you envision.

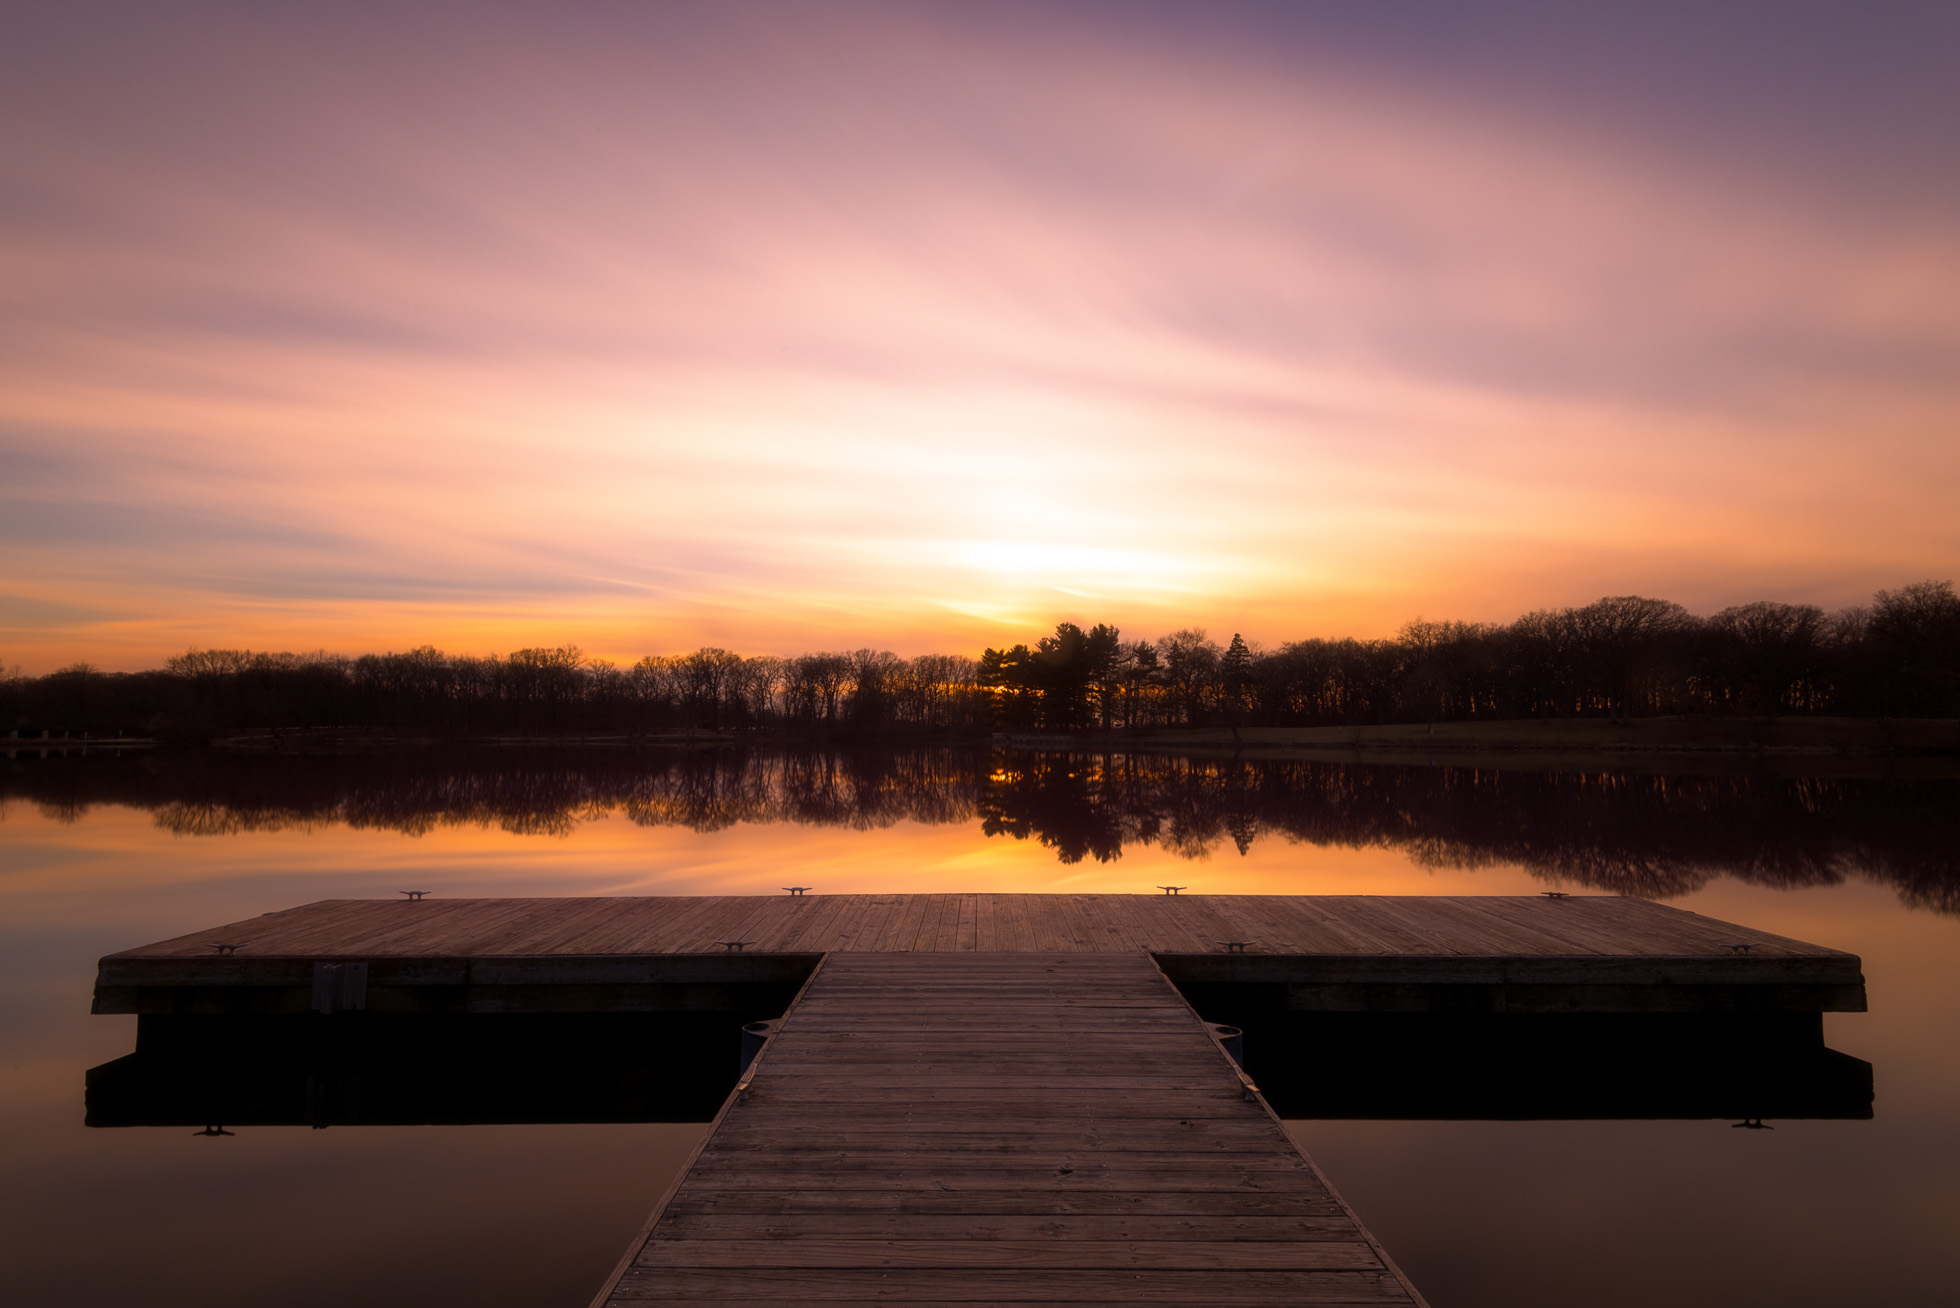
Winter Suburban Sunset
3 - Take Advantage of Falling Snow - Even better than fresh fallen snow is snow that is FALLING!! There is something incredibly magical about a landscape captured with snowflakes falling all around. So grab all your protective gear to keep your camera weather proofed and head out to capture the atmosphere.
4- Get Out When the Snow is Fresh - Whenever possible, head out to capture a fresh fallen snow as early as possible. The earlier you get out, the fluffier the new snow and the less car tracks or footprints will have been made in the snow. Additionally, when you consider your composition, avoid walking around aimlessly as you may end up wanting a composition that includes all the tracks YOU just made!

5 - Avoid Condensation & Moisture in Your Gear - Whenever you can, try to avoid changing your lens out in the cold and wet weather. This will minimize any moisture or condensation getting inside the camera. If you have more than one camera body, you could consider choosing a wide angle lens for one body and a telephoto lens for the second. Additionally, while I have never had trouble with my camera having condensation coming in from the cold, placing it in a sealed ziplock bag as it comes to warmer temperatures is recommended.
6 - Pack a Towel - It’s a great idea to keep a towel in your camera bag in case any of your gear does get wet. Choose something soft like a microfiber towel to dry off your gear.
Hope these are helpful tips to add to your winter shooting! Part 3 coming next week! Do you have a favorite winter shooting tip? Tell me in the comments.
Happy Shooting!
Kristen Ryan is an award winning and published landscape and fine art photographer and educator residing in the Midwest suburbs of Chicago. All images are available for purchase in the Fine Art Store or by request. Kristen leads ladies landscape photography retreats in the Tetons, Chicago, and the Canadian Rockies, offers private mentoring and teaches an online landscape photography workshop, The World Around You.
5 Tips for Shooting in Overcast Weather
It’s no secret that I love clouds, as most landscape photographers do. Clouds make a sky far more interesting than a clear blue sky. They create mood and atmosphere. But sometimes the clouds are so thick that the sky becomes gray and overcast, which is not any more interesting than a clear blue sky. What do you do in those situations? I suppose if you are home, you can just sit that one out and spend your day editing or engaging in life outside of photography. But when it happens during a long awaited trip to a dream destination, you want to make the best of it. So here are a few ideas of how to embrace that overcast light.
1) Seek Out Waterfalls or Other Moving Water ~ Overcast light is the perfect time to shoot waterfalls, rivers, or streams. Grab your 6 stop Neutral Density Filter and play with shutter speed and long exposures . The soft, overcast light helps to shrink the dynamic range and eliminates the dappled light and harsh shadows that come with bright sunlight. Bonus in the autumn, overcast light lets you bring out the fall colors without the harsh highlights.

2) Experiment with Slow Shutter and Panning ~ Experimenting with tree panning is a perfect activity for an overcast day. Panning can be done in any light, but in softer light, it will be easier to get a slower shutter speed and avoid bright highlights that come in full sun.

3) Fill the Frame ~ Look for some beautiful details in the foreground and fill your frame with them. For example, maybe a mix of fall colors in the foliage or fog floating through the trees. I often use a longer focal length for this kind of shooting.

4) Minimize the Sky in the Frame ~ If the sky is not adding interest to the scene, make the foreground the majority of the frame. Place the horizon or tops of trees, mountains or hills near the upper line of the Rule of Thirds or even higher. Typically in these situations I will use a mid focal length or longer focal length rather than my wide angle.

5) Underexpose the Sky ~ Sometimes the sky is a pure gray or white blanket over the scene, but other times you might be able to see some texture in the clouds. If you see texture, you can work with it in post processing. By underexposing, you capture more sky detail and can edit to create some moody atmosphere.

So next time the clouds got you down, remember these tips and get creative. There is always some beauty to be found!
Kristen Ryan is an award winning and published landscape and fine art photographer and educator residing in the Midwest suburbs of Chicago. All images are available for purchase in the Fine Art Store or by request. Kristen leads ladies landscape photography retreats in the Tetons, Chicago, and the Canadian Rockies, offers private mentoring and teaches an online landscape photography workshop.
7 Tips for a Great Sunburst
One of my very favorite techniques for adding drama and impact to landscape images is creating a sunburst when the sun is in the frame. Sunbursts introduce added interest to any frame and are especially fun to add in when you have a completely clear sky.
A starburst of the sun happens as a result of diffraction. Light goes into the small opening of a narrow aperture of our camera and is then bent around the edges of the blades. This disperses the light rays into a starburst.

Here are some tips and thoughts to think about as you capture sunbursts in your shooting!
1) Choose A Wide Angle Lens - Wider focal lengths will produce more rays in the starburst so your best bet will be a focal length in the 14-35mm range. This is not to say you cannot capture a sunburst with a longer lens, but the wider angles are ideal. Keep in mind that regardless of focal length, different lenses create different looking sunbursts. For example, my Nikon 14-24mm lens produces a bit of a circular flare starburst at 14mm (image below) which is different from my Nikon 16-35mm lens at 16mm. (image above) Experiment with your lenses and focal lengths to see which one produces your favorite burst!

2) Close Down Your Aperture - Closing down the aperture will produce more distinctive rays in the sunburst. It is possible to get a sunburst with an aperture wider than f/16 but f/16 or f/18 are my top choices for a great sunburst.
3) Sky Matters - The best conditions for a good sunburst will be a patch of clear sky for a bright and sharp sunburst! Trying to create a starburst through a thin layer of hazy clouds is like banging your head against a wall. When the sky has some thicker clouds amongst clear sky, when the sun hits the clouds, this can create nice potential for a burst of rays into the sky and over the clouds.
4) Consider the Position of the Sun - When the sun is in the middle of a clear blue sky, a nice sunburst can be achieved. Other times, the best sunbursts are created as the sun hits another object, such as a mountain top, horizon, building, tree, etc. This helps the rays to disperse over the object the sun is hitting. This can require patience waiting for the sun to rise or set to the position desired. And sometimes it can require a little movement on your part to line things up.


When shooting sunbursts through trees, even slight shifts in position can help create a better or more distinct sunburst.
5) Expose for the Highlights - One of the keys to getting a great sunburst with distinct rays is to be sure that the highlights are well contained. Ideally, it is best to avoid blowing any of the sun highlights except for the circle of the sun. Exposing for the bright sun does mean that the overall image is somewhat underexposed and the shadows will be quite dark.
6) Bracket Exposures - Following #5’s tip for exposing for the highlights to get a great sunburst, consider bracketing your exposures and also taking an image exposed for the shadows and one for the midtones. Then combine them in post processing so you have detail in the full tonal range of the scene. You can bracket manually or program the camera to automatically take several images at different exposures.

7) Consider Your Position - As mentioned in tip #4, both the position of the sun and your position matter for creating a strong sunburst. Another thing that is impacted by your position is additional flare. Shooting into the sun can bring creative and desirable flare but it can also create unwanted and distracting flare. Look for this unwanted flare as you shoot and in your test shots and consider shifting your position. Sometimes minor adjustments in your position can remove unwanted flare or position it better in the frame where it is less distracting or more easily cloned out. A lens hood can also be a useful tool to avoid unwanted flare. Though sometimes nothing avoids it completely.

Kristen Ryan is a landscape and fine art photographer residing in the Midwest suburbs of Chicago. All images can be purchased in the Fine Art Store. Kristen leads ladies landscape photography retreats in the Tetons, Chicago, and the Canadian Rockies, offers private mentoring and teaches an online landscape photography workshop twice a year.
8 Tips for Landscape Photography on Family Vacations
If school isn’t out where you live, then it is likely starting to wrap up! Summer is finally here and this is a popular time for family vacations. Long, carefree days and so many options for travel in weather that encourages outdoor activities.
One question I am often asked is how I am able to capture landscapes when traveling with my family. So I thought I’d share some of my thoughts and tips as summer vacation preparation is upon us!

1. Have Realistic Expectations! A family vacation is just that, a ‘family vacation’ not a ‘photography vacation’. On a photography trip, we can chase the light to our heart’s content and make that the number one priority. On a FAMILY vacation, our loved ones and our family experience is the top priority. If you have a love for landscape photography like I do, I do not think it is unrealistic to take a little time for yourself to shoot and fulfill the creative need, just like a runner is filled up by a daily run. And if you are traveling somewhere beautiful, you will want to capture some of those scenes. But you won’t get every sunrise, sunset and top photographic location. I come home with images I love, and many in good light, but I do not explore in the way I would on a photography trip. Going into the trip with unrealistic ideas just creates disappointment and that is not what you want for your experience with the people you love.
2. Ask Locals for Tips and/or Research Top Photo Ops - Before you go, research your destination’s top photographic spots! If you are visiting for a short time, you will want to know the hot spots ahead of time. Choose the ones that are reasonable to get to for sunrise or some that would be fun for the family to explore. In addition to Google, ask some locals for tips. This may be local photographers or even hotel or restaurant employees.

3. Get Up For Sunrise - This is one of my top tips! Sunrise is one of the most beautiful and peaceful times of day. Even when I visit a very populated location, sunrise not only has some of the best light of the day, but it also is a time I can experience the beauty of nature with the fewest other people around, often completely by myself. My family also likes to sleep in so I am able to sneak out for an hour or two in the morning before they are ready for the day. I get my landscape fix and start the day in a positive way without my photography taking away from family time.

4. Scout locations While Exploring during the Daytime - As you and your family explore, consider if any of the locations would be great spots to come back to for sunrise or sunset (if opportunity allows). Always look for spectacular views, interesting lines, foreground and framing elements.
5. Include Your People in the Frame - Landscapes are not always void of people and quite often including a human element in the frame can enhance the strength and impact of your image. The human element can create a great sense of scale and a stronger story. Including your own loved ones in your images adds more meaning and sense of experience for you as well.

6. Keep Your Camera With You Often - When it is convenient and makes sense, keep your camera with a versatile lens (24-70, or 24-105 would be my top picks) around your neck during your exploring so you can capture those special moments or gorgeous views as you come upon them. Unless you are shooting long exposures or in low light, a tripod isn’t necessary to capture gorgeous images and memories.
7. Get in the Frame - This tip is not necessarily landscape related, though could be. Adding yourself into the landscape is also a great way to add impact to your images. But take the opportunity to set your camera on a tripod and capture yourself with your family. You’ll never regret doing it, but you very well may regret it if you don’t.

My handsome husband and I in Oahu
8. Let it Go & Enjoy! - Sometimes it is just best to put the camera down and enjoy your family and the experience. The creative process can take a lot of energy at times, and sometimes it is just best to let it go and give all that energy to just enjoying your loved ones. It is just an image after all. The people in your life are worth so much more.

My four favorite little people
BONUS TIP #9: Plan a trip FOR your photography! Sign up for a workshop or retreat or plan a trip for yourself where you can go and make chasing the light and top locations your number one priority. Gifting yourself this opportunity is truly invaluable. And when you know you will get this dedicated creative time, it is easier to miss out on opportunities when you travel with non-photographers.
Where will you be traveling this summer? I’d love to hear about it in the comments :)
Kristen Ryan is a landscape and fine art photographer residing in the Midwest suburbs of Chicago. All images can be purchased in the Fine Art Store. Kristen leads ladies landscape photography retreats in the Tetons, Chicago, and the Canadian Rockies, offers private mentoring and teaches an online landscape photography workshop twice a year.


Best Lenses for Landscape Photography
Are you wondering what lens is the best choice for landscape photography? I often get asked by my online students and retreat attendees what lens is best for landscape photography and which lens is my favorite. The simple answer is that my favorite lens/focal length is the one that best captures my vision of the image I am seeing in the moment.
The more in depth answer is that there really isn’t a SINGLE best lens for landscapes. It depends very much on the particular location. Sometimes you may need an ultra wide angle to get the entire scene in the frame or the sky is so amazing you want to include as much of it as you can. Other times, you want to hone in on a smaller portion of the scene; just the part that is grabbing your eye. And sometimes you really need reach to grab detail that you cannot get with anything other than a telephoto.
So, what’s the best lens? There isn’t ONE. However, I will give you some thoughts and examples of the several lenses I use and then you can see how these lenses would help you in the areas you photograph.
First off though….zoom or primes? Prime lenses are sharp and fast and will capture high quality images. However, as a photographer with a landscape focus, I am partial to zoom lenses in most circumstances. The reason being that it is not as easy to just ‘move your feet’ to get a different angle in most cases. I often need to zoom ‘out’ or zoom ‘in’ to change the frame. This also allows me to set up on a tripod and get various compositions from one location.
Ultra wide angle
I shoot with both the Nikon 14-24mm, the Nikon 16-35mm, and the Sigma 14mm f/1.8. I also have a 16-35mm for my Sony a7rii. All are fantastic lenses and I know from friends that the Canon 16-35mm f/2.8 is also an amazing lens.
These focal lengths will allow you to really showcase the expanse of the world. Imagine an endless sky, spanning view of mountains, or endless stars at night. The ultra wide angle is your best friend in these situations. If you love sunbursts, a wide angle lens will also give you the most amazing sunbursts!
The ultra wide angle is often my favorite. I love taking in the wide expanse of the world and very often, only the widest angles will truly capture that magic.

16mm was necessary to capture this wide scene of the Chicago Skyline to include the golden morning sunlight shining in from the left.

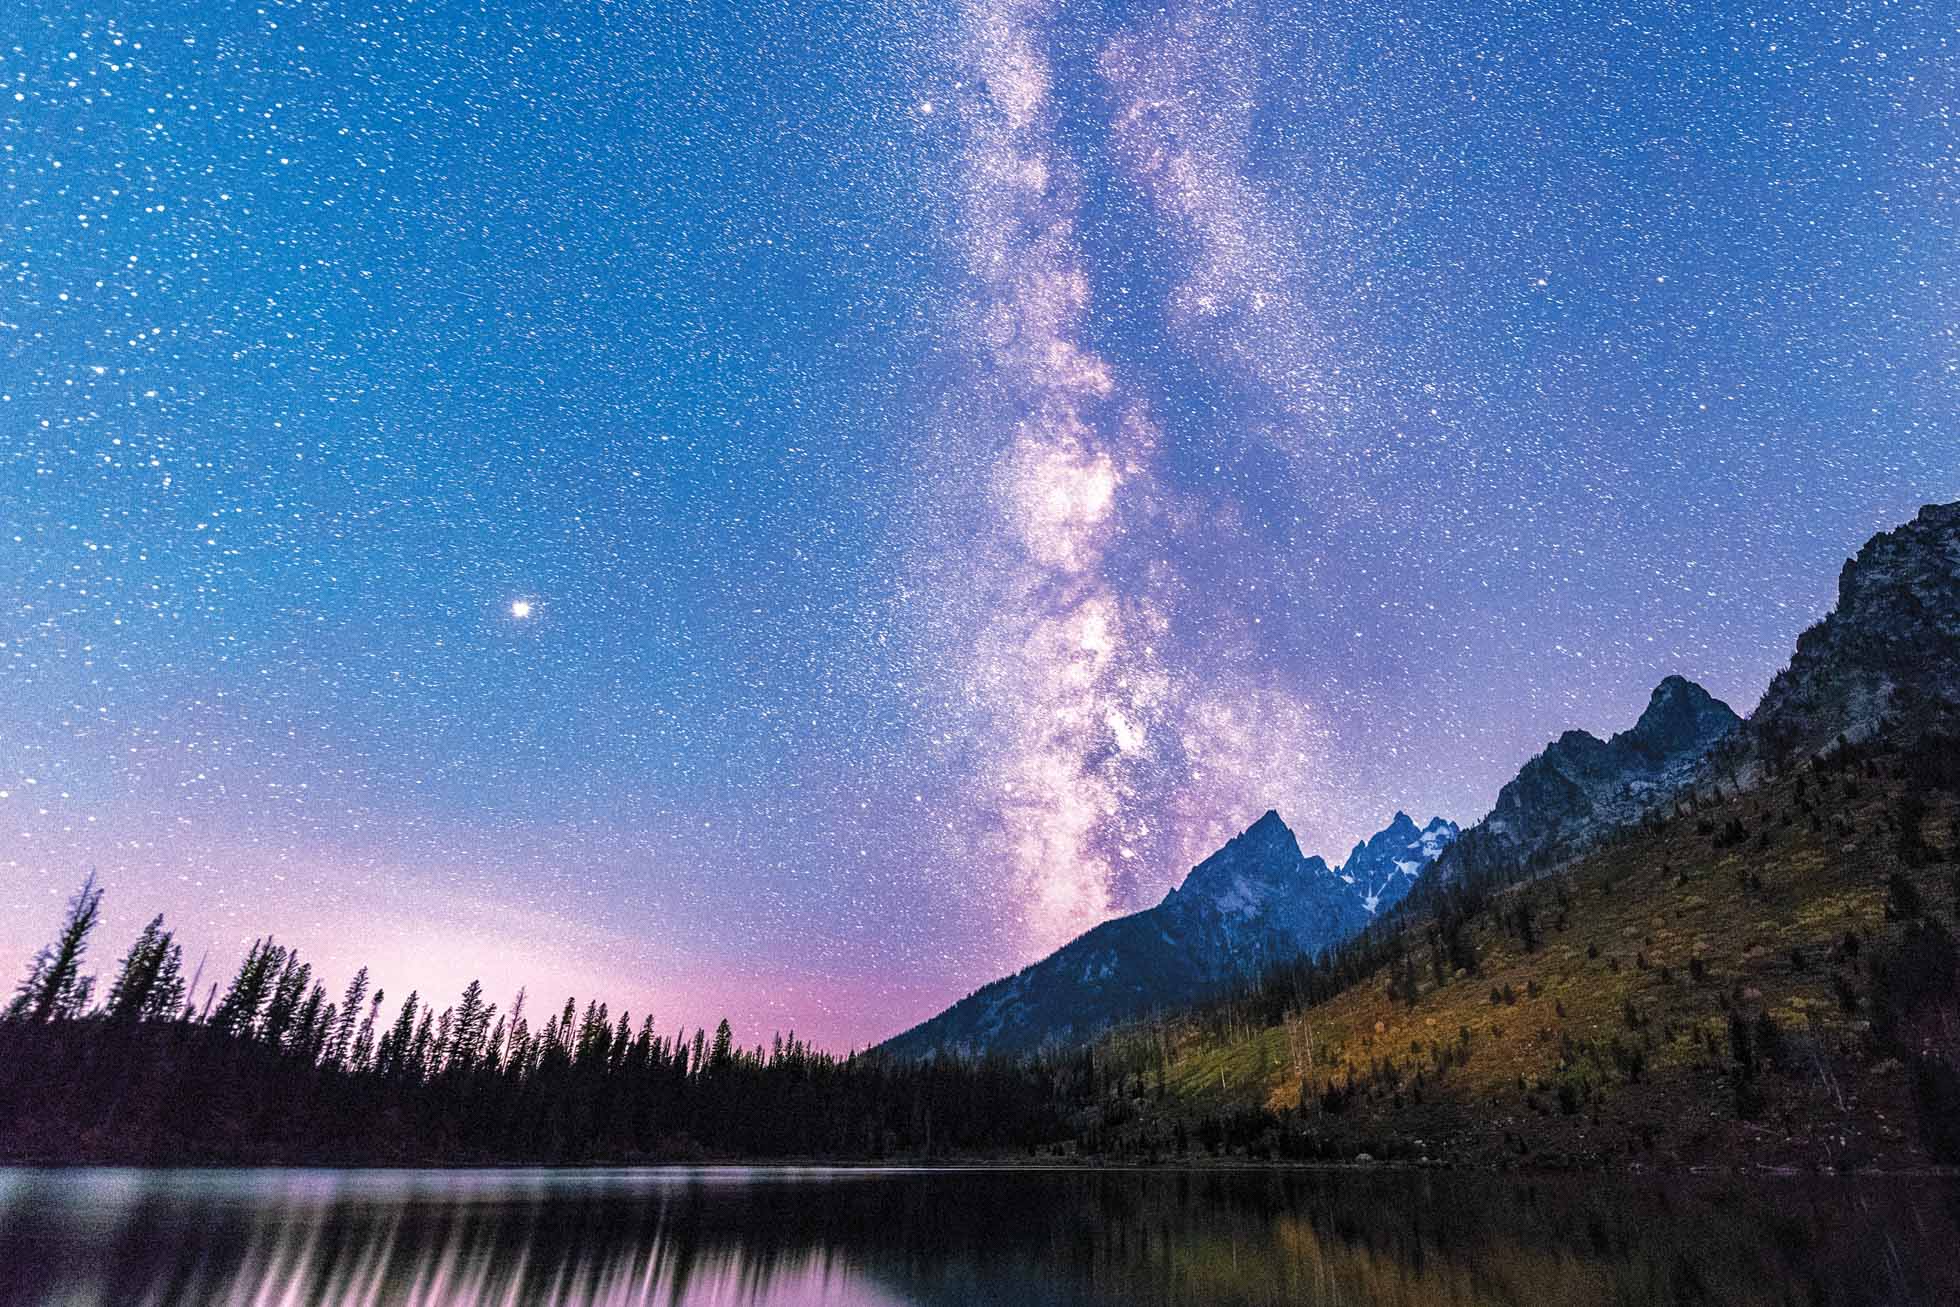
14mm is my favorite focal length for capturing the night sky. The ultra wide focal length captures the vast sky of stars in addition to the foreground scenery.

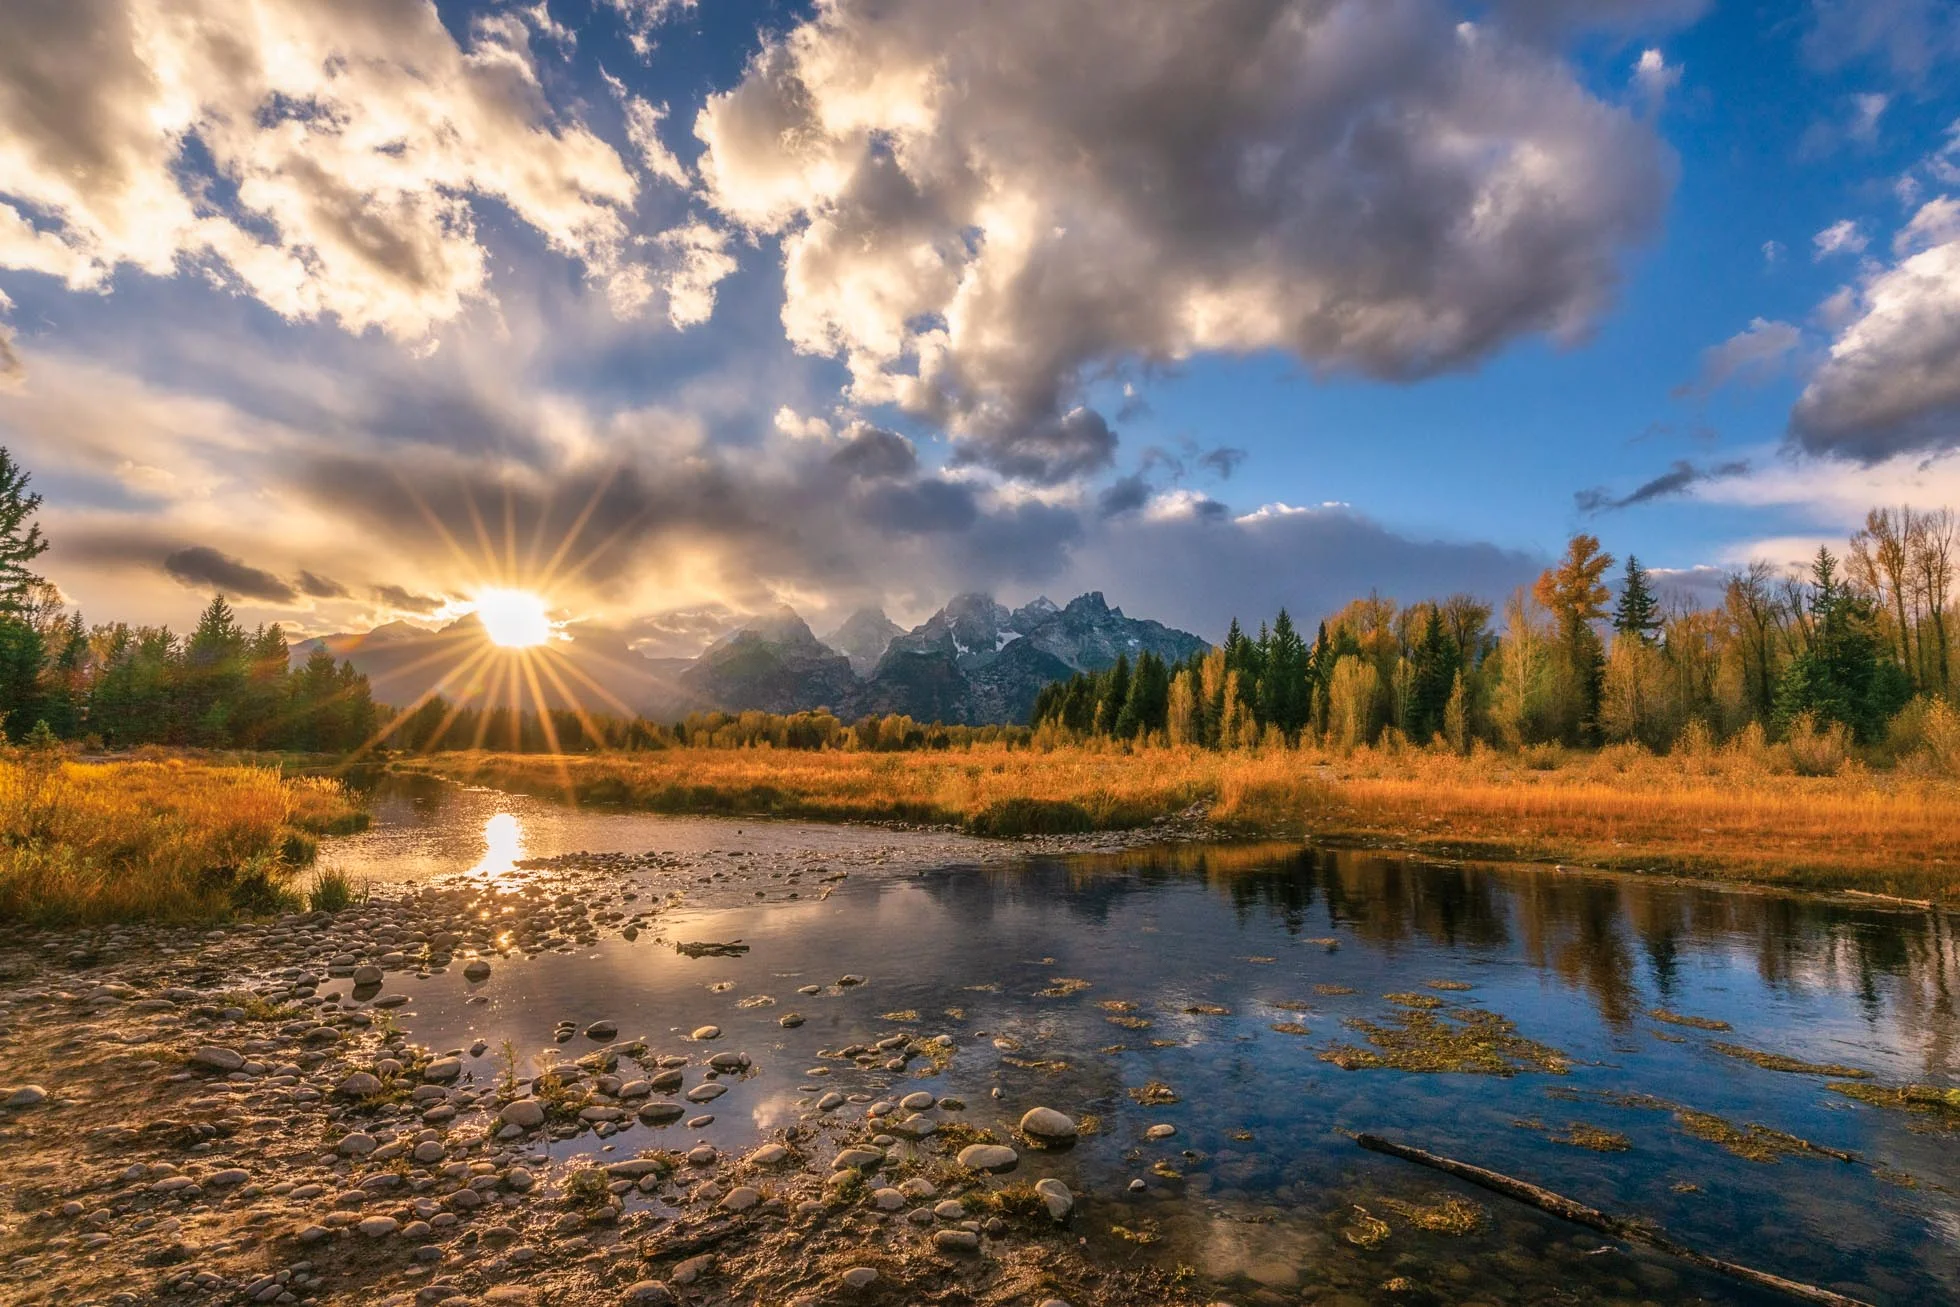
16mm captures the entire sunset scene in the Tetons, including a vivid and distinct sunburst.

16mm allowed me to include significant foreground and ocean in addition to the beautiful sunrise sky.
But, I could not capture the variety that I do with only these widest angles.
Mid Range
I love my Nikon f24-70 f/2.8. If you could only buy or travel with ONE lens, I’d probably say to choose a 24-70 or 24-105 (which I don’t own but there are some great lenses out there in this focal length range)
The 24-70 (or 24-105) gives you a nice wide angle in the 24-35mm range but also allows you to zoom in a bit and grab some closer details. If I am hiking, for example, and want to only carry a camera without extra gear, this is often the lens I will grab. It is so versatile. This mid range gives you a very realistic view of the world’s scenery.
Some examples in this focal range.

48mm focused this frame between the trees. A wider focal length would have added distraction outside of the framed focal point of the waves.

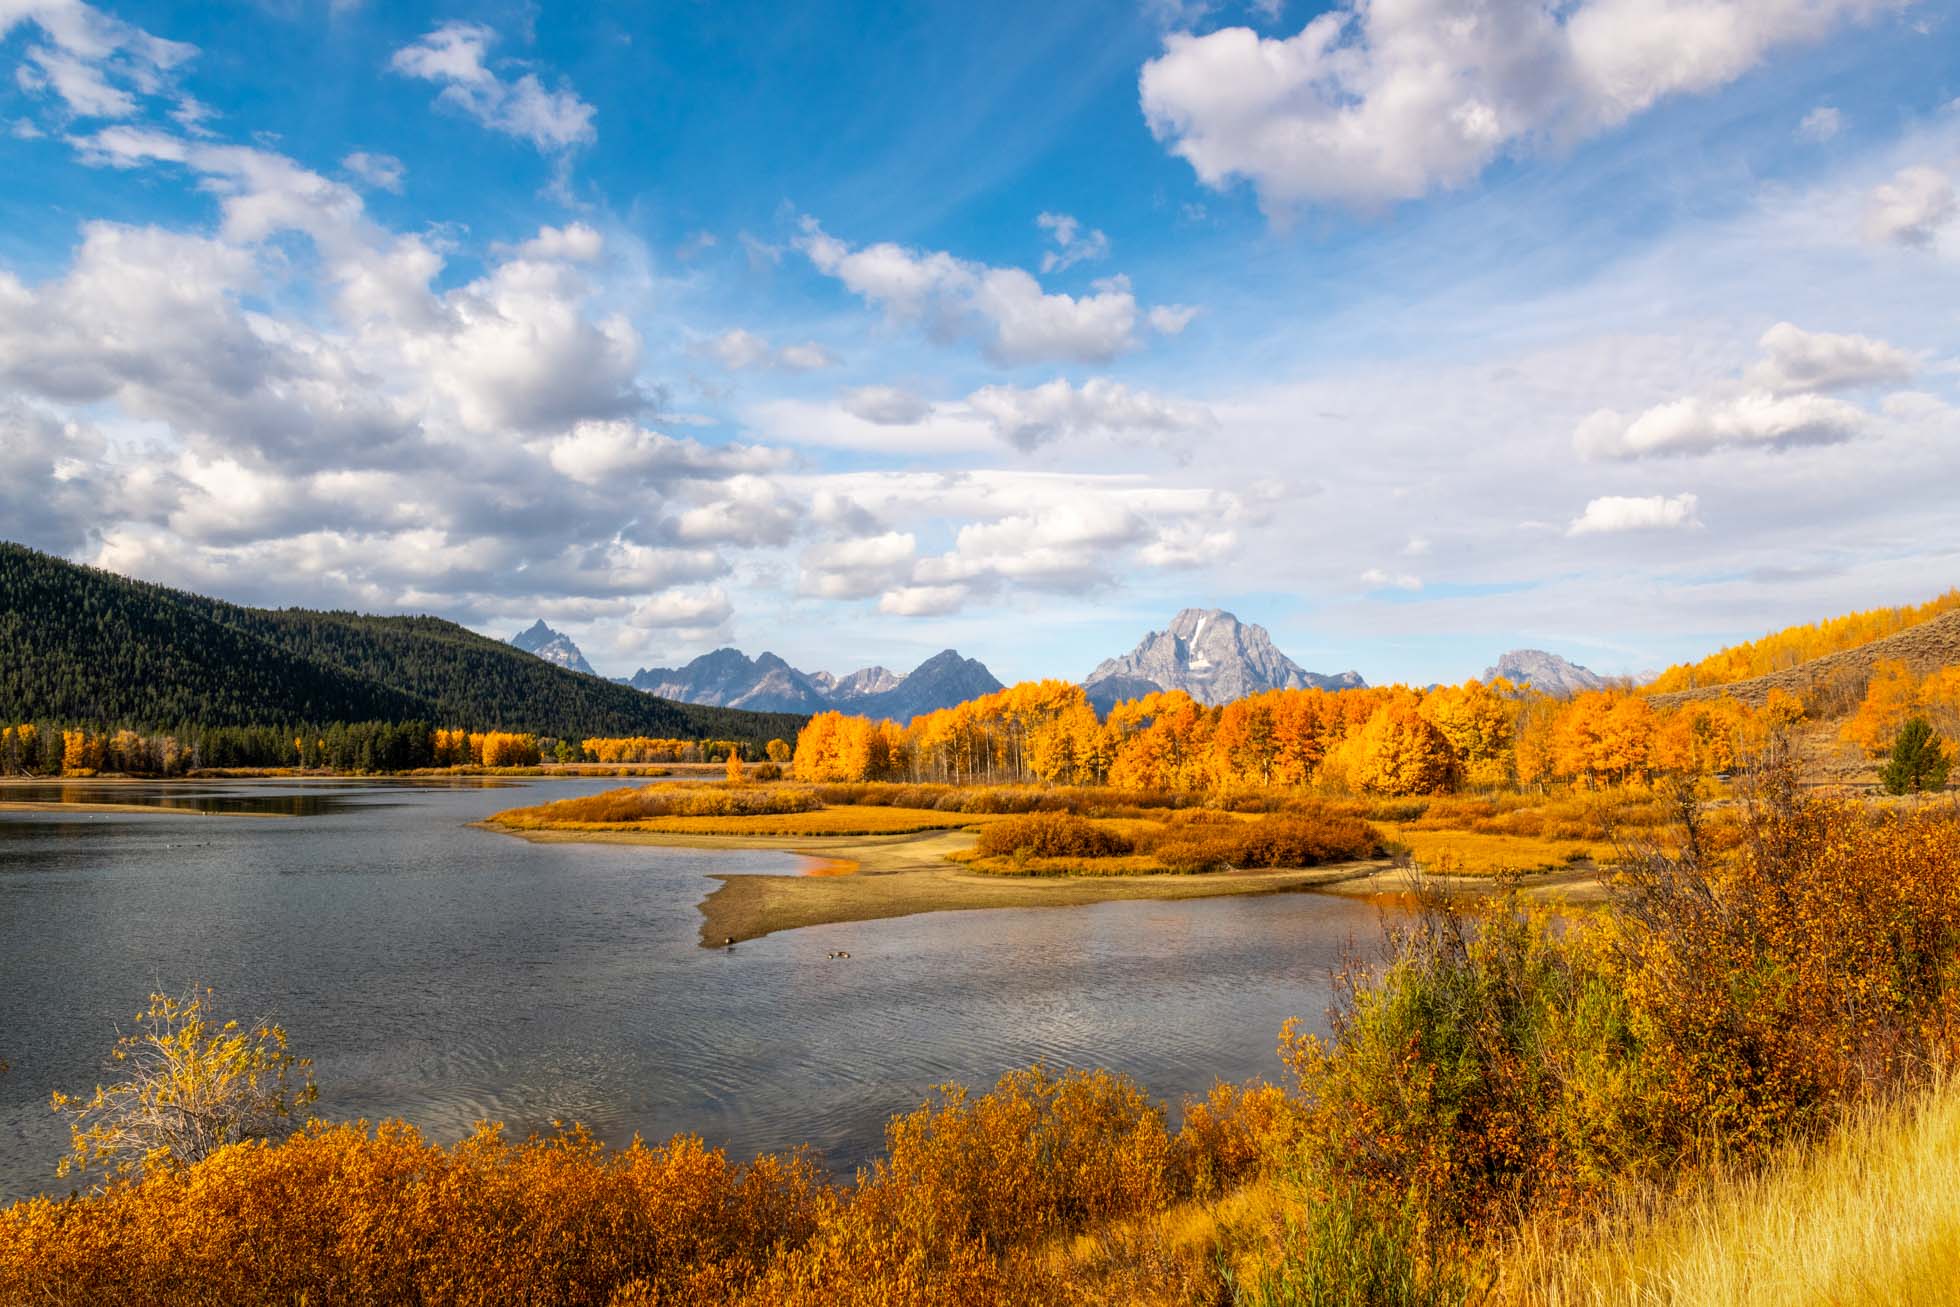
60mm brings me closer to Mt. Moran in this sunrise scene and creating nice symmetry between the mountains and their reflection.

70mm captures the birds and sun rays as the clear main subject of the frame while including the environment around them.

70mm brings the frame closer to the mountains and makes them a more prominent part of the frame than a wide angle
Telephoto
I own both the Nikon 70-200mm and the Sigma 150-600mm. I bought the Sigma more for wildlife and sports, but I also use it for some detailed landscapes.
Focal lengths in the 100+ range allow you to capture details of the landscape that you cannot get close enough to with the wider angles. Such as zooming in on a single mountain in a range, shooting across a body of water, or isolating certain details in a scene.

200mm
The week after Halloween, we got our first big snow. It just so happened I had just been out to the Arboretum the prior week photographing peak fall color. So after the snowfall, I drove through and spotted this incredible scene of seasons colliding. 200mm with my 70-200mm lens allowed me to highlight the detail of these two trees next to each other by filling the frame with the contrast of fall color and snowy branches.

175mm
I used my 70-20mm at 175mm here to isolate the crashing waves in the ocean of the coast of Oahu.

150mm
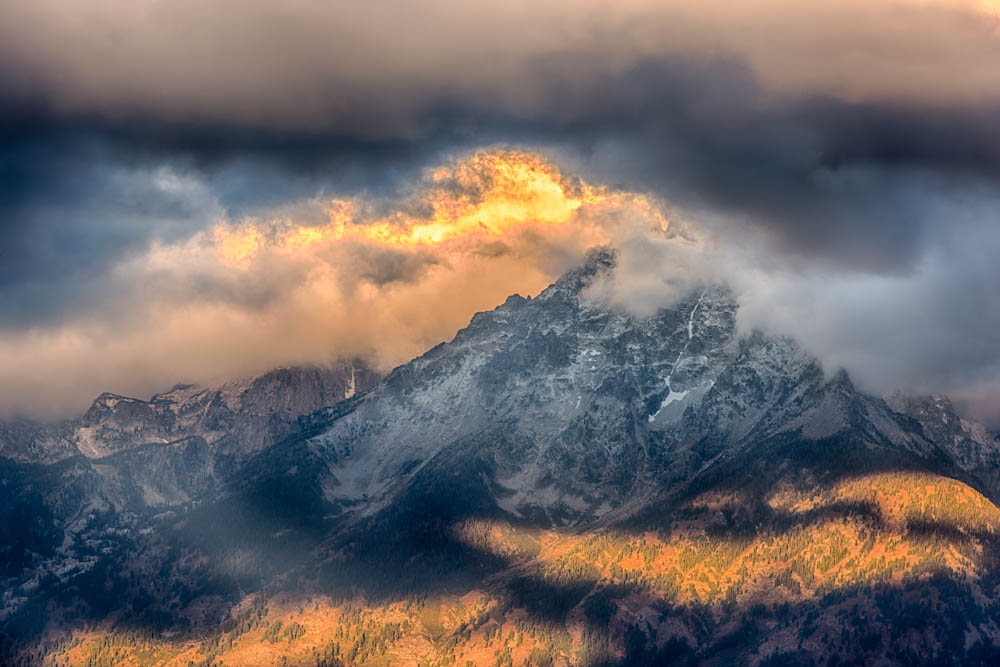
As the sunset’s golden light hit the Grand Teton, I captured this at 150mm to isolate the light on the Grand complimented by the colorful autumn foliage in the foreground.

550mm
While capturing the sunrise at Oxbow Bend, I noticed the way the light was hitting this beautiful golden tree across the water. I put on my Sigma 150-600mm to isolate the tree against the background of low clouds.
As you can see from the examples above, the best lens & focal length is the one that best captures the beauty speaking to you in that moment. Sometimes it is a wide angle, but other times you need a long focal length to isolate the beauty in the distance.
Hope these examples and thoughts help you to capture all the beauty in front of you at home and in your travels.
Kristen Ryan is a landscape and fine art photographer residing in the Midwest suburbs of Chicago. All images can be purchased in the Fine Art Store. Kristen leads ladies landscape photography retreats in the Tetons, Chicago, and the Canadian Rockies, offers private mentoring and teaches an online landscape photography workshop twice a year.
4 Ingredients to Impactful Landscape Photography
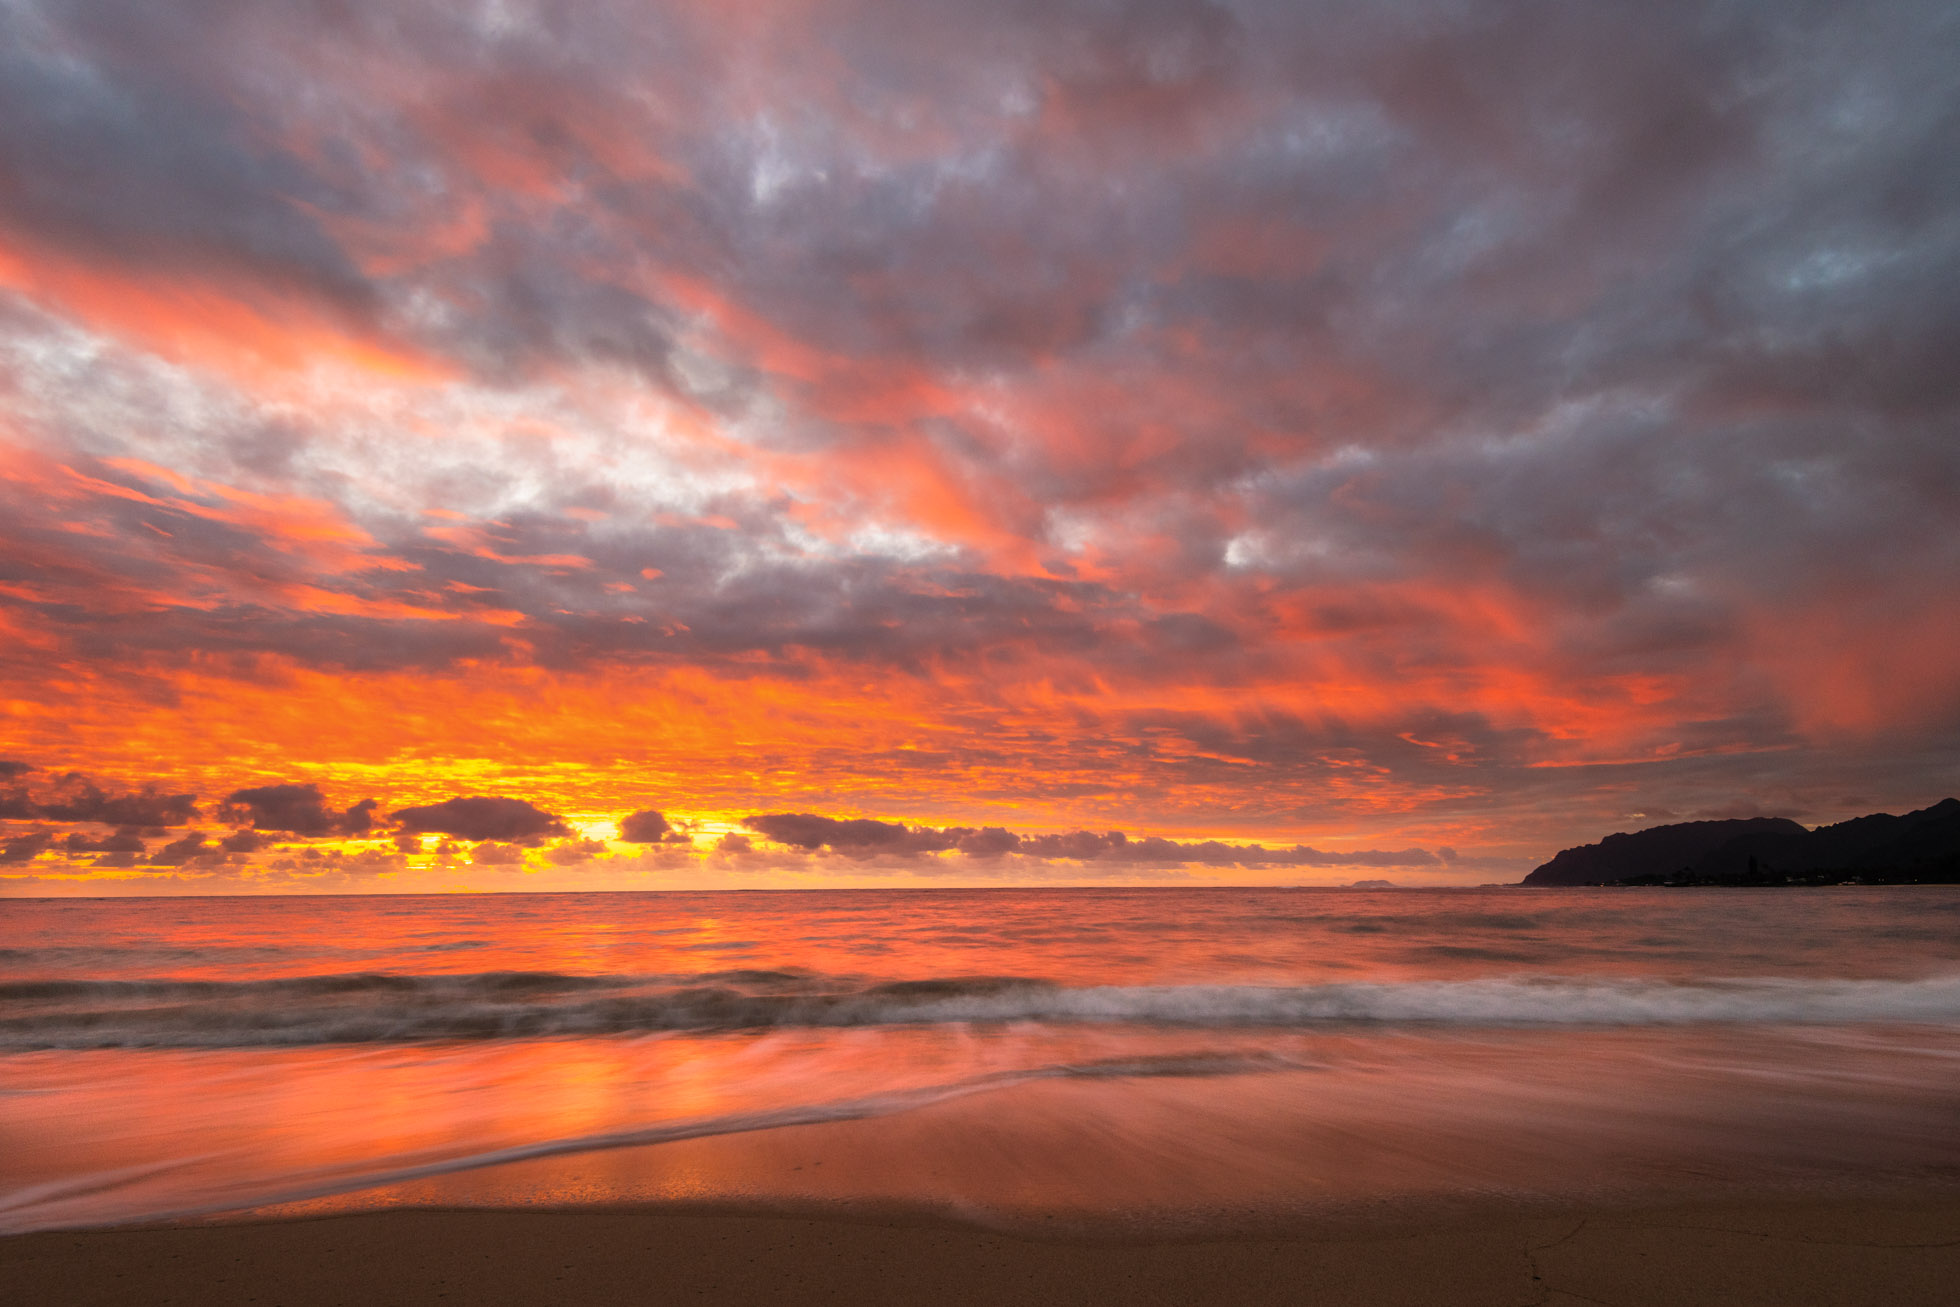
Sunrise on the North Shore of Oahu, Hawaii
I often reflect on why I spend a lot of my time with landscape photography, both shooting and processing as well as educating others. The reasons why are a topic all their own. But all the time I spend shooting, studying, practicing, educating and encouraging others has made me reflect on what it is that creates stunning landscape photographs. I think about how to take my photographs to that next level and of new ways to teach and encourage others in my retreats and online workshop.
In my mind, it comes down to 4 ingredients. There are exceptions to every rule, of course, but there are 4 ingredients that must come together to create exceptional landscape and nature imagery. Several of which we can control, and one in which we cannot, at least for the most part.
1. CRAFT
The first ingredient in creating amazing landscape images is knowing your craft. And when I say craft, I am referring to the technical settings and techniques involved in mastering your camera and in shooting landscape photography more specifically. It is important to put in the time to learn the basics of photography, including the exposure triangle, white balance, focus and metering modes. Learn how to use filters such as polarizers, graduated neutral density filters and regular neutral density filters. Honing your craft including learning to read your histogram and how to bracket images to capture the entire dynamic range of the scene. Develop an understanding of depth of field and learn to use a tripod and intervalometer with ease. Learn the rule of thirds and other composition elements that will add depth and strength to your frame. Take a class on post processing or study on your own how to use the tools of these programs. This is all about learning the techniques and tools you may need to capture a well exposed and focused image and edit it in Lightroom or Photoshop.
2. VISION
The second ingredient in creating amazing landscape images is vision. Learning the tools and techniques is just half the equation. Beyond understanding the technicals, we have to learn to see in our minds what we want to create with these techniques. The two go hand in hand, as the stronger understanding of the technicals and the more we hone our craft, the stronger and more creative our vision grows. Vision helps us find that unique perspective or puts an artistic polish on the image through post processing. Craft is the skill while vision allows us to express ourselves with that skill. The more we practice the various techniques, in shooting and processing, the more creative possibilities open up to us. We learn to see what we might not have seen before. For me, this vision comes from framing images in my mind as I drive or hike, and from reflecting on past clicks of the shutter that fall short of impressing me. Just like our craft, our vision grows from practice and is integral to creating unique and impactful landscape images.

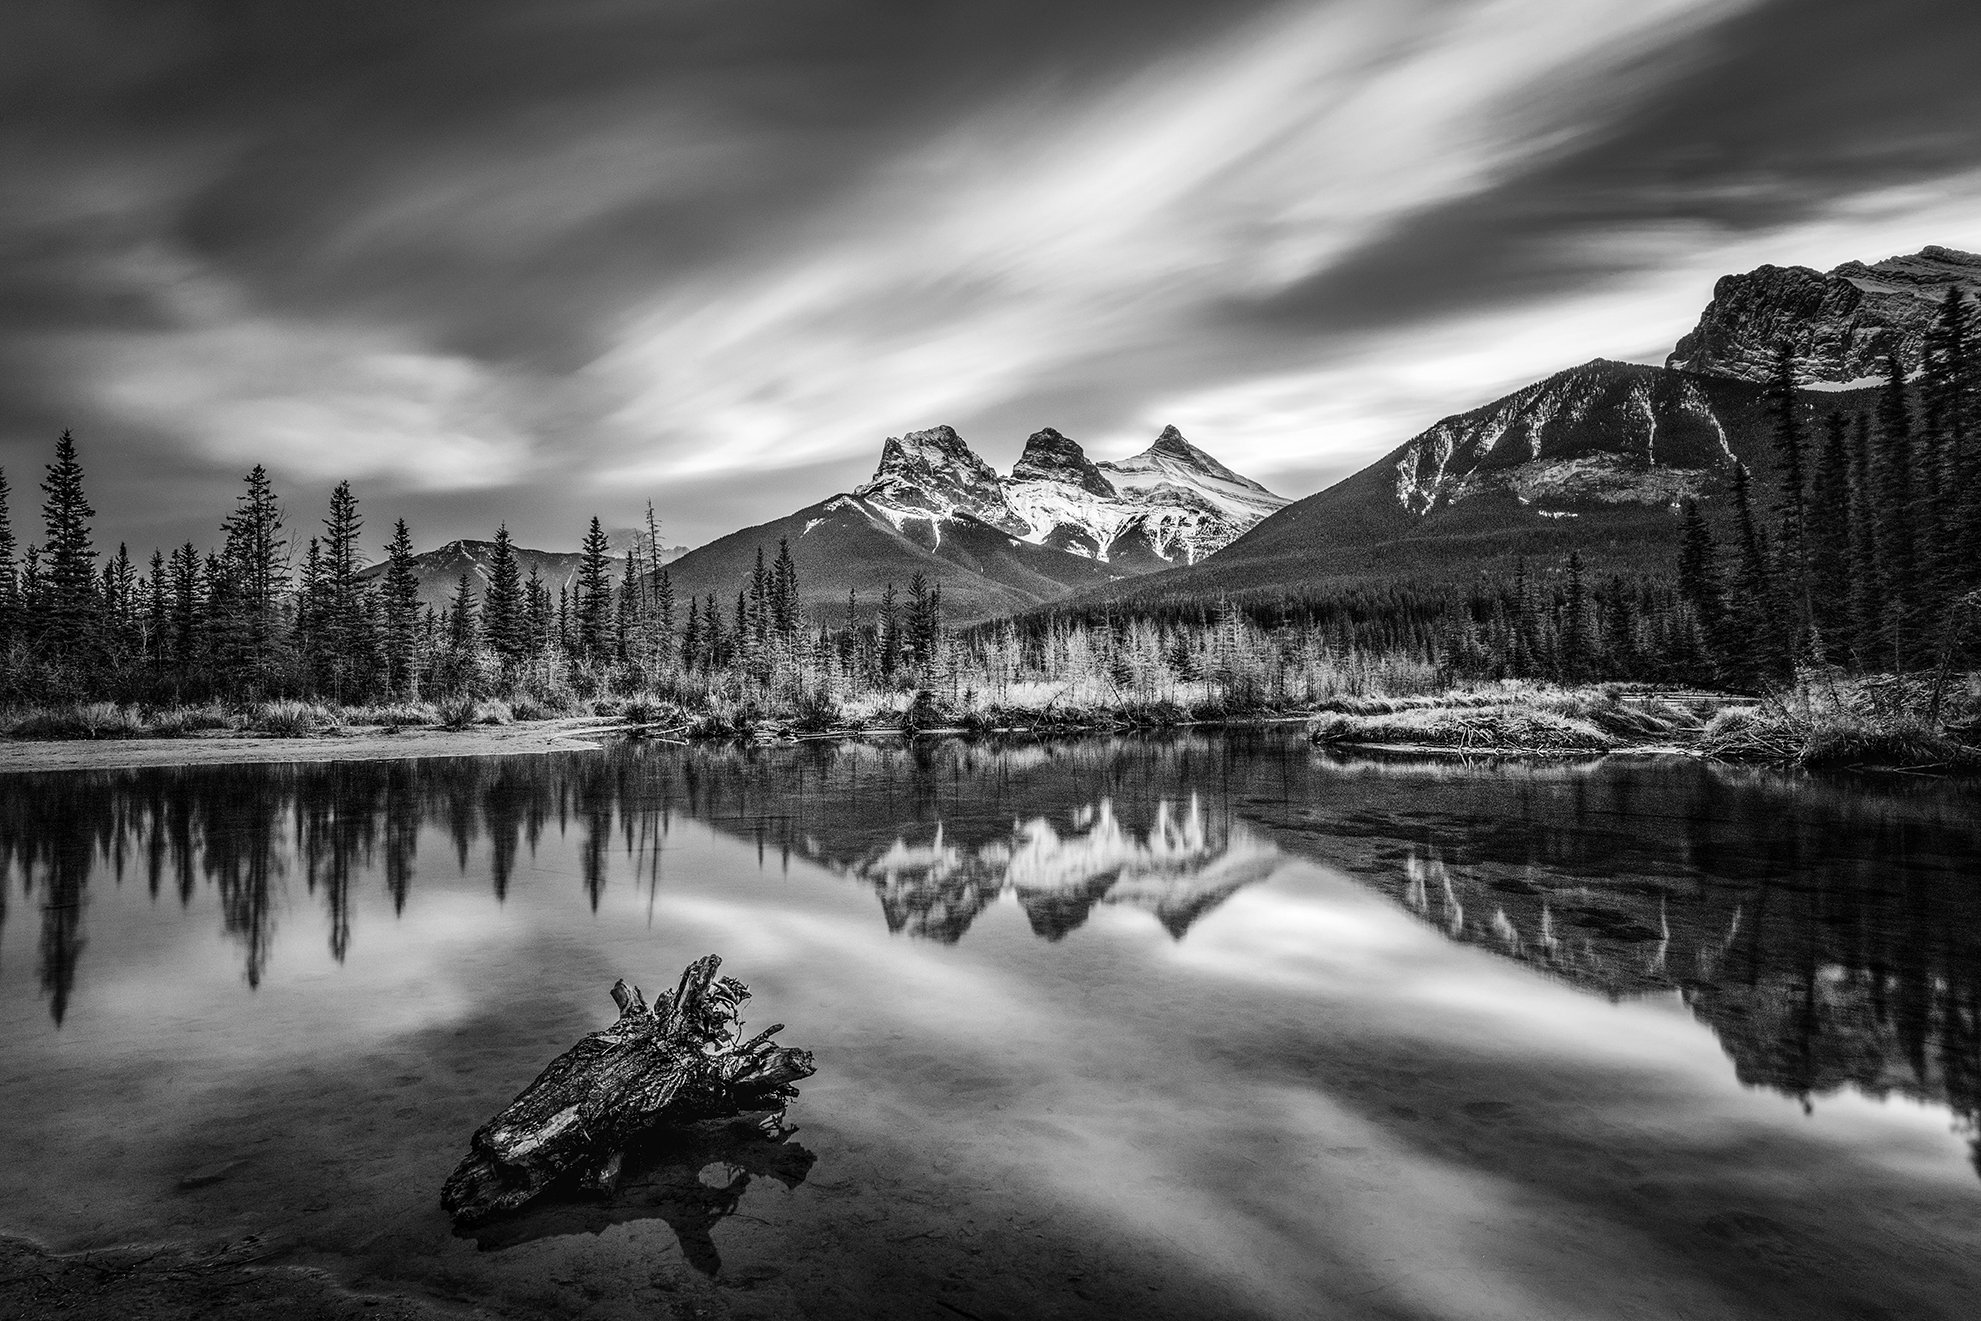
My vision here called for an 8 minute exposure. Mt. Rundle in Banff National Park. Alberta, Canada
3. OPPORTUNITY
To practice and develop both craft and vision, there must be opportunity. Sometimes these opportunities may fall in your lap and other times you must create opportunities. You have to sacrifice sleep or time with family to get out when the light is good or to travel to a place which inspires you. This can be easier said than done. Unless photography is your full-time job, you may have another job that restricts your time or perhaps you take care of kids full time and getting out or away requires finding childcare. If you live close to incredible scenery, you may have many great opportunities close by. If you don’t, you may have to work a little harder.
The opportunity factor can be a little complicated because in many ways you have control. You can decide (to an extent) where you live but if you are married, you have only some control. You can decide to get up early for sunrise, but you may have kids who have to get to school and your spouse is already off to work, such as my situation. You may love photography but your career is another profession and it demands a lot of your time. You may dream of traveling off to Norway, New Zealand, Bora Bora or Patagonia, and maybe you could, but your 3 young and adoring kids are at home needing care. You may want to go shooting at night in the city or in the middle of nowhere to find dark skies, but venturing out alone as a woman feels scary or unsafe.
It can be challenging to combat the things that work against you, and in some cases you COULD make more opportunities but then other aspects of life may suffer. I feel this often as I long to live near the mountains and to travel to those places like Norway and New Zealand. However, my life is outside Chicago, where my husband’s job supports myself and my 4 kids in a way for which I am so grateful. I steal my opportunities to shoot at sunrise when we travel as a family, though I don’t explore in the same way I would as a photographer. I am finding ways to travel as a landscape photographer but going too far or being gone too long is not something I am comfortable with right now. My creative heart is pulled in one direction but my mama heart is pulled in another. I may not be ‘less’ of a photographer for lacking some of these opportunities, but it means some of the images I dream of are for another day, another season of life perhaps.
The trouble with having (and to some extent choosing) limited opportunities leads me to the fourth ingredient over which we have little to no control….
4. LUCK
The fourth ingredient is luck. And when I say luck I am referring to the luck of Mother Nature. We have absolutely no control over the weather! Where we sometimes, but not always, have a little control is that we can make an effort to go out to shoot when we see an optimistic forecast. You can head out for sunset when the forecast is for partly cloudy or head out to shoot the Milky Way during the New Moon and a clear forecast. But you cannot control when that beautiful puffy cloud filled sky in the afternoon suddenly decides to become clear with no sunset color whatsoever. If you head out to shoot those stars and the clouds come earlier than expected, you cannot just blow them away. If you plan a trip to the mountains in the autumn when it is usually peak color and peak comes the next week, there is nothing you can do about it. You can get up every morning of a vacation, but if you get a week of clear skies, your sunrise will look mostly the same. Only a landscape photographer gets sad to see a weekly forecast of full sun after full sun! There is nothing you can do to change the weather when Mother Nature foils your plans.

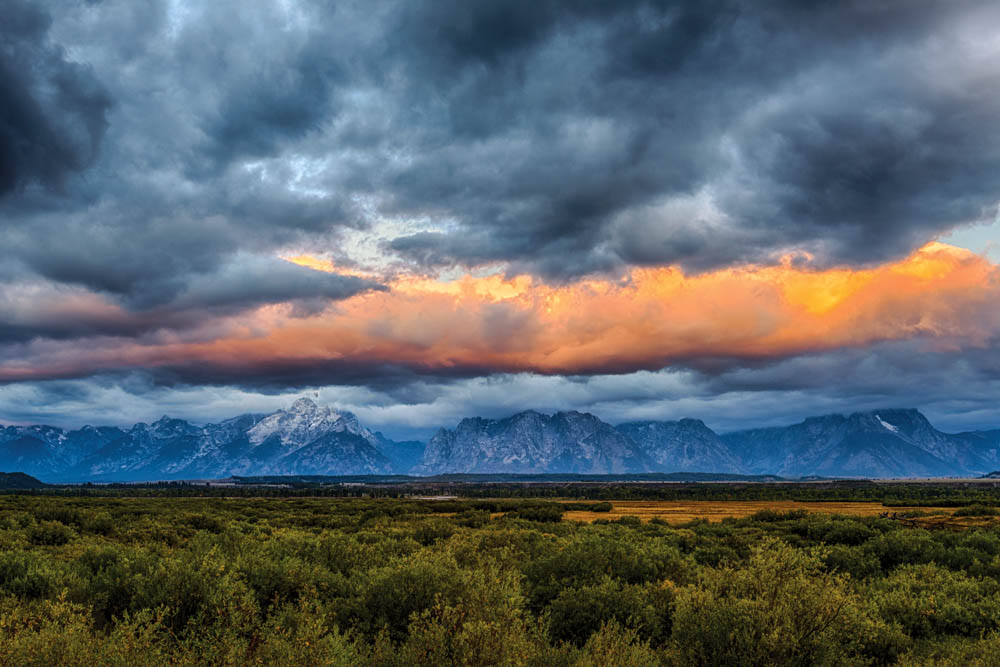
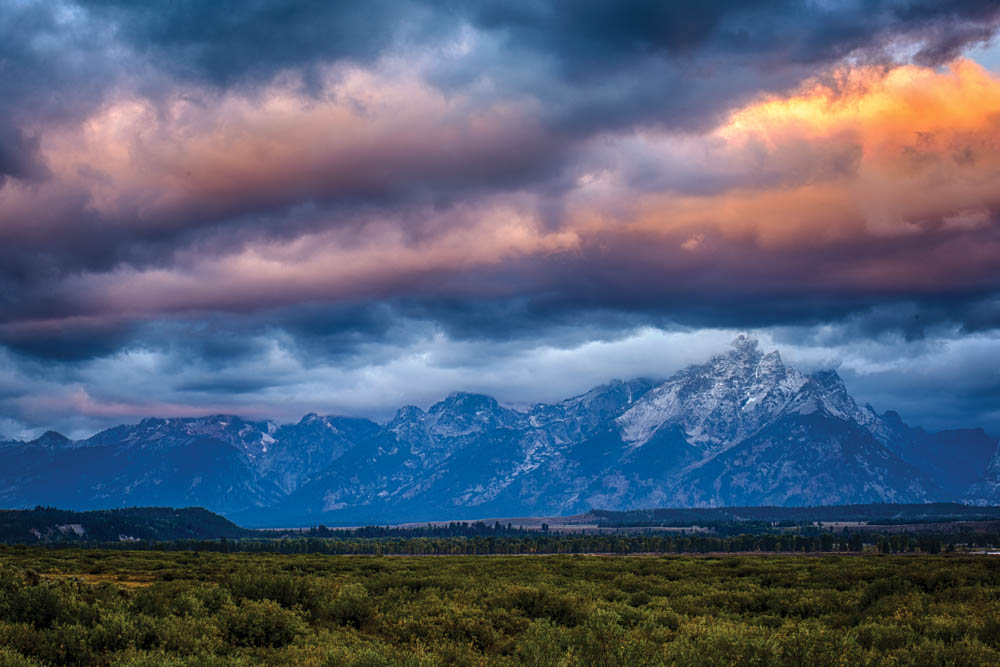
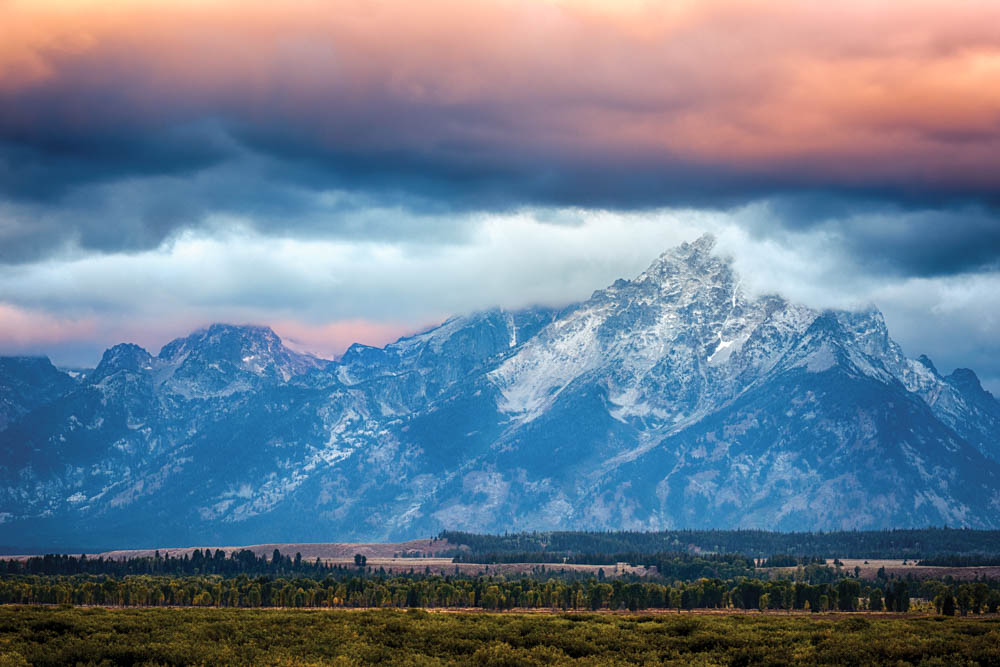
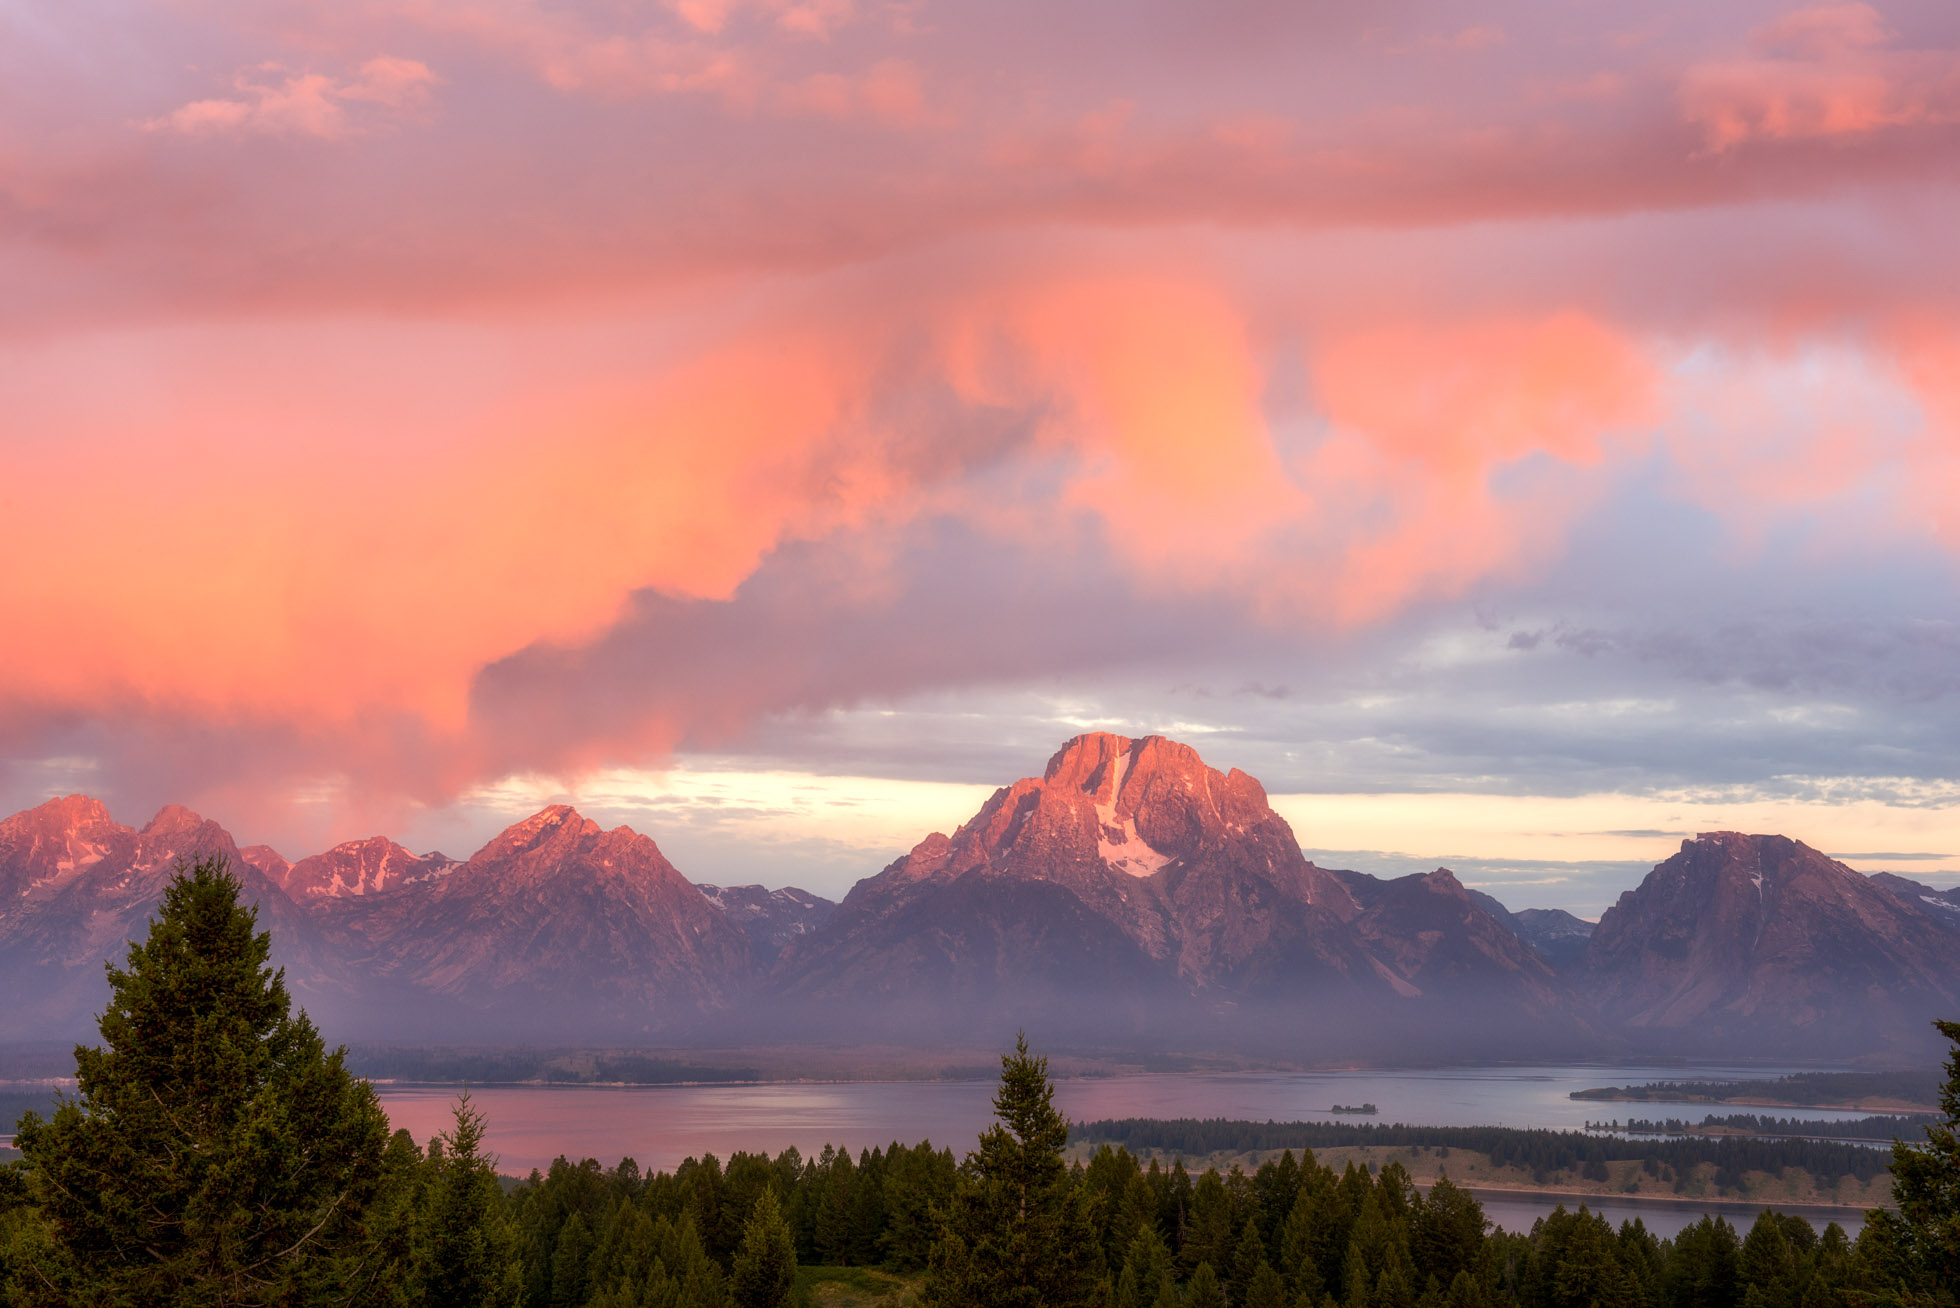
When Sunset is Stormy in the Tetons. Grand Teton National Park, Wyoming
There are two things you can do, however. The first is to look for the beauty that IS in front of you, because if you are open to the idea that there is always SOMETHING beautiful to photograph, you can usually find it. It may not be what you were hoping for, but if your mind is open to creativity and possiblities, you might just find it. Maybe the photographs won’t be as epic as what you hoped for, or maybe they will be, just in a different way. If all fails, the other option is to try again another day. Create another opportunity. It may take some time but keep trying, and you will find the jaw dropping sunrises, the star filled skies and the rainbows through the clouds.

Magical morning in Oahu, Hawaii
So hone your craft, let your vision and creativity run wild often, create and seize the opportunities you get! You may find Mother Nature rewards you with what you hope for, or perhaps something else entirely. And when you get drenching rain while your photographer peer gets a gorgeous rainbow, congratulate them on a beautiful capture, knowing yours is out there for another day :)
And lastly, get out for the experience of being in nature. In the end, isn’t that what draws us out there as much as the images? It does for me anyway.
Happy shooting my friends!
Looking for some photography filters to add to your creativity, check out Maven Filters! *
Kristen Ryan is a landscape and fine art photographer residing in the Midwest suburbs of Chicago. All images can be purchased in the Fine Art Store. Kristen leads ladies landscape photography retreats in the Tetons, Chicago, and the Canadian Rockies, offers private mentoring and teaches an online landscape photography workshop twice a year.
*affiliate link

10 More Tips to Improve Your Landscape Photography
Last week I shared 10 Tips to Improve Your Landscape Photography. I hope it gave you a little inspiration to remember next time you head out to shoot! Today I am sharing 10 MORE tips, plus a bonus tip :)
1. Get out often & early - The more you get out to shoot and practice all of the techniques, the more they will become second nature and your workflow will become fluid. Landscape photography has a variety of creative and technical practices that take frequent practice to become second nature. Getting to your location early allows you to take your time in finding your chosen composition and prevents you from feeling rushed as the light changes.

Sunrise in Oahu, Hawaii
2. Know How to Read Your Histogram - Understanding your histogram and how to adjust settings for the best exposure is so critical to capturing the details throughout the dynamic range. My goal is always to capture detail from the bright highlights to the dark shadows. I aim for my histogram to be as far to the right side as possible without it climbing the right wall.
3. Use a shutter release - A shutter remote is one piece of gear I always have with me. When I use a tripod I always use a shutter release. This will enhance the sharpness of your images and is also useful for shooting long exposures and time lapses.

1.3 seconds of wave action at sunrise in Oahu, Hawaii
4. Invest in good filters - Learn about the various types of filters from polarizers, graduated neutral density filters and regular neutral density filters, and invest in good ones. Polarizers help to cut glare and haze and enhance the vibrance of skies. Graduated neutral density filters cut light in part of the frame to allow you to capture more detailing the shadows without blowing out the highlights. And regular neutral density filters will block light so you can shoot longer exposures for creative effect.

Long exposure of the clouds and water utilizing a 10 stop Neutral Density Filter at Lake Louise, Alberta, Canada
5. Scout out locations - Taking the time to scout out locations for good light and compositions will help you maximize your shooting opportunities when you go during sunrise and sunset. Sometimes the best light and color lasts only mere minutes so making sure you have scoped out the best perspective ahead of time will help you be more successful.
6. Check your frame - Pay attention to what is IN your frame AND OUT of your frame. Examine the edges and consider everything that you include and leave out. Both can be equally important to the viewer’s scan path.
A gorgeous autumn afternoon in Grand Teton National Park
7. Look for leading lines and framing opportunities - Nature has so many lines from trails, shorelines, roads, etc. Use them to lead the viewer’s eye to your main subject. Framing your subject can create depth and impact. I love to look for framing to capture a unique perspective of a frequently photographed location.

Sunrise on a chilly morning on the Chicago Lakefront
8. Less can be more - While many strong landscapes are composed with many elements, sometimes a minimal frame can be just as impactful. Examples of less is more may be an abstract seascape or a simple subject like a tree surrounded by a lot of negative space.

Panning of the Pacific Ocean in Crystal Cove State Park, California
9. Break the rules - There are lots of rules that are rules for a reason, such as using the rule of thirds for composition, not blowing your highlights or clipping your shadows, etc. However, rules are meant to be broken. Know the rules but be willing to break them with intention and creative purpose. For example, not centering your horizon is generally considered a "rule" in landscape photography. But I LOVE a centered horizon

Long Exposure in Grand Teton National Park, Wyoming
10. Maximize foreground interest - Foreground elements are one of the best ways to create depth in your landscape images. Rocks, shells, grasses, flowers, etc. are all great examples of foreground elements. Consider the placement and type of foreground and be intentional. Foreground should add to the frame and lead the eye to the main focal point rather than distract.
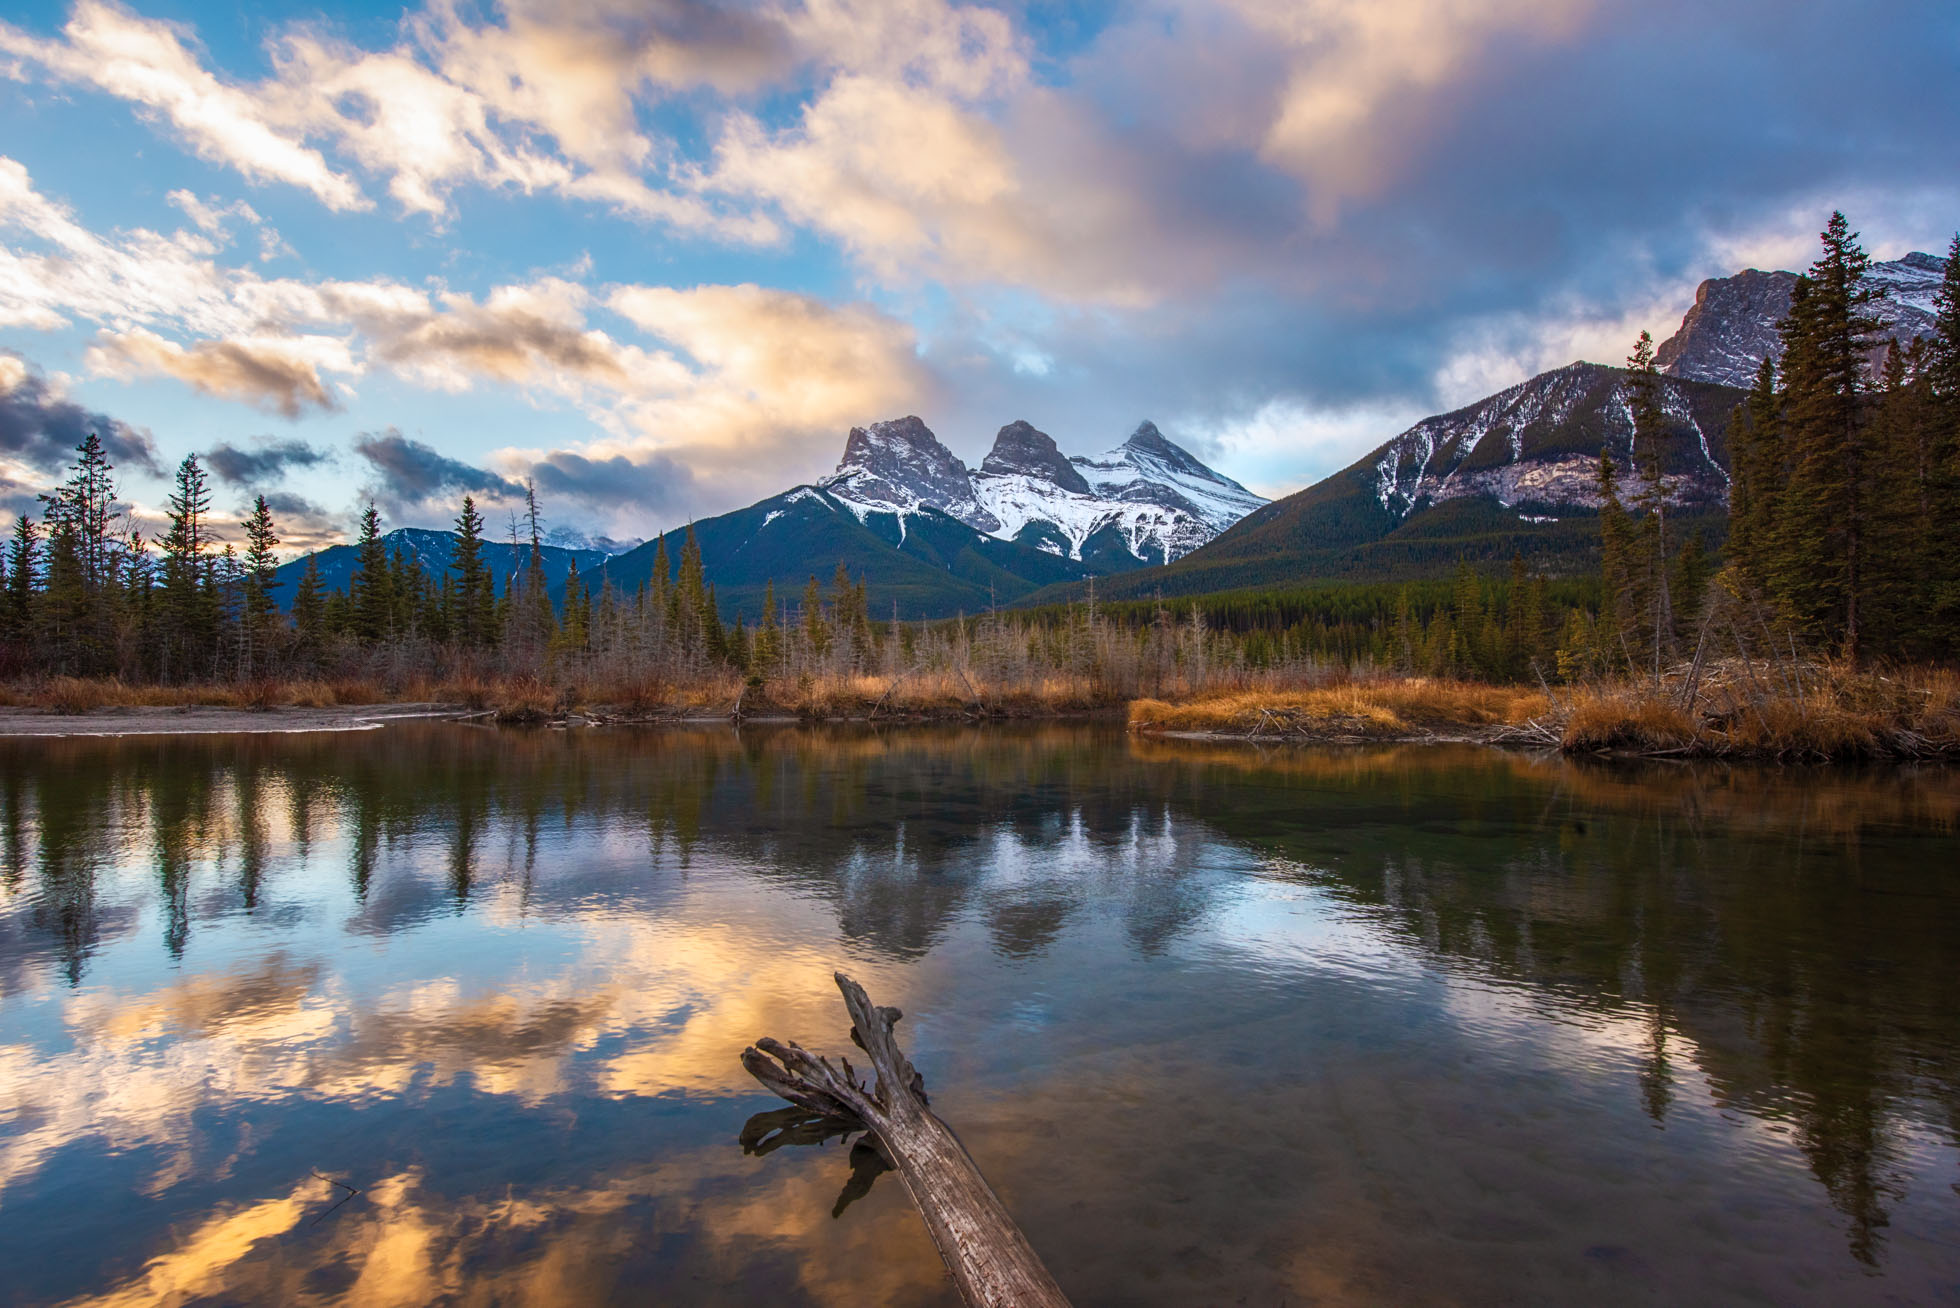
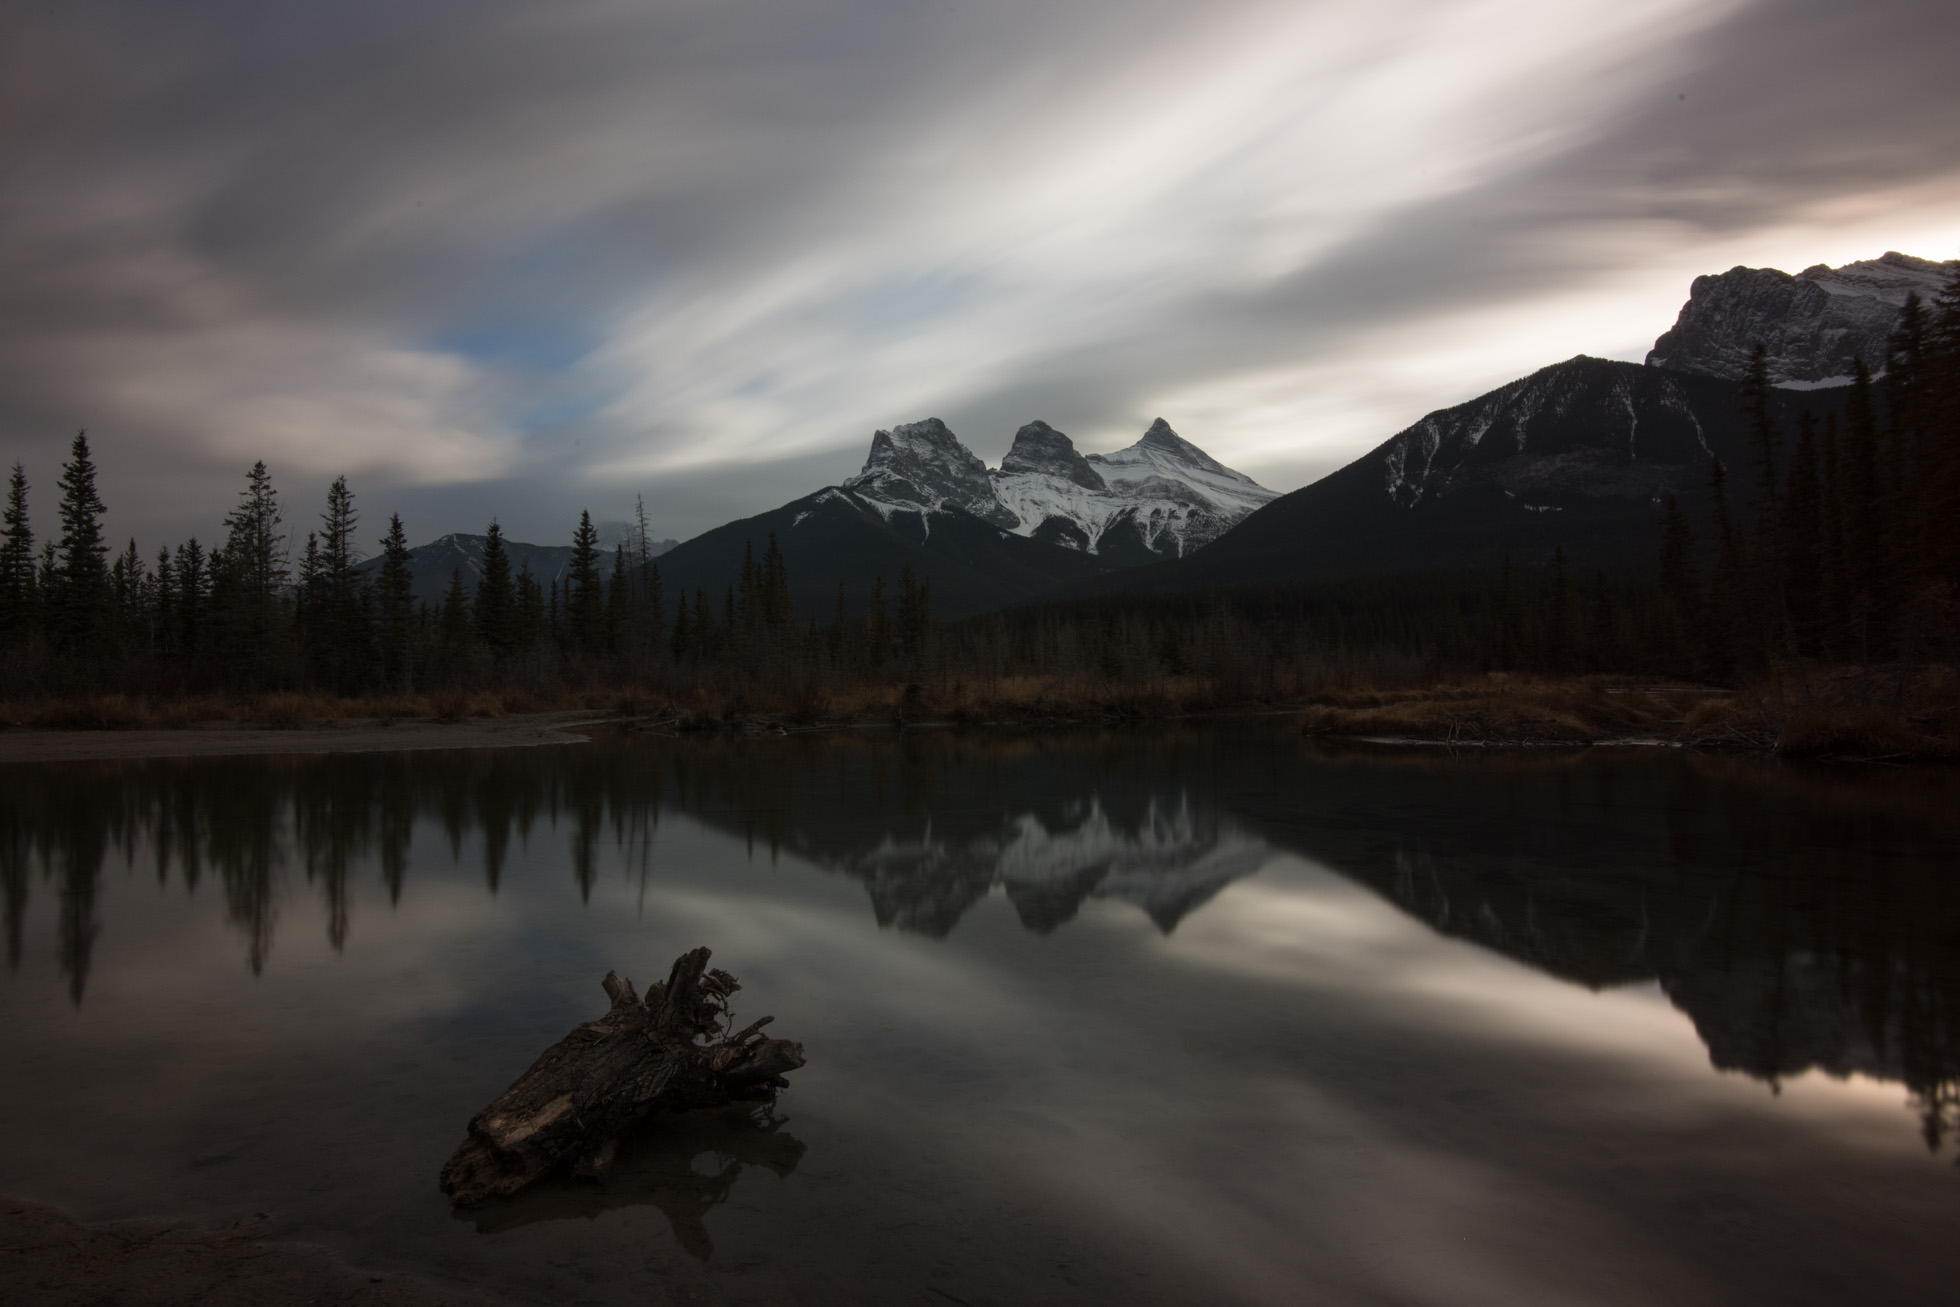
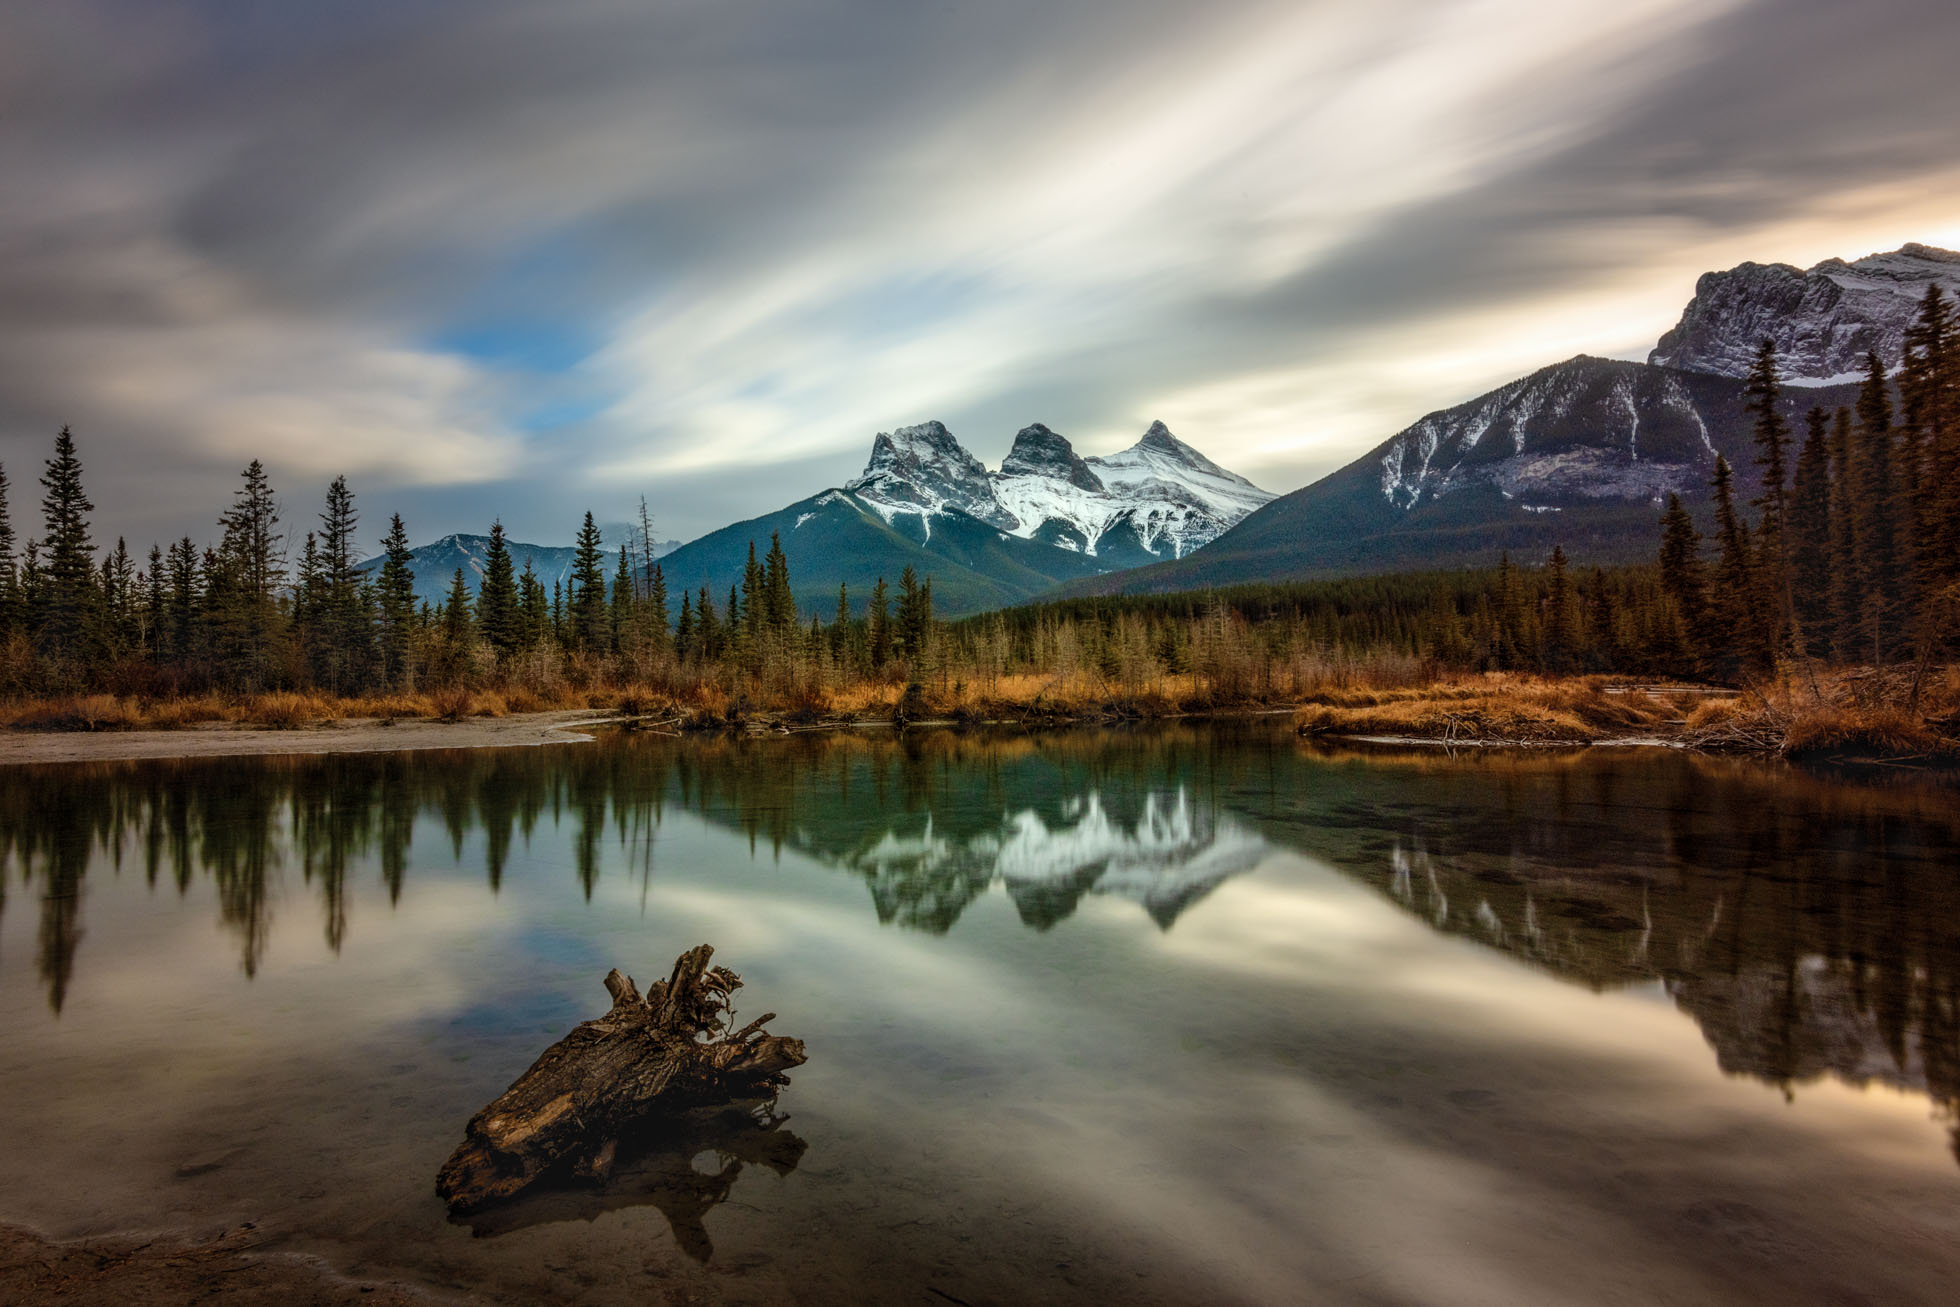
Sunrise at the Three Sisters Reflection Pond in Canmore, Alberta, Canada
BONUS!! #11. Learn from your mistakes & successes -The number one thing that has improved my landscape photography the most is learning from my mistakes and successes while shooting. Every single shoot that I go on, in spending time with my images afterward, I self critique where I made mistakes in exposure, focus and composition. This analysis has helped me to refine my techniques and remember to look for things that I didn’t think to look for when I was first starting out.
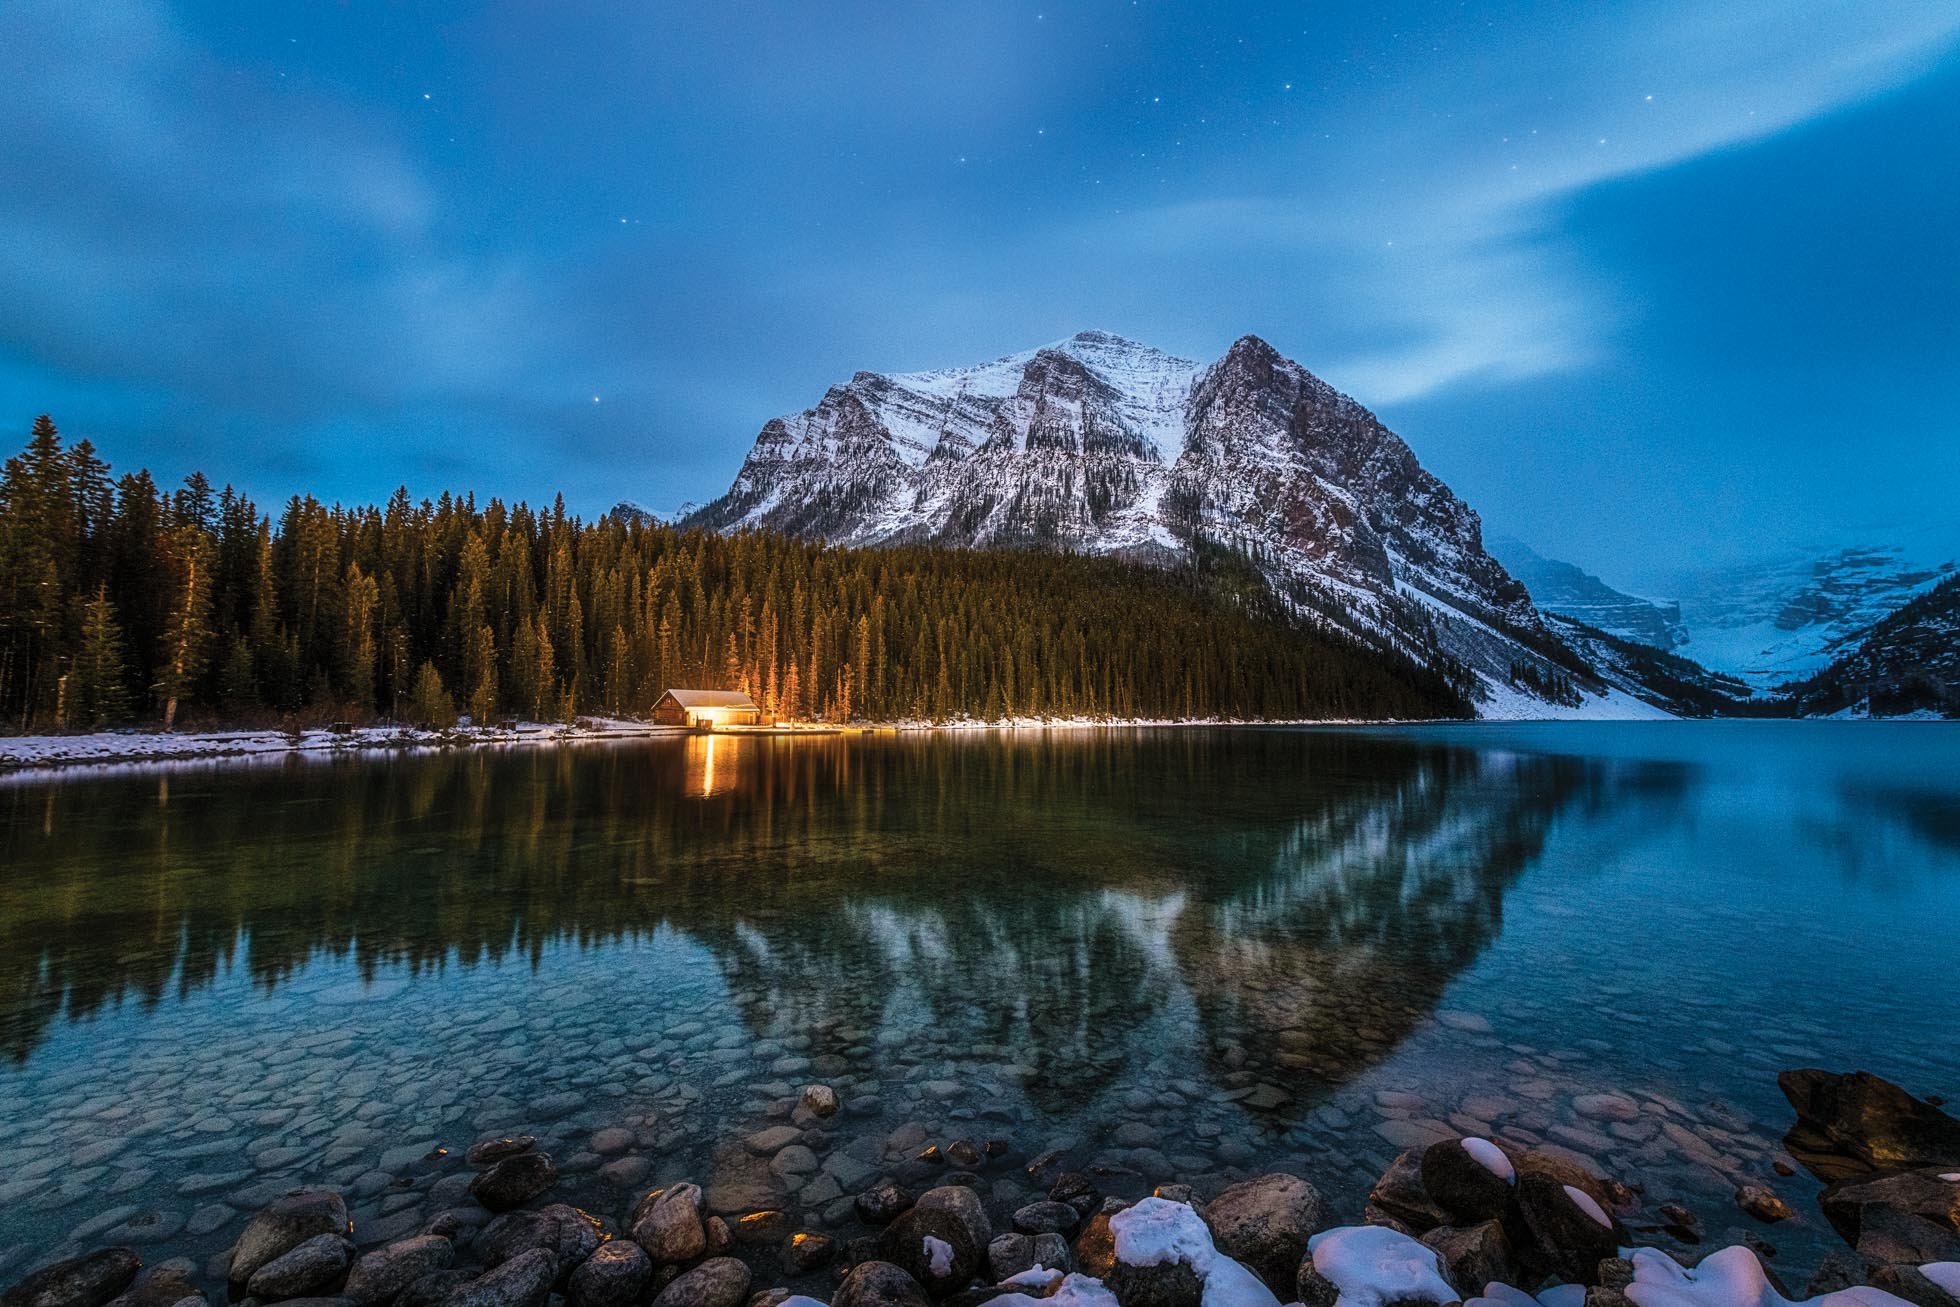
Night capture of Lake Louise boat house in Alberta, Canada. Image is a merge of an exposure for the boat house and another for the rest of the scene.
Kristen Ryan is a landscape and fine art photographer residing in the Midwest suburbs of Chicago. All images can be purchased in the Fine Art Store. Kristen leads ladies landscape photography retreats in the Tetons, Chicago, and the Canadian Rockies, offers private mentoring and teaches an online landscape photography workshop twice a year.

10 Tips to Improve Your Landscape Photography
1. Learn the fundamentals - It is really important to understand all the settings of your camera and have a solid understanding of the exposure triangle and white balance. Having a solid understanding of how to use ISO, aperture and shutter speed will not only create better technical photographs but increase your artistic creativity as well.

2. Buy a great tripod and USE it!
I know no one is excited about another heavy piece of gear to carry but a tripod is one of the best investments you can make in your landscape photography. A tripod will help increase the sharpness of your images by keeping your camera steady. This is especially crucial when bracketing images or using slow shutter speeds. This is such an easy step to achieve in improving your landscape imagery.

This 30 second exposure in the Tetons could not be achieved without a tripod
3. Shoot In RAW
Landscape photography often means shooting in light with a high dynamic range. In order to capture and keep all the details in your image, you want all the information that a RAW file will capture. RAW files are much more forgiving when you make a mistake an underexpose your image. You can often rescue a underexposed image without damaging the image quality with a RAW file, but not with a JPEG.
4. Learn Basic Post Processing
Learn to process those RAW files so that you can bring out the scene you captured. Even the most basic RAW adjustments can go a long way to transforming the straight out of camera file you captured. Lightroom is excellent for cataloging and quick adjustments and is easy to use. Remember that often just some small adjustments are all you need to take an image to that next level.
See BEFORE & AFTER below of the Three Sisters in Canmore, Alberta Canada.
5. Get out in the right light
There is a reason landscape photographers get up early and stay out late. The light at these times will create more compelling and dynamic images. Yes, it is possible to create incredible photographs in the daytime hours, but more often than not, those golden hours into night time will raise the interest in your landscape imagery.
Sunrise in Oahu, Hawaii
6. Experiment with perspective
You got the tripod, set it up, and stay there shooting away, right?! NO! Always vary your perspective. Get high, get low (even if that means taking the camera OFF the tripod), find some framing, look for leading lines and foreground interest. Perhaps there is a perspective that grabs you right away. Capture it. Then move around and find another one.

In this image, I used the ice in the foreground to create depth, a unique perspective and a greater sense of season and story.
7. Be creative with your shutter speed
In landscape photography, creative use of a shutter speed is often what takes an image from pretty to WOW! When photographing water or clouds in particular, a creative shutter speed allows you to put your own artistic spin on a scene that makes it unique. Finding the ‘right’ shutter speed for your vision can be a process but a fun creative experience.

.4 seconds of waves in Oahu, Hawaii
8. Vary your focal length
Often with landscape photography we naturally think the widest angles are best. And often this is true, but not in every case. Sometimes the widest angle will make our subject appear too small in the scene and we need a middle focal length. Other times it is details that draw our eye which can only be captured by a telephoto lens. Many times I try to capture a scene with various focal lengths to create several unique images from the same location. In the grid below the images are focal lengths as follows:
35mm. 70mm
130mm 200mm
9. Slow Down
Instead of quickly snapping the shutter, slow down and take in the scene in front of you. Consider the light. Thing about what is drawing you to the scene and why. Think about how you are feeling. Look for a unique perspective and take your time setting up the shot.
10. Capture what speaks to you!
In any scene you are capturing, there is something or some number of things that are drawing you to that scene. Perhaps it is the overwhelmingly wide expanse of the land, the way the light is hitting the trees, the curve of a wave, or the formation of the clouds at the tip of a mountain. Hone in on the beauty that is speaking to you and use your tools to capture the scene in a way that highlights those details. Listen to your inner voice and follow it. Always shoot for yourself, to satisfy your own inner artistic voice.
Check back next week for more tips to improve your landscape photography!

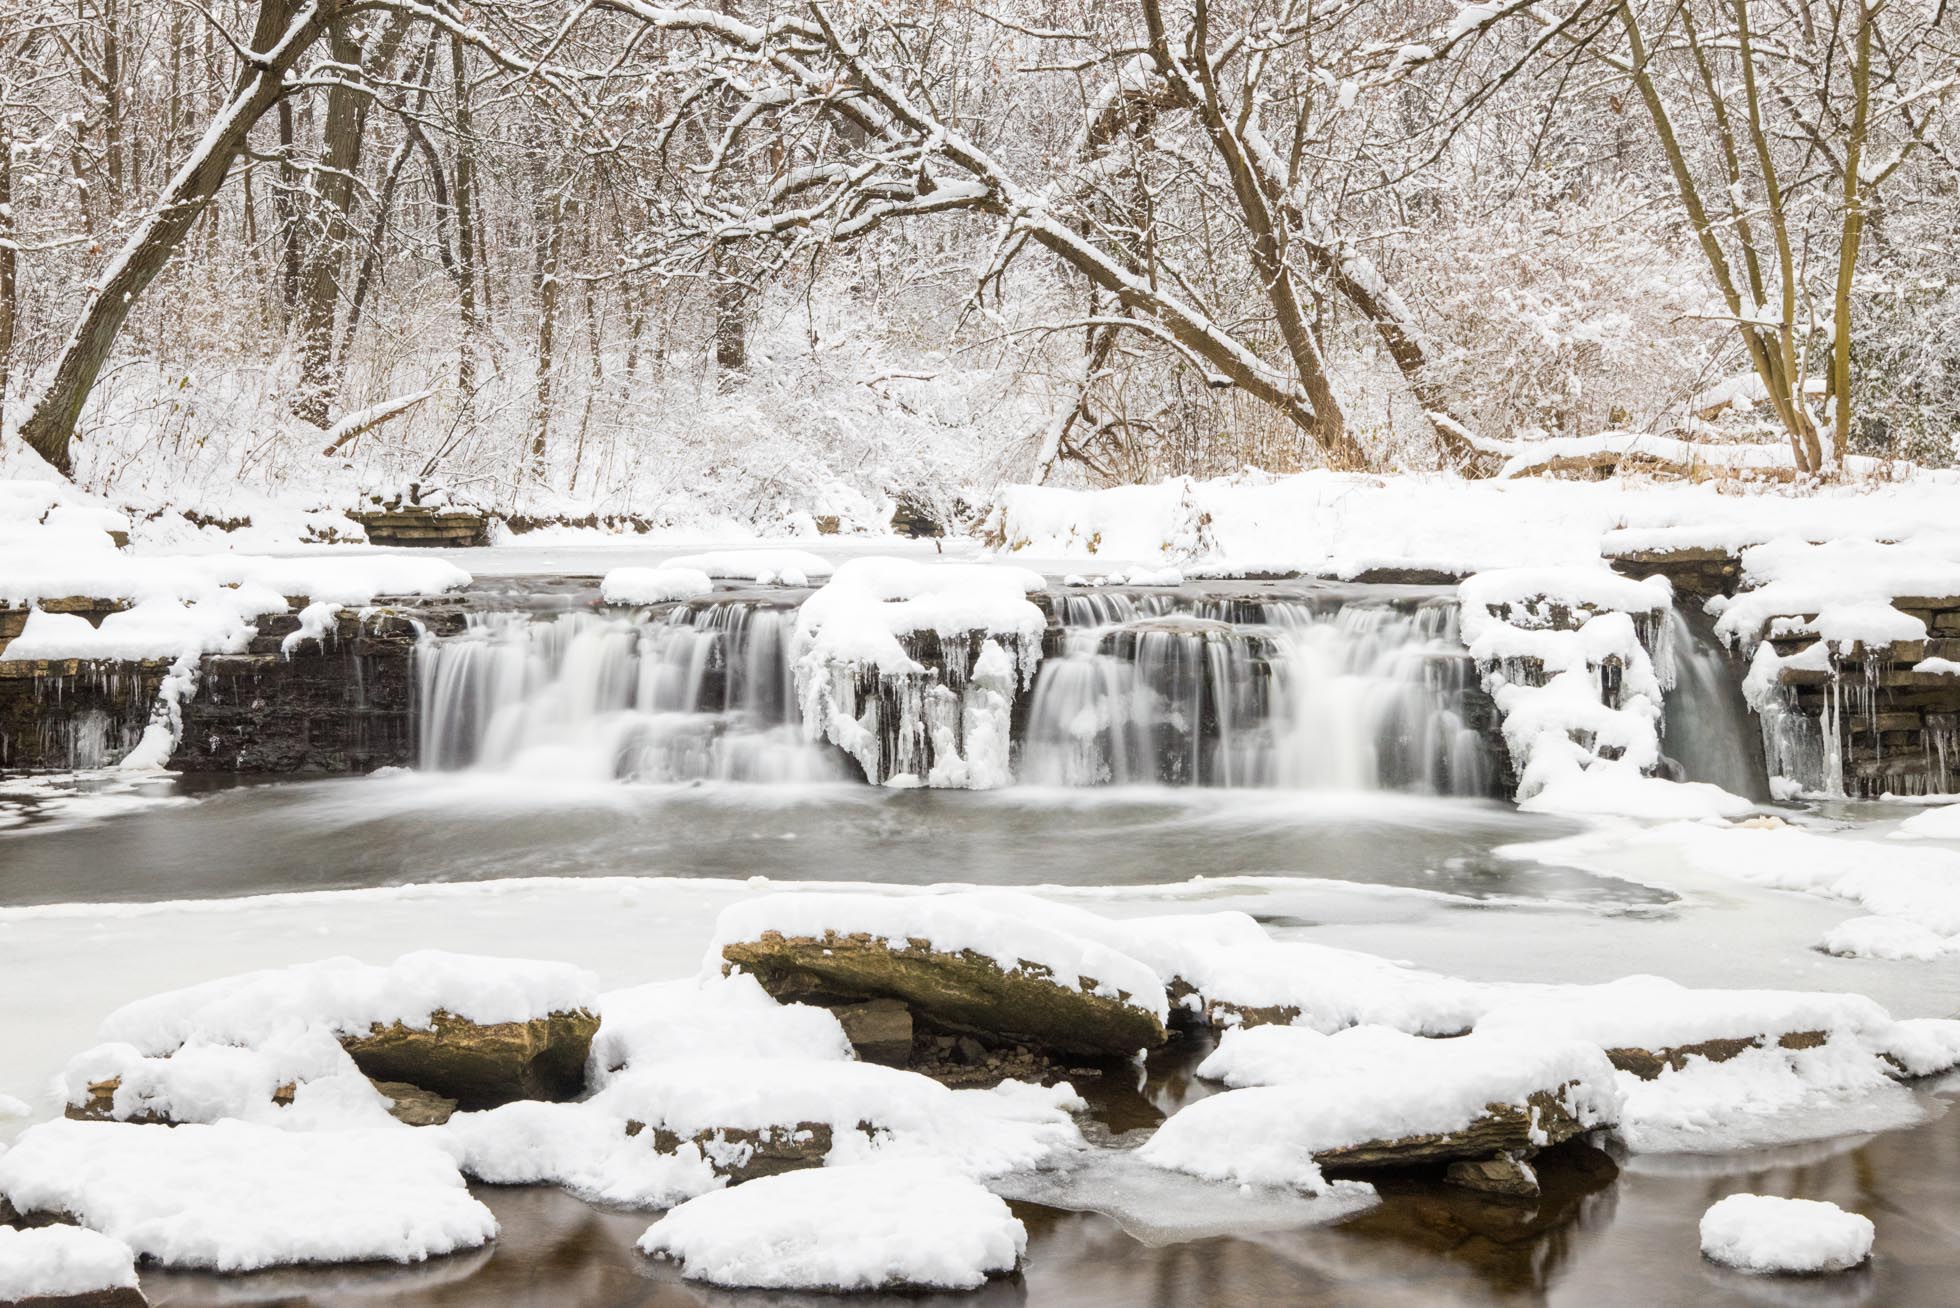
A beautiful icy and snowy afternoon in the Midwest
Kristen Ryan is a landscape and fine art photographer residing in the Midwest suburbs of Chicago. All images can be purchased in the Fine Art Store. Kristen leads ladies landscape photography retreats in the Tetons, Chicago, and the Canadian Rockies, offers private mentoring and teaches an online landscape photography workshop twice a year.
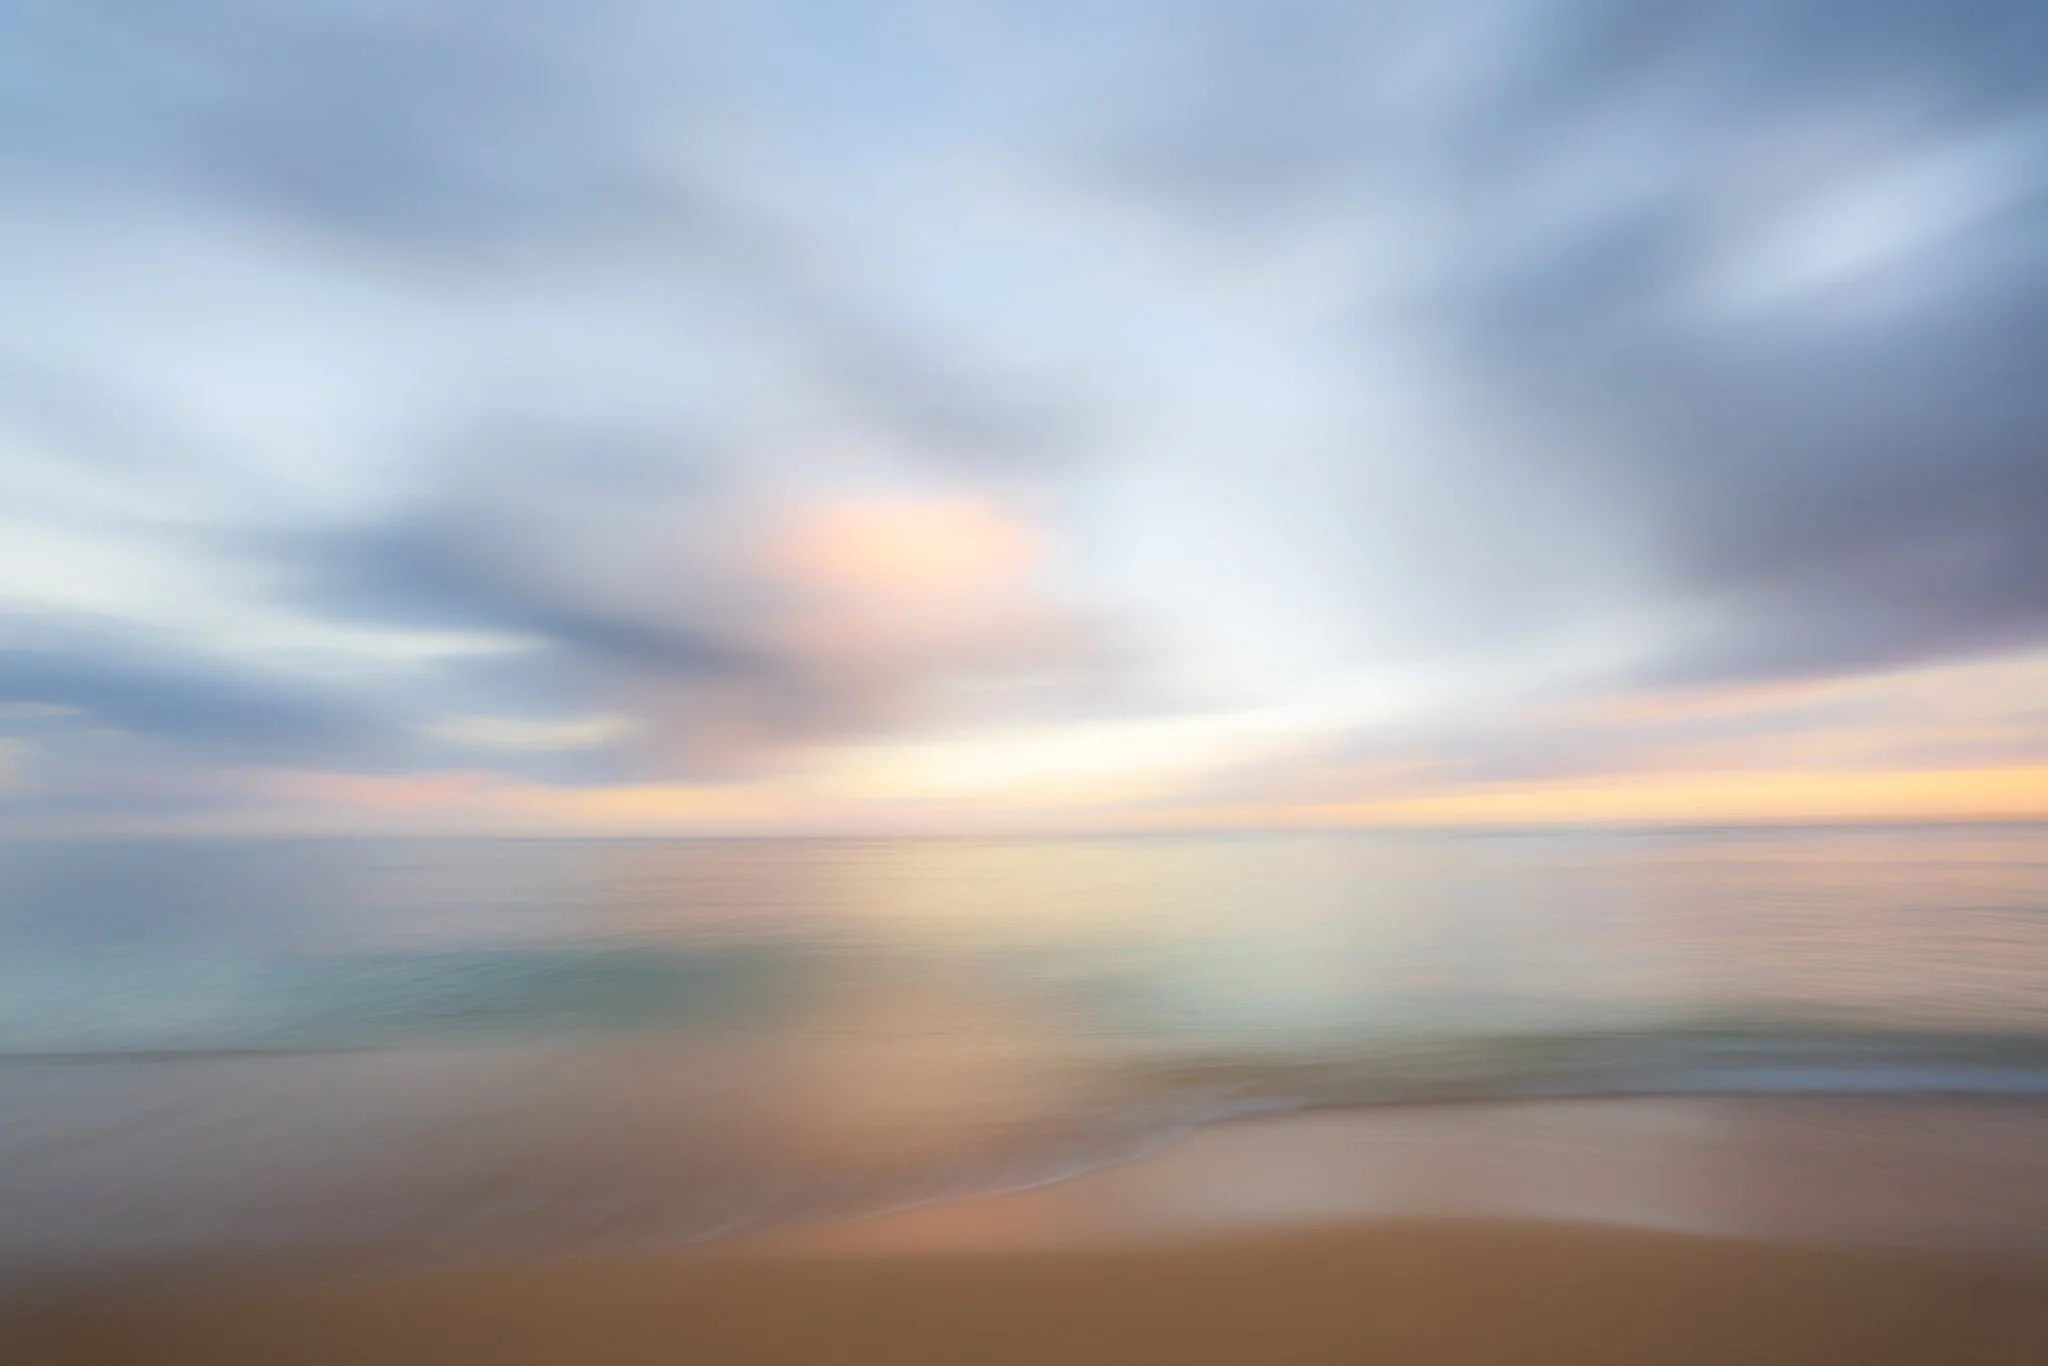
Seascape Panning
One of my favorite techniques to play with at the beach is horizontal panning. It is really simple and can create a beautiful dreamy effect of the water, sand, and sky in any combination.
You will want to use a shutter speed between about 2 seconds up to around 1/30 of a second or so. To do this, you’ll need to set your ISO quite low and close down your aperture significantly. If during the day, you may need a Neutral Density Filter to block some light. A 6 stop or 3 stop filter would be best in this situation. A 10 stop filter will be more than you need and just make things harder.
You can use a tripod or shoot handheld. A tripod may keep you steadier horizontally but handheld works too so definitely don’t hesitate to try this without a tripod. In either case, you’ll want to frame your shot and focus on your scene and then after you press the shutter, or AS you press the shutter with the faster shutter speeds, just pan the camera to the right. When I shoot handheld I hold my arms close to my body and just turn my body to keep steady. If shooting around 1/30 of a second, you’ll need to move quicker to get the effect. With a second or two you can go slower as you have more time.
Sometimes it helps to start moving and then press the shutter, or you can also try putting your camera on continuous mode and as you twist your body press the shutter and let it take several shots as you move left to right.
The fun thing is that you get a slightly different effect each time. You may get a bunch you don’t like along with one or two that you really love. The painterly effect is subjective so choose the ones that YOU love!
Have questions, feel free to reach out!


Looking for a 6 stop filter to help you reduce the shutter speed? Check out Maven Filters. * I always have a 6 stop in my bag for capturing this effect and others!
Kristen Ryan is a fine art landscape photographer from the suburbs of Chicago. You can purchase prints in the Fine Art store or contact her for custom orders. She teaches an online landscape photography workshop, “The World Around You” and hosts in person ladies’ landscape photography retreats.
7 Reasons I Don't Shoot EVERYDAY!
If you find it stressful to shoot everyday or are feeling guilty for not shooting more often, allow me to let you off the hook. Don’t get me wrong, there are many great reasons and benefits to shooting everyday. And when I began my photography journey 8 years ago, I did shoot everyday and continued to do so for at least 2 years if not 3, or even 4. While I never completed an official ‘365’ I guarantee I did a couple. I shot everyday out of love for learning and because I felt inspired to shoot everyday. Because I was constantly shooting and evaluating my images, my learning was fast and furious and I have many memories & images to show for it. I would never discourage you from shooting everyday if you are inspired to do so, but if you are at a point in your photography that you aren’t feeling that constant inspiration, I believe it is ok and sometimes beneficial not to pick up the camera. So allow me to give you a few reasons to ease your guilt!

Amazing Sunset during the 2018 Magic in the Tetons Retreat
Before we begin though, I think it is important to recognize that there are 2 situations in which we pick up our camera to shoot. The first is when a moment speaks to us so strongly that we instinctively reach for our camera. We may be inspired to capture some amazing light, a touching or memorable moment among our loved ones, a sudden sighting of wildlife out our window, or an epic sunset, etc. For this reason, my camera is kept close by in the center of my house. It is at the ready for these moments!
The second situation is more planned, set up, or manipulated. This may be heading out for a sunrise landscape session, setting up a macro, self portrait, or still life shoot, or grabbing the camera and kids with the purpose of a photo session in a particular setting or activity. When I was first learning, I took this approach often but these days, it is harder for me to find a good window of time, or when there is, the energy to capitalize on it.
So here are a few reasons that support “not shooting everyday”
1) Avoiding Burnout - Anything you do at a high intensity for a long time can lead to burnout. This is especially true if you begin feeling less than inspired or self motivated to keep up this intensity. If you are constantly pushing yourself to keep doing something even if you aren’t feeling like it, burn out is more likely. Allowing yourself to take a break when you aren’t inspired allows you to recharge and let the creativity come naturally.
2) It gives you the freedom to shoot a lot in particular inspiring situations (such as on a vacation) and indulge in spending time with those images without adding more images to your cue or backlog. This is a big one for me personally. When we travel, I come home with hundreds (sometimes thousands!) of images of both family and landscapes and these are some of my most treasured images. I want time to work through those images and I know that shooting more on the heels of this travel will just add to my unedited archives.

Long Exposure during a gorgeous sunset on the island of Kauai

My husband and youngest son in the waves in Kauai
3) Post Processing Boost! Not only does the time allow me to go through those unedited archives and keep me from adding more to my to-do list, but it gives me time to expand and fine tune my post processing tools and vision. Editing is a very important part of this art and an additional way we put our own voice into our images. Gifting ourselves the time to spend on this aspect of our art and not rushing ourselves along is so important to growing our imagery. This time editing also allows me to reflect on what I might do differently in the field next time.

Sunset glow at Emerald Lake in Yoho National Park
4) It means I pick up the camera when I am truly inspired, which I believe will lead to images I love rather than images I took because I needed a ‘shot for the day’. Now…don’t get me wrong, there is definitely value in pushing yourself to be creative and get that daily shot. But at this point in my photography, I know what will speak to me and what won’t. And with that extensive backlog I mention earlier, if a shot doesn’t impress me, it won’t move into the editing cue. So I choose not to add more clutter to my EHDs unless I know it is worth it. Quality over quantity.
5) Taking that daily shot off your to-do list can free you up to getting something else done. I know when other life is weighing me down, sometimes I need to tackle other tasks so that my brain can be less cluttered and distracted, opening up my mind to creativity.

A little abstract panning in the Tetons during the Magic in the Tetons retreat
6) Observe and Experience life without the camera up to your eye. Taking the opportunity to simply see the beauty and moments in life can help rejuvenate your inspiration. Taking away the pressure to capture every moment can allow you to recharge and inspire your creative eye. Other activities can spark ideas for photographic ideas. Or perhaps some time reading about creative techniques will bring ideas for something new to try!
7) Breaks are good for the mind, body and soul. Even in things we love, breaks are good, allowing us to feel a continued passion and creativity. And I believe even when we are learning new things, giving space in our practice can allow the sub conscious to digest what we are learning. While repetition and practice are valuable no doubt, so is physical and mental rest. As a former freelance harpist, I will always remember coming back from a two week vacation to my gig playing the harp for the afternoon tea at the Drake Hotel in Chicago. I wondered how it would feel to play after two weeks away, fearing I’d be rusty. And I distinctly remember being surprised by the way my fingers felt so light and fluid over the strings, more so than before my break. Additionally, in our practices of art, music, sports, etc., quality practice can be more important than quantity.

An 8 minute exposure created star trails over Mt. Rundle in Banff National Park
So if you are inspired to shoot everyday, by all means, continue on! But if you have days you aren’t feeling it, I offer you these reasons to give yourself permission to let the camera sit until the next time you feel inspired. I guarantee the inspiration will come if you give it the space to return!
Check out my online workshop, mentoring, or ladies’ landscape photography retreats for educational opportunities.
9 Tips for Creative Long Exposures
One of my very favorite things to do when shooting nature and landscapes is to experiment with long exposures Anytime I have the opportunity to get a creative exposure of clouds or water, I try to take it.
60 seconds in Grand Teton National Park - using a 10 stop filter.
Here are some tips to help you find success when experimenting with long exposures:
1) A tripod is your best friend. I know, I know, they are cumbersome and a pain to carry but are necessary so that you can keep your frame stable throughout the long exposure. Make sure your tripod is steady and secure.
2) Invest in good Neutral Density Filters. I recommend having a 3 stop, 6 stop and 10 stop ND filter in your bag.. In brighter light and to get 30 second or longer exposures, you will often need a 10 stop filter. In lower light and/or an exposure of just a couple seconds, a 6 stop filter may be sufficient. For even longer exposures in daylight you can use a 15 stop filter as well, or you can stack a 10 stop with a 3 stop or 6 stop.

4 seconds at Natural Bridge in Yoho National Park - using a 6 stop filter.
3) Compose your frame and focus for the desired depth of field BEFORE putting the filter in front of the lens. Once you put a 10 stop filter on, you can't see through to focus and compose.
4) Set the new exposure BEFORE putting the filter on the lens. Find your proper exposure without the filter on. Then you can use a Long Exposure Calculator App to find the new shutter speed after you put on the filter. Usually you will need to max out your ISO and aperture unless you are shooting in really low light. For example, say I set my ISO to 100 and aperture to f/22 and my base shutter speed is 1/80. If I enter into the app a 1/80 shutter speed and tell it I am using a 10 stop filter, the app will then tell me that a 13 second shutter speed will give me the same exposure with the filter on. So then I will change my shutter speed to 13 seconds before I put on the filter. The less I touch my camera after putting on the filter, the better.

4 minute exposure using a 15 stop ND filter in Grand Teton National Park.
5) Use a Shutter release remote. These are critical if you are using a shutter speed slower than 30 seconds as you must then turn to bulb mode. But even out of bulb mode, using a shutter release is one more way to eliminate the chances of bumping your frame and increasing sharp focus. Your camera’s timer is also a great option. I often use a 2 second timer.
6) Cover your eyepiece viewfinder to prevent light from coming into the frame as this creates undesirable light leaks. My Nikon D810 and D850 have a little door that covers the eyepiece. But otherwise, I would cover it with a black/dark cloth or anything else that will keep the light out.
7) Check your histogram. Sometimes finding the right exposure with the filter can be a bit of trial and error. Don’t rely on the app or the LCD screen. Make sure the histogram is toward the right without climbing the right wall. If you need to bump exposure, lower that shutter speed, OR if your shutter speed is where you want it for creative effect, raise your ISO or open up your aperture.

2 minutes with a 10 stop filter at Lake Louise in Alberta, Canada
8) Consider the creative effect and mood of the image you want to create! When choosing your shutter speed length, think about your creative vision. For really streaked clouds, you may need a 60 second exposure or even a few minutes. If clouds are moving fast, 15-30 seconds may create the look you desire. With water, you may want to create a really smooth effect with 20-60 seconds or perhaps you want to leave more texture in the water with a 1 second exposure or a fraction of a second.

2.5 seconds in Kauai
9) Lastly, look at the other areas of your frame. Do you have unwanted blur in other areas of your frame…such as trees, grasses or other foliage? If so, capture the exact composed frame with a faster speed so you can composite the two images later in post processing.

3 minute exposure for the sky combined with a fast shutter for the foreground grasses. Shot in the prairie of Illinois.
It's a little addicting, so don't say I didn't warn you! Are you looking for filters for long exposure photography? Check out Maven Filters.*
Check out my online workshop, mentoring, or ladies’ landscape photography retreats for educational opportunities.
*Affiliate Link
Magic in the Tetons...A coming together of past, present and future
Back in 1969, years before I was born, my grandparents bought property in Jackson Hole, just south of Grand Teton National Park. By 1971, their house was built and a history of family memories was born. My first visit was as a very young girl and the story told to me by my grandparents is that when I was 4 years old, I put up my arms and declared the Tetons "My Mountains". Though this is hardly true in reality, that feeling has grown and stayed with me for nearly 40 years. I have been fortunate to live in great homes and communities and travel to many wonderful places in my 41 years, but nowhere has my heart and soul felt so complete as in the Tetons.
As I fly into the valley, the jagged peaks come into view and the feeling of coming home washes over me. I get a lump in my throat, a sense of peace, and a feeling like my heart is going to jump out of my chest all at the very same time. The piece of me that has been missing has returned and I feel complete once again.
Driving the park road, putting one foot in front of the other on the trails I know by memory, watching the clouds float over the mountains, my heart soars and the feeling of being in 'my place' is so intense and familiar. I have seen the area change so much over the years and the tourist traffic increase dramatically. But the magic of the Tetons remains the same year after year and my need to be beneath their grandeur remains as strong as ever.
Hiking and photography have always been 2 of my favorite activities in GTNP. My husband and I hiked and camped all the backcountry trails in the early 2000s, finishing with a pizza at Dornan's and an afternoon of reading in the hammock with a beer. Eventually, the hikes became shorter with our kids but photography became a more serious endeavor.
It seems only fitting that the Tetons have such a strong presence in my landscape photography since my passion for the landscape genre began in Jackson Hole. I dream of spending more time here exploring both iconic locations and the roads less traveled, capturing these peaks in all seasons and conditions. It is easy to simply spend hours watching Mother Nature unfold over the valley, as the light and shadows dance and the Grand plays hide n seek amongst the clouds.
My passion for landscape photography led me into teaching the genre 3 years ago when my first online workshop began in September 2014 with Click Photo School. The workshop has now run 6 times with a fall and spring run each year. Through this workshop, I have met so many photographers and have had the privilege of seeing the world through their lenses and watching their landscape photography grow. The friendships formed have been a highlight for me and it has been especially rewarding to meet many of these alumni at the annual Click Away conferences where I have also led several landscape classes.
As much as I love the online teaching, I long to also work and connect with my students in a more hands on way. Teaching at Click Away reinforced this for me and also demonstrated the inspiration, creativity and connection that comes from in person gatherings. I found myself longing for more landscape and nature focus and the opportunity to connect with others who share my passion. I long for the opportunity to teach and inspire as we immerse ourselves in nature and chase the light. I want to bring a group of creative women together for connection and inspiration to learn from each other and support each other in our art. I want to create an opportunity to give ourselves the gift of several days focused on nothing but nurturing our need to learn, create and connect with other women who share this need.
For a couple years, the dream of leading a workshop in the Tetons was simmering in my brain. Finally I knew I needed to stop daydreaming and make this dream a reality. I wanted to bring my vision of this retreat experience together with my love and knowledge of the Teton area.
I am excited to say that I have a fantastic group of 7 ladies signed up for this unique experience and I look forward to kicking off the first annual Magic in the Tetons retreat September 27 for 4 days and 4 nights of nature, photography and friendship.
This past fall my grandparents home was sold and the loss is heartbreaking. But this retreat is a bright spot for me. Taking my past history there and my love for capturing its beauty to create this future adventure.
Past, present and future coming together to build friendships, inspire creativity and capture the magic of the Tetons!
7 Reasons Why I Love Landscape Photography
Why Landscapes? Do you ever wonder why people fall in love with landscape photography? Or why you might give it a try? Why spend time on this genre?
The thoughts surrounding the answer to this question have been swirling in my head for the longest time; months, a year, maybe more. It’s a question I have asked myself at various times over the last couple years and reflected upon.


After all, we are all busy people with so many choices and so little time. Life is short and precious and every moment matters. With 4 young kids, there is never enough time and I am always questioning how I use it.
Sometimes it makes me wonder why I spend so much time on photography. I remember distinctly thinking about this in the fall of 2015. Shortly afterwards, we had an incident with my youngest boy, 4 years old at the time, where he crashed his bike and one of his top front teeth. He had to have it pulled because the tooth cracked down the middle up into the root. In an instant his baby smile was goneTwo days prior, we had been at the park during my middle boy’s soccer practice. I brought my camera along and captured my twins while they ran around doing their thing. One of my favorite images was of my boy in a full on genuine smile. And right there…that’s why I take those pictures of them. I was so happy to have a last real shot of his baby smile in the midst of his bike accident.


But landscapes…well, then, why landscapes. That’s not capturing my kids fleeting moments. And most of the time I’m not even with them when I’m shooting landscapes. I spent some time reflecting on this and the short answer, I realized is that they are good for me physically, mentally and emotionally. And there are several reasons for this.
1. They get me out in nature - Shooting landscapes forces you to get outside and find the beauty around you. Sometimes this means discovering places right in front of your eyes that you just never noticed were beautiful before. Other times this means exploring new places and getting out on a hike or nature walk. Even if I don’t come back with images that excite me, I’m always better for having gotten out in the fresh air. It also pushes me to explore new places that I might not have discovered otherwise. Students in my workshop, The World Around You frequently comment that they visit or discover places they had never been before in order to practice their landscapes during class.
2. They lead me to see the world in new ways - Not only does landscape photography push me to explore new places, but it gives me a push to get out during those times of day that we are often holed up inside, such as sunrise, sunset and nighttime. Because it can be more challenging to get out at those times, we often don’t in our daily lives. But since these are the times when the most interesting light can be found, landscape photography pushes us to set an alarm in the morning rather than sleep in, or to stay out for (and even past) sunset. Or it leads us to find a dark place at night and observe the stars. I have seen more sunrises thanks to shooting landscapes than I ever had before. I have gone on winter hikes and seen the milky way over the Tetons at 4:30 in the morning. Often a little physical discomfort is involved, whether pushing through sleepiness or shivering in the cold, but it is almost always worth it. And the adrenaline high when the LCD screen captures what you saw, is indescribable.
3. Shooting landscapes is like therapeutic meditation - Getting out to shoot landscapes clears my mind and soothes my worries and anxiety. When I get out and set up to shoot a landscape scene, I find that my mind is freed of my worries and distractions. I become completely focused on the scene around me and setting my camera to achieve my vision. Watching the sun come up over the horizon or dramatic clouds change as they move across the sky becomes entrancing and my mind and body are freed from the tension of anxiety as I focus on capturing the wonder of nature. For that time, all that matters is freezing those moments in front of me and in finding creative ways of capturing the beauty unfolding.
I watched the clouds drift over the Tetons for 2 hours this September morning.
4. They give me a genre of my art that is all for me - I love photographing my kids and capturing all their childhood moments, but I love that I have a genre that is all about me and my art. It does not rely on my kids’ cooperation, them being cute or little, wearing the right clothes, or anything else. I love that now and in the future, I will always have the world at my fingertips to shoot. Photographing the kids can come and go and change depending on their stage of life, but I know I can have my landscape photography outside of them.

5. The world is my canvas - Sometimes I get frustrated living in the Chicago suburbs. I’m a bit far from the city to make it easy accessible, especially at ideal landscape light times, there is no beach and no mountains. But, there is beauty to be found everywhere if you look for it at the right times. Prairies, forests, lakes and ponds, oceans, mountains, deserts and cities. Endless opportunities and even a single location changes dramatically in different weather conditions and seasons. I love finding new locations but I also love the challenge of trying to find something new in the same location.
There is also so many fun creative techniques and opportunities to show your voice through landscape photography in your processing. While my goal is to portray the mood of the scene as it was, there really is an opportunity to push the scene to reach your vision that is so fun if you enjoy post processing and sometimes, I can really lose myself in that process. Processing landscapes is just FUN!!

6. To transport me right back in time to those moments - You know how you look at a picture of your child from when they were little and your heart melts remembering that moment? Well, landscapes can be the same way. When you truly feel like you captured the feeling of that moment out in nature, the photograph can bring you right back. That feeling of peacefulness in the open air, of being in awe as a sunrise unfolds or storm clouds develop over the mountains or sea, can come right back as I edit an image.
They allow me to capture a place that is special to me, or one I have visited but may never go back to, and remember it just as I experienced it. The way I capture it or process it may not be the way someone else would have done so, but the image represents the way I saw it and felt in that moment.
This is one of my very favorite images EVER...capturing the warmth of our family home my grandparents owned all my life and the magic of the nature that surrounds this place represented by the milky way. The home was sold this fall and my heartbreak is indescribable. But I'm so grateful for my experiences and that I was able to capture this and many other images of their property & our experiences there the last few years.


7. Landscapes CAN and DO include people - I love that my practice of landscapes alone helps me to capture my children in the environment the way that I want to. Shooting landscapes makes me really look at every area of my frame in regards to composition and what is included in my frame, whether my depth of field works for my vision, and whether there is detail in all the highlights and shadows where I need it. Landscapes have pushed my practice of both technical and creative choices consistently and made me a very intentional shooter far more than I was before.


#8 would be the way they have improved my photography overall, but that's a whole separate article!
Ultimately, shooting landscapes allows me to capture the magic and awe that is our world. Not only does it get me out to see some of the more wondrous beauty of the world, like sunrise over the Tetons, or the most glorious fall colors in the forest, but it also has taught me to see the extraordinary in the more simple beauty of my local surroundings where a lone tree, curve of a path or simple reflection could make a stunning subject.

Kristen Ryan is a landscape and fine art photographer residing in the Midwest suburbs of Chicago. All images can be purchased in the Fine Art Store. Kristen leads ladies landscape photography retreats in the Tetons, Chicago, and the Canadian Rockies, offers private mentoring and teaches an online landscape photography workshop twice a year.